What's new in VisionKit
 laurent b
Description: Discover how VisionKit can help people quickly lift subjects from images in your app and learn more about the content of an image with Visual Look Up. We'll also take a tour of the latest updates to VisionKit for Live Text interaction, data scanning, and expanded support for macOS apps. For more on VisionKit, check out “Lift subjects from images in your app" from WWDC23.
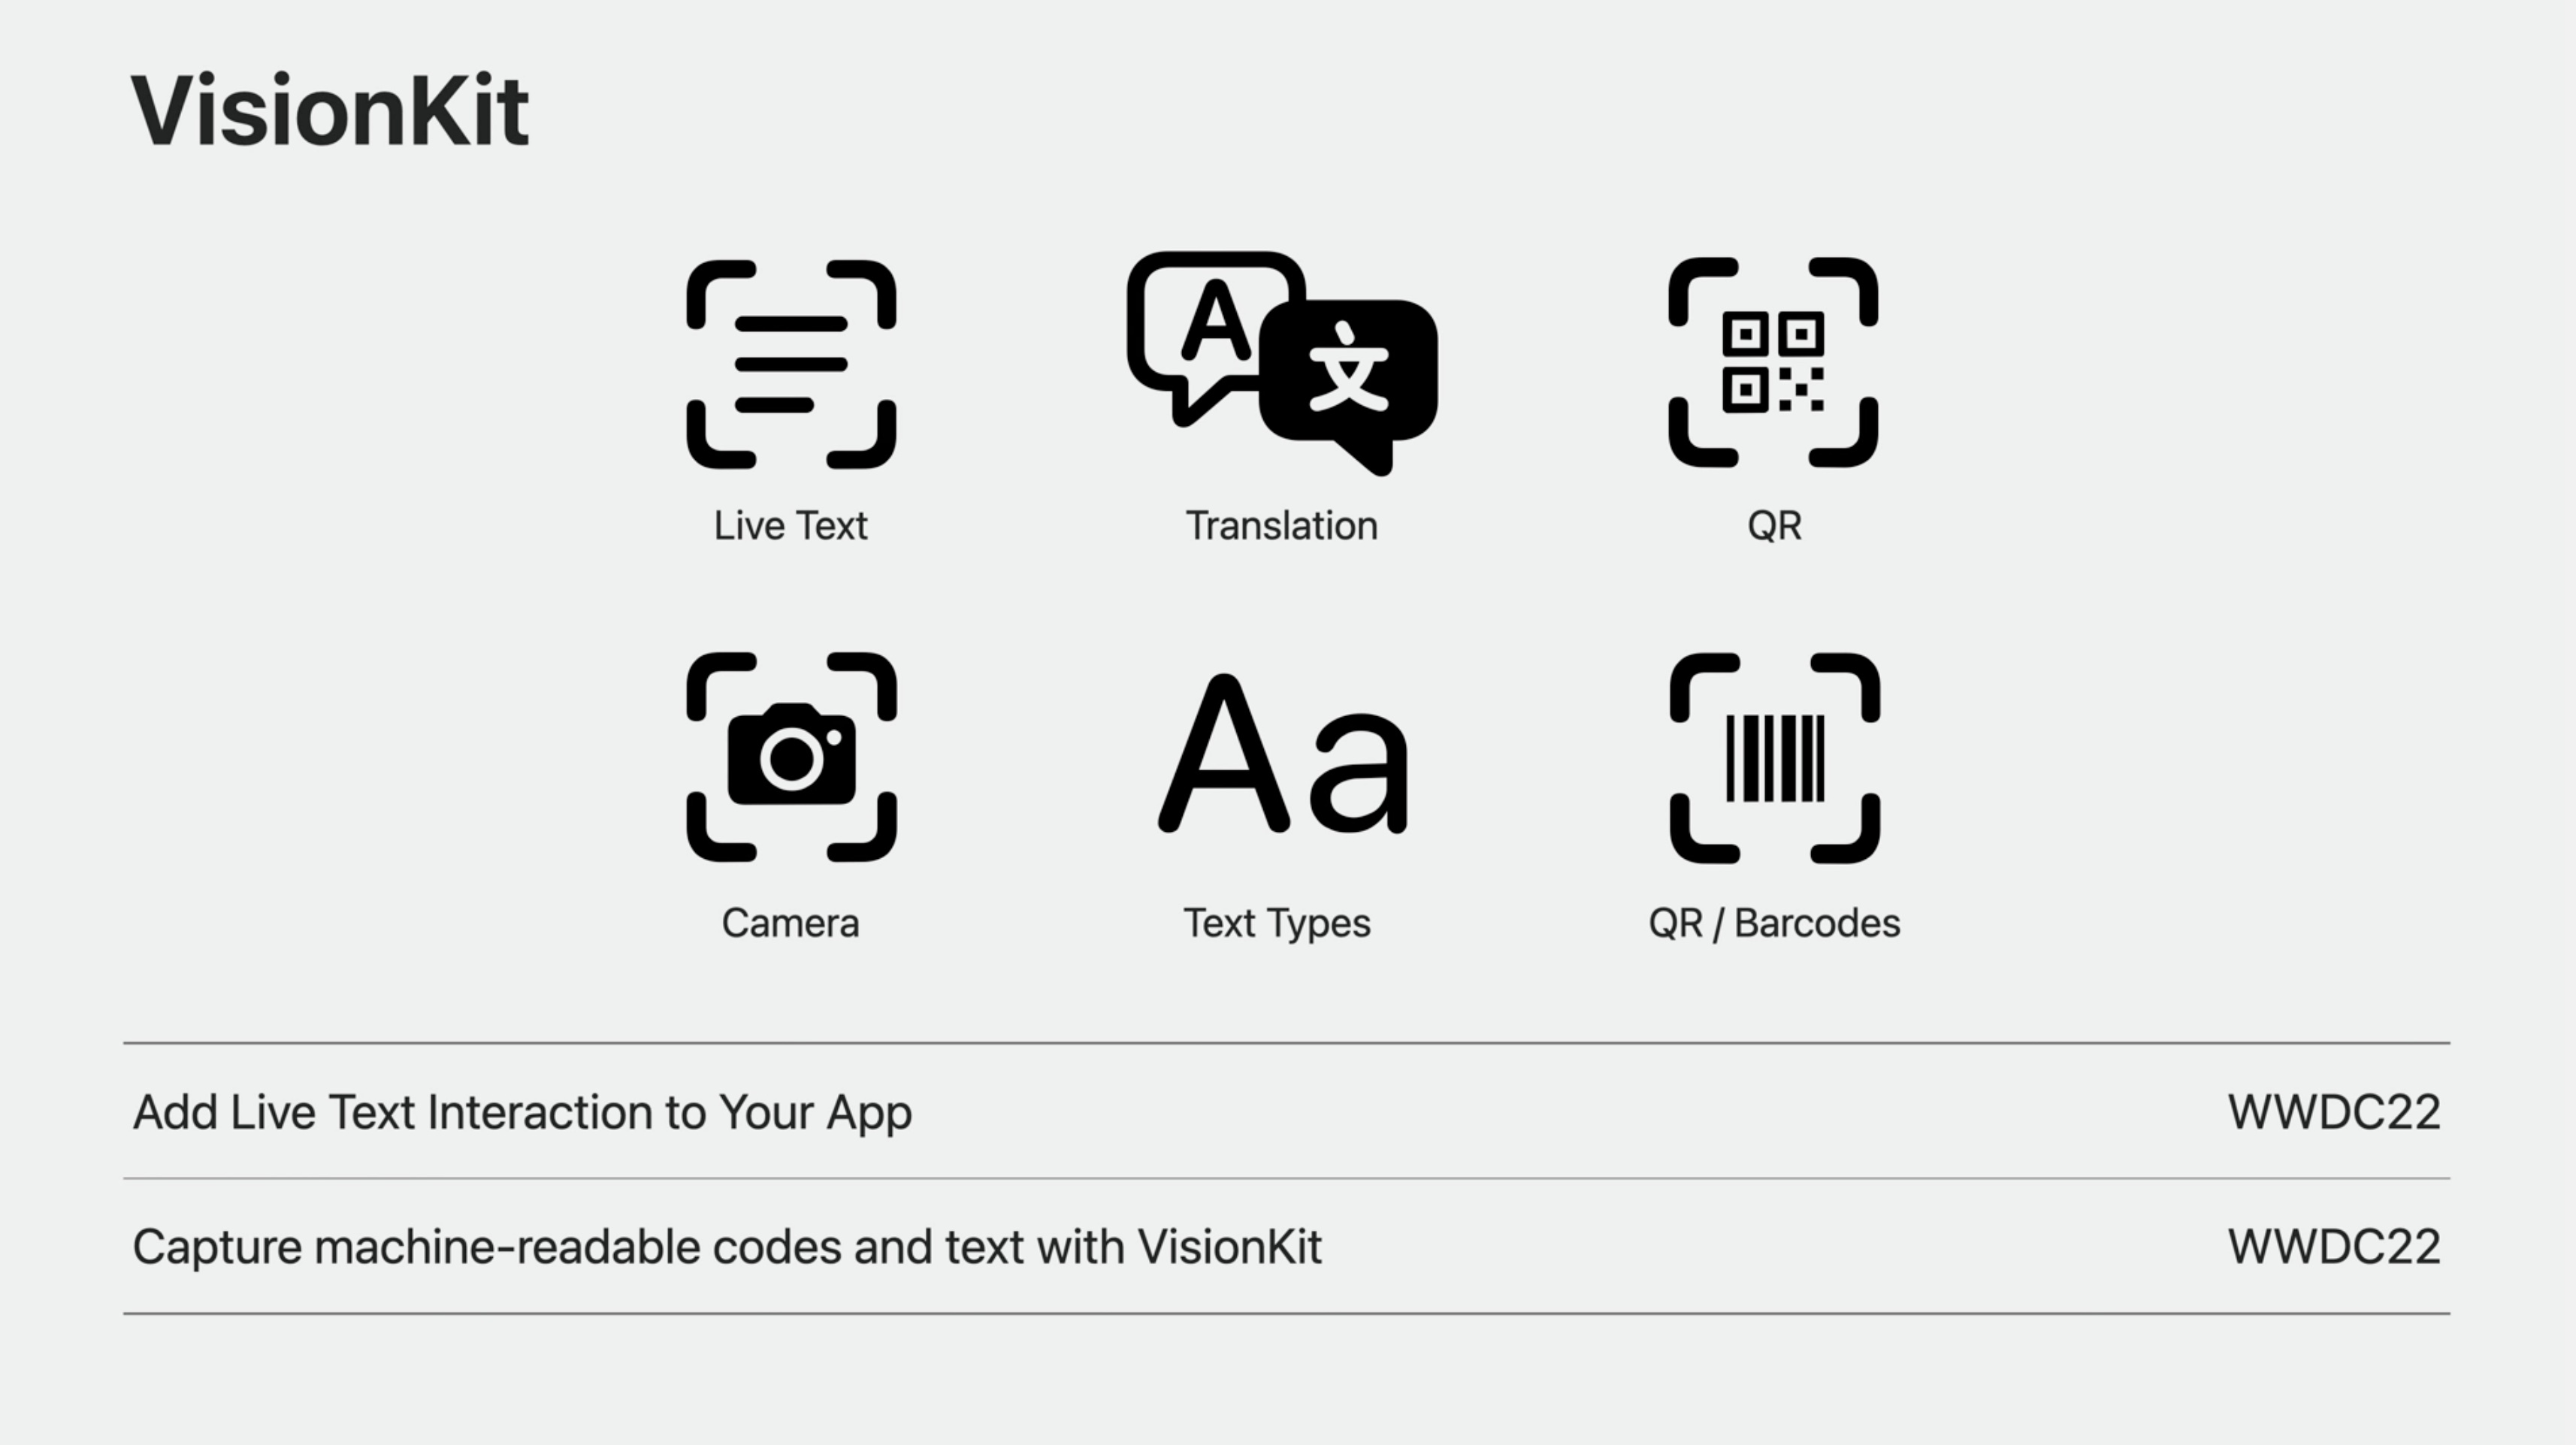
To recap, last year Live Text support was added in VisionKit, enabling interactions such as text selection, translation, QR support, and more for images in your apps. VisionKit also introduced the DataScannerViewController, The Data scanner uses a live camera feed provide a simple and full featured way to capture specific text types, as well as many variants of machine readable codes. Information on those APIs are included in these WWDC22 sessions.
You can get the links to the talks below at the end of this post.
This year VisionKit is adding support for:
- Subject lifting
- Visual Look Up
- Data Scanner and Live Text. A new Live Text API for text selection.
- Expanded platform support for Catalyst, and context menu integration for native macOS apps.
Subject Lifting
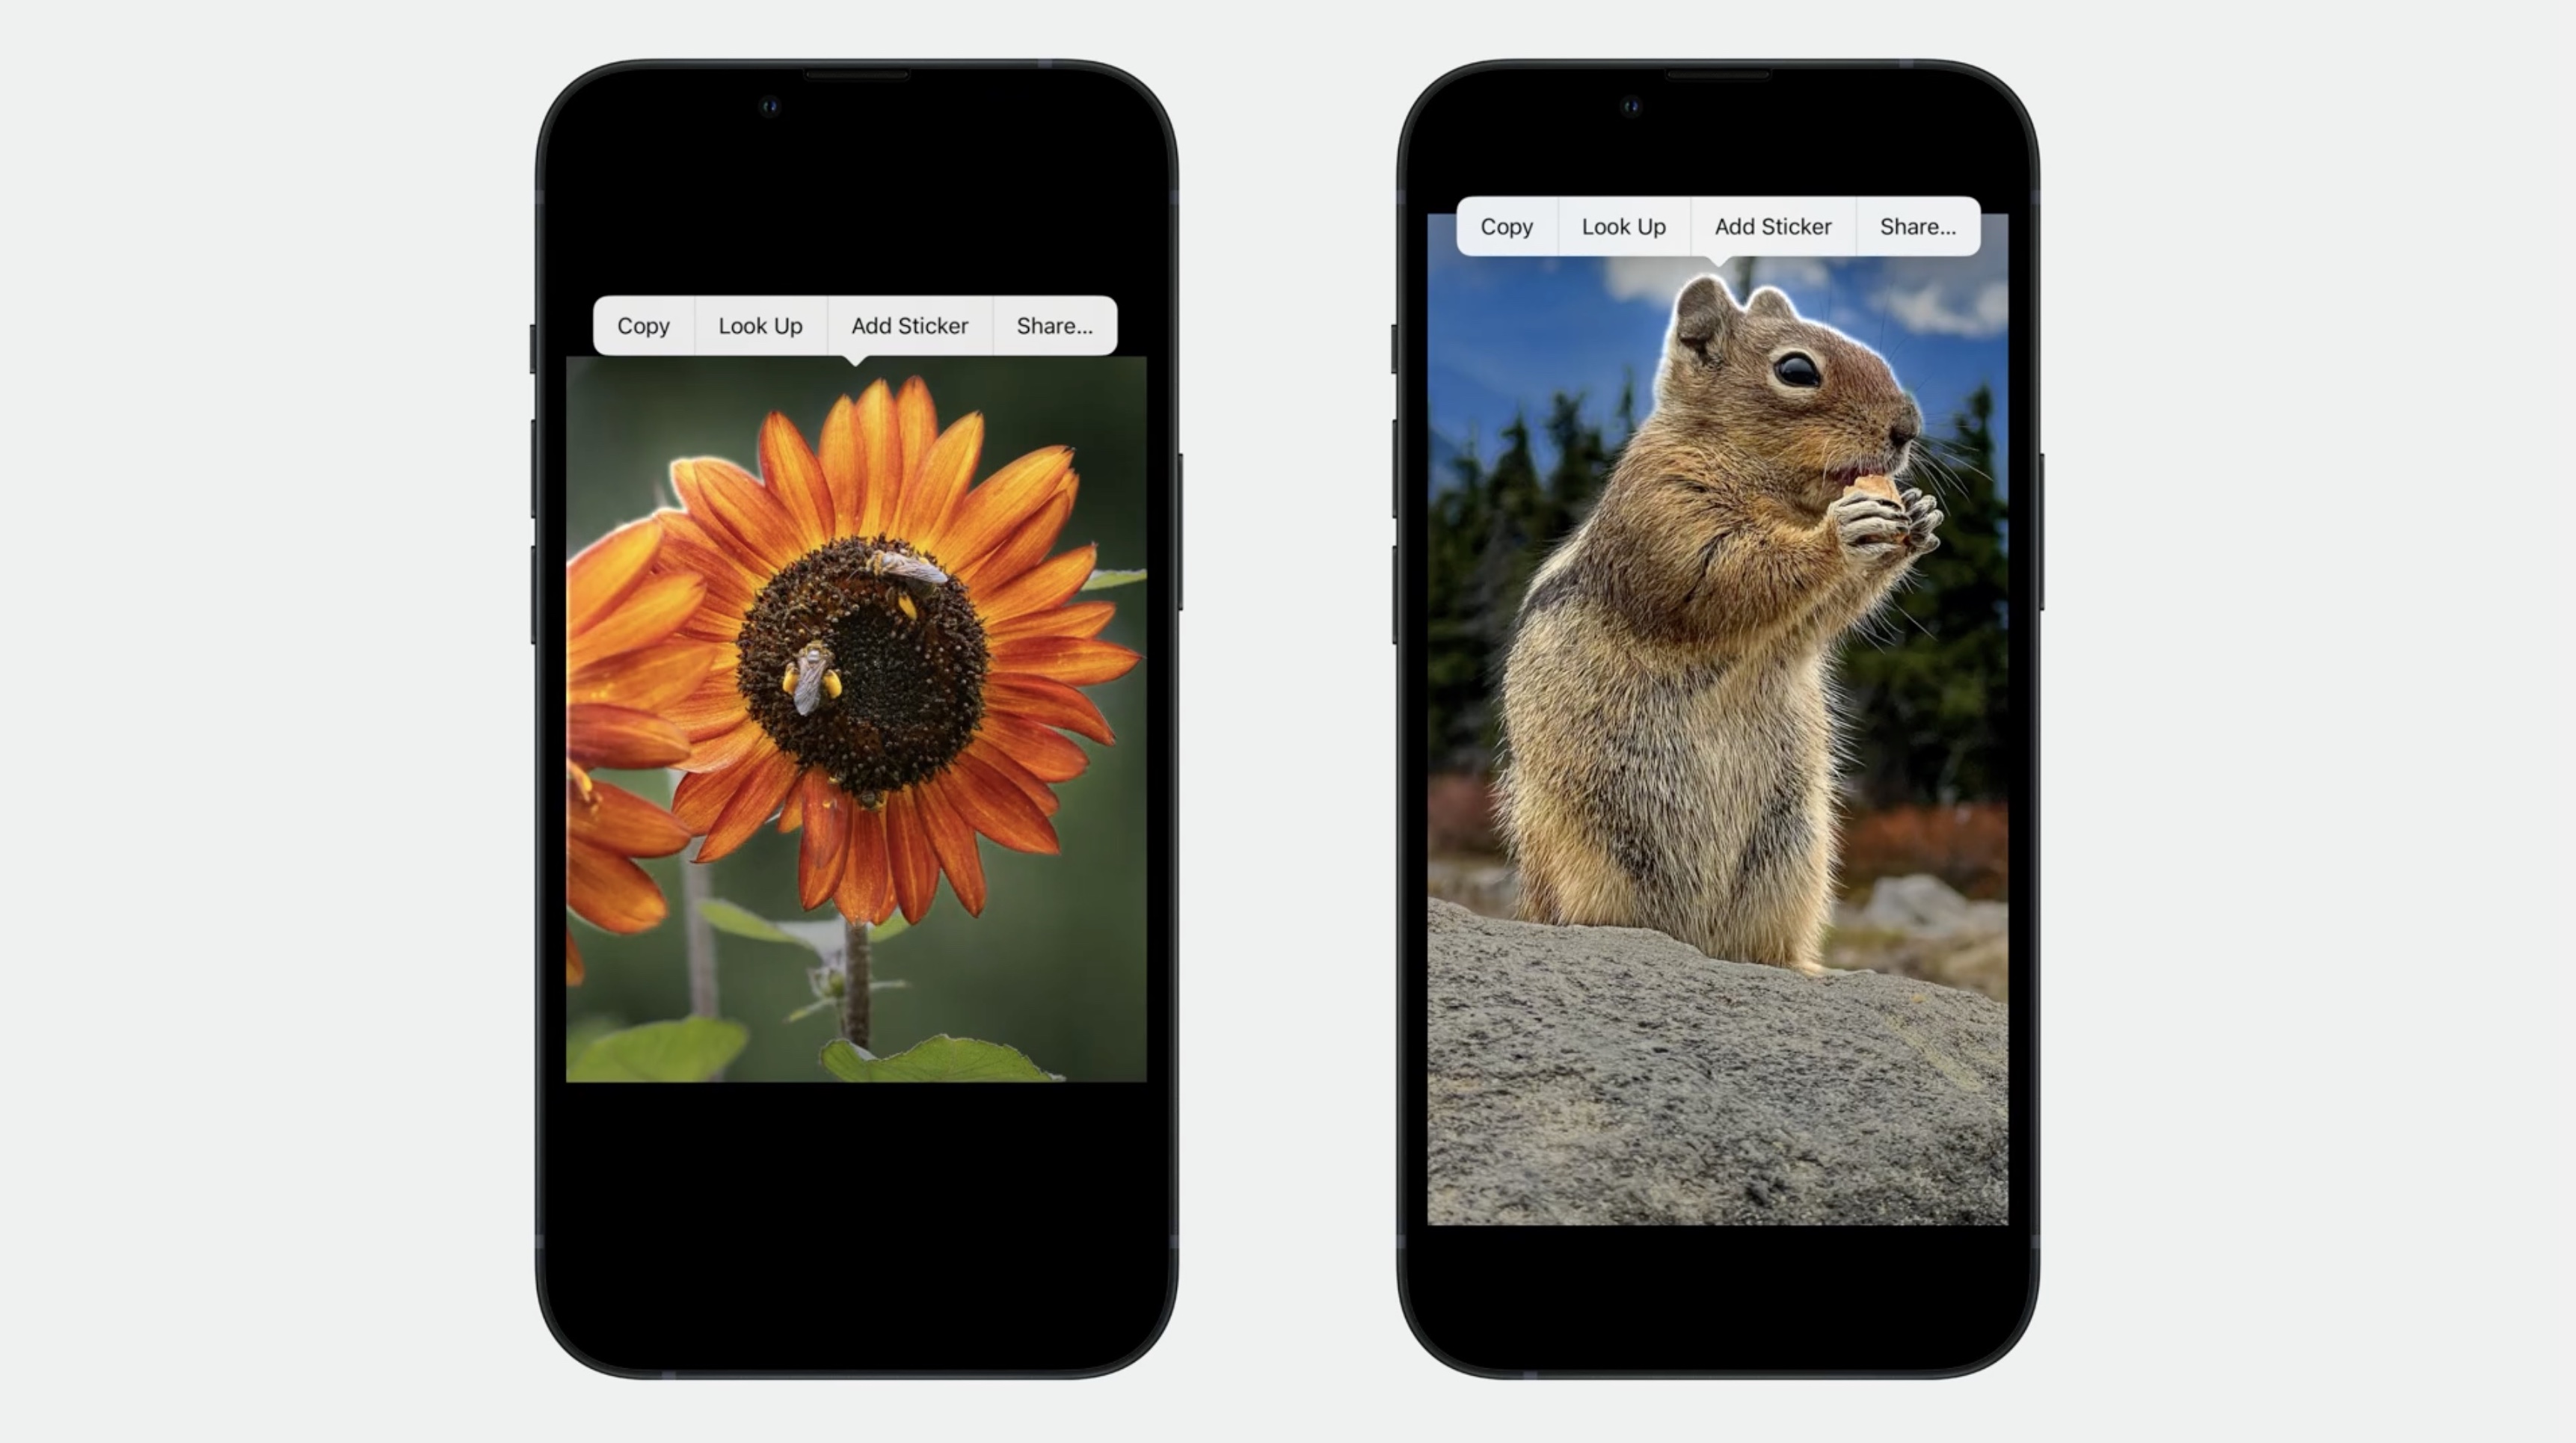
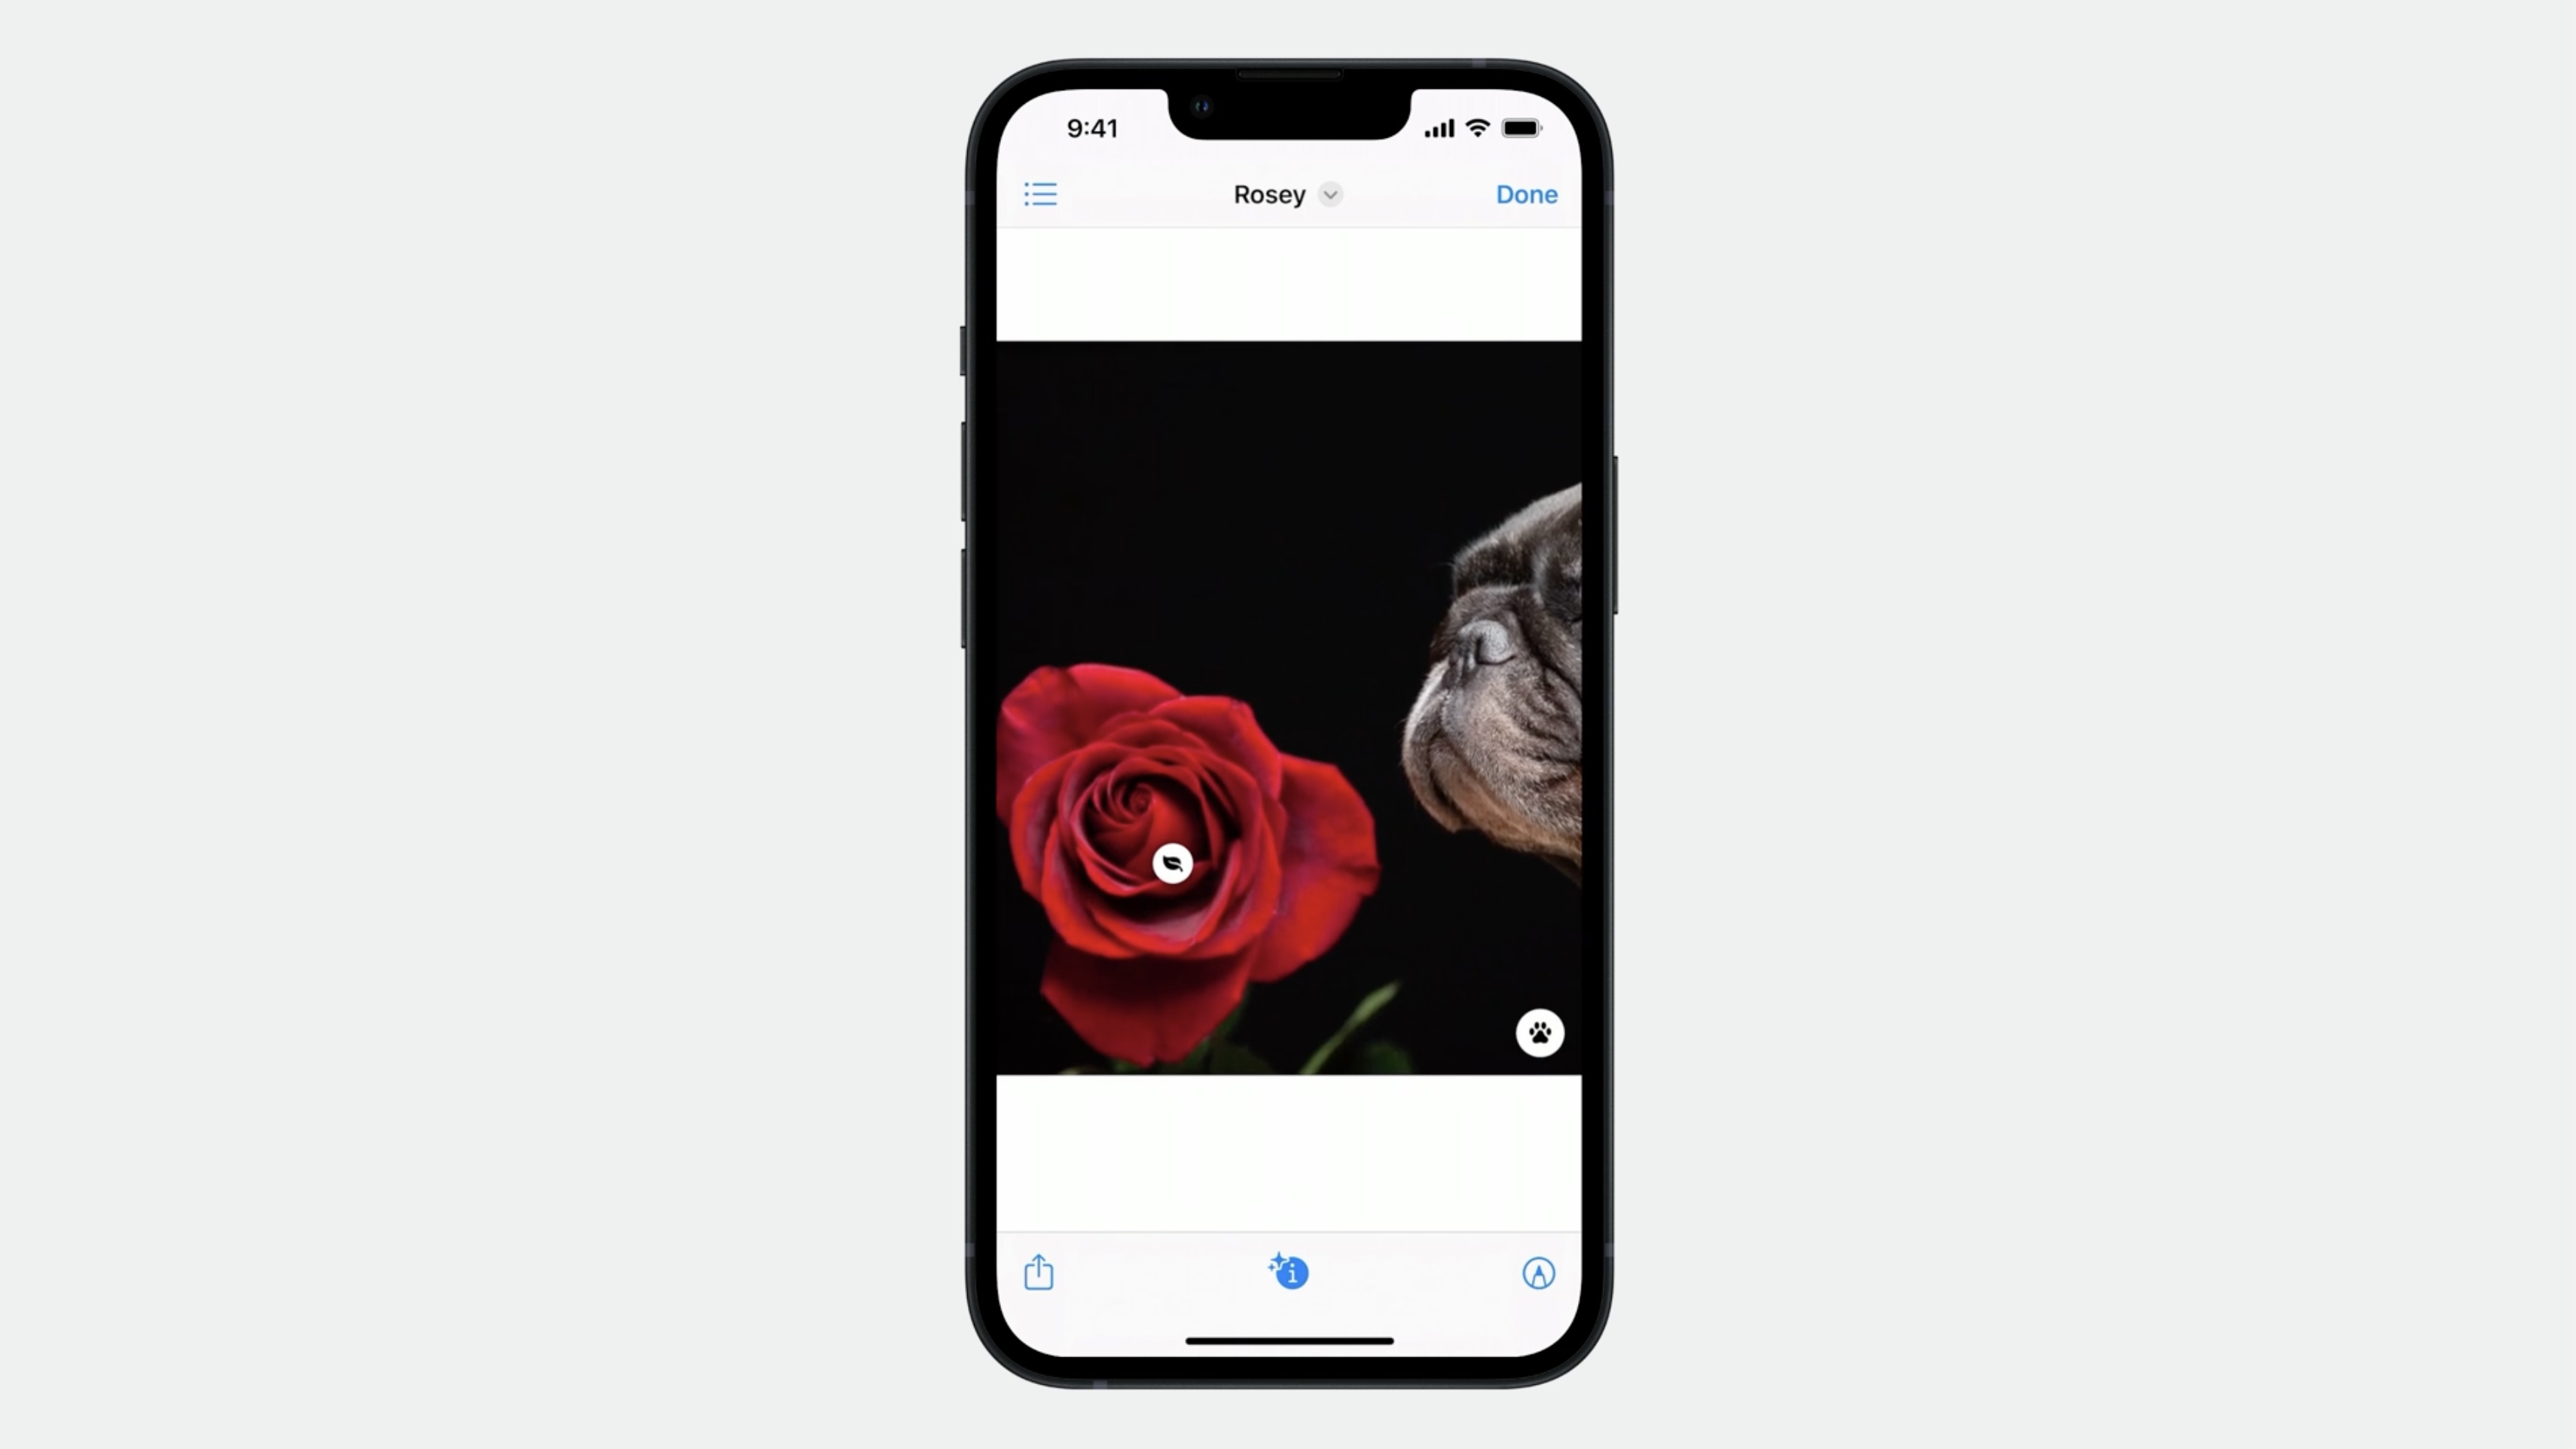
With a simple long press on the subject of an image, it lifts it from its surroundings and becomes highlighted with this beautiful animated glow, and then I am presented with several options to share it, or invoke Visual Look Up.
New for iOS 17
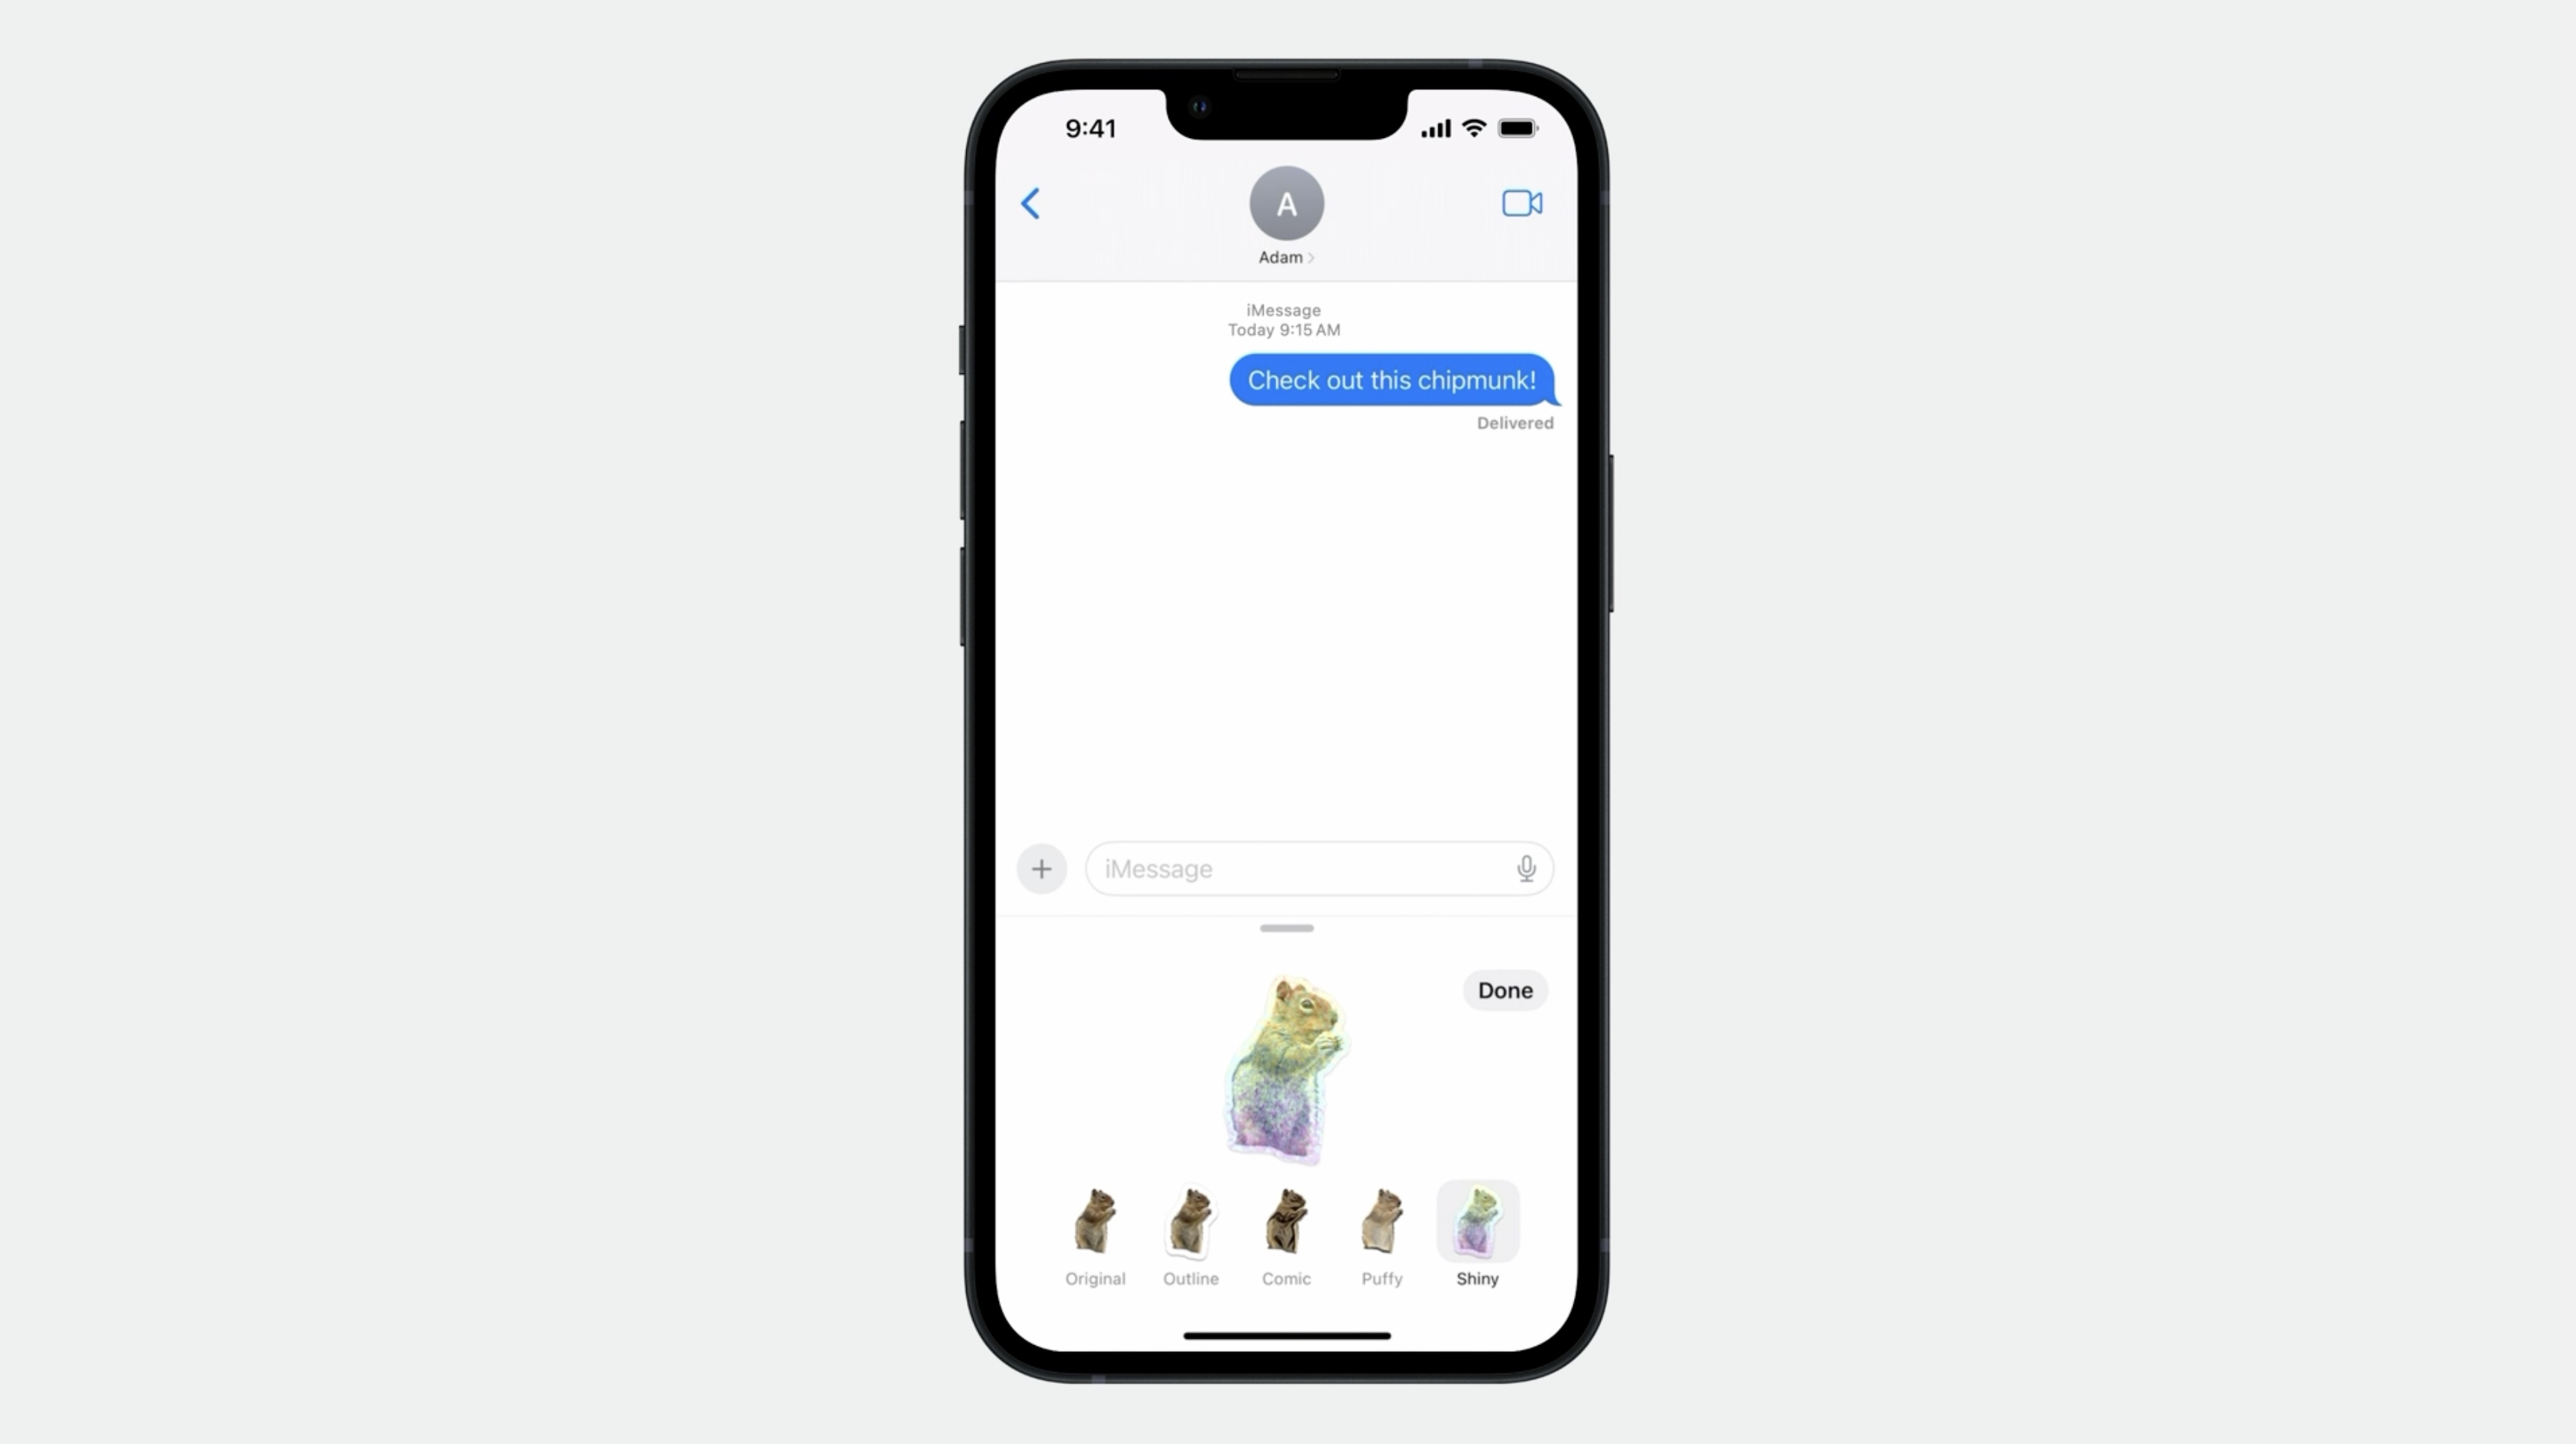
You can now use any lifted subject to create a sticker, with fun effects such as shiny, puffy, and more to share with your friends and family.
Now the good news is, integrating Subject Lifting is very simple.
Here is the same code snippet from the last year's video, it supports Subject Lifting, without any code changed.
func analyzeCurrentImage() {

    if let image = image {
        Task {
            do {
                let configuration =ImageAnalyzer.Configuration([.text, .machineReadableCode])
                let analysis = try awaitanalyzer.analyze(image,configuration:configuration)
                if image == self.image {
                    interaction.analysis =analysis;
                    interactio.preferredInteractionypes = [.automatic]
                }
            }
            catch {
                // Handle error...
            }
        }
    }
}
Let's explore further. Notice that I'm not passing anything special into the analyzer configuration. This is because in order to preserve power and performance, Subject Lifting analysis is handled separately by the interaction after the initial analysis is complete. For iOS this process occurs after it's been on screen for a few seconds, and for macOS it will occur the first time the menu appears.
This means you don't need to handle the case of the user swiping though many photos. The interaction will handle this for you. All you need to do is ensure you have an appropriate interaction type set-- in this case, automatic-- and the rest is handled by the interaction.
Subject lifting interaction types
Let's examine Subject Lifting compatible interaction types a bit closer. Automatic gives the default out of the box experience, combining text interaction, Subject Lifting, and more.
If you only want Subject Lifting, and not text selection or data detectors, you can set the interaction type to .imageSegmentation, or combine it with other types.
And finally, if Subject Lifting just does not make sense for your app, but you want the previous automatic behavior from iOS 16, no problem, you can use a new type, .automaticTextOnly. This provides features such as text selection and data detectors, but not Subject Lifting.
We have a detailed session specifically on Subject Lifting available if you would like to learn advanced topics about this amazing new technology in both VisionKit, and Vision.
Lift subjects from images in your app
Visual Look Up
This year VisionKit also supports Visual Look Up. Visual Look Up allows users to easily identify and learn about pets, nature, landmarks, art, and media.
And In iOS 17, Visual Look Up will support additional domains, including food, products, and signs and symbols.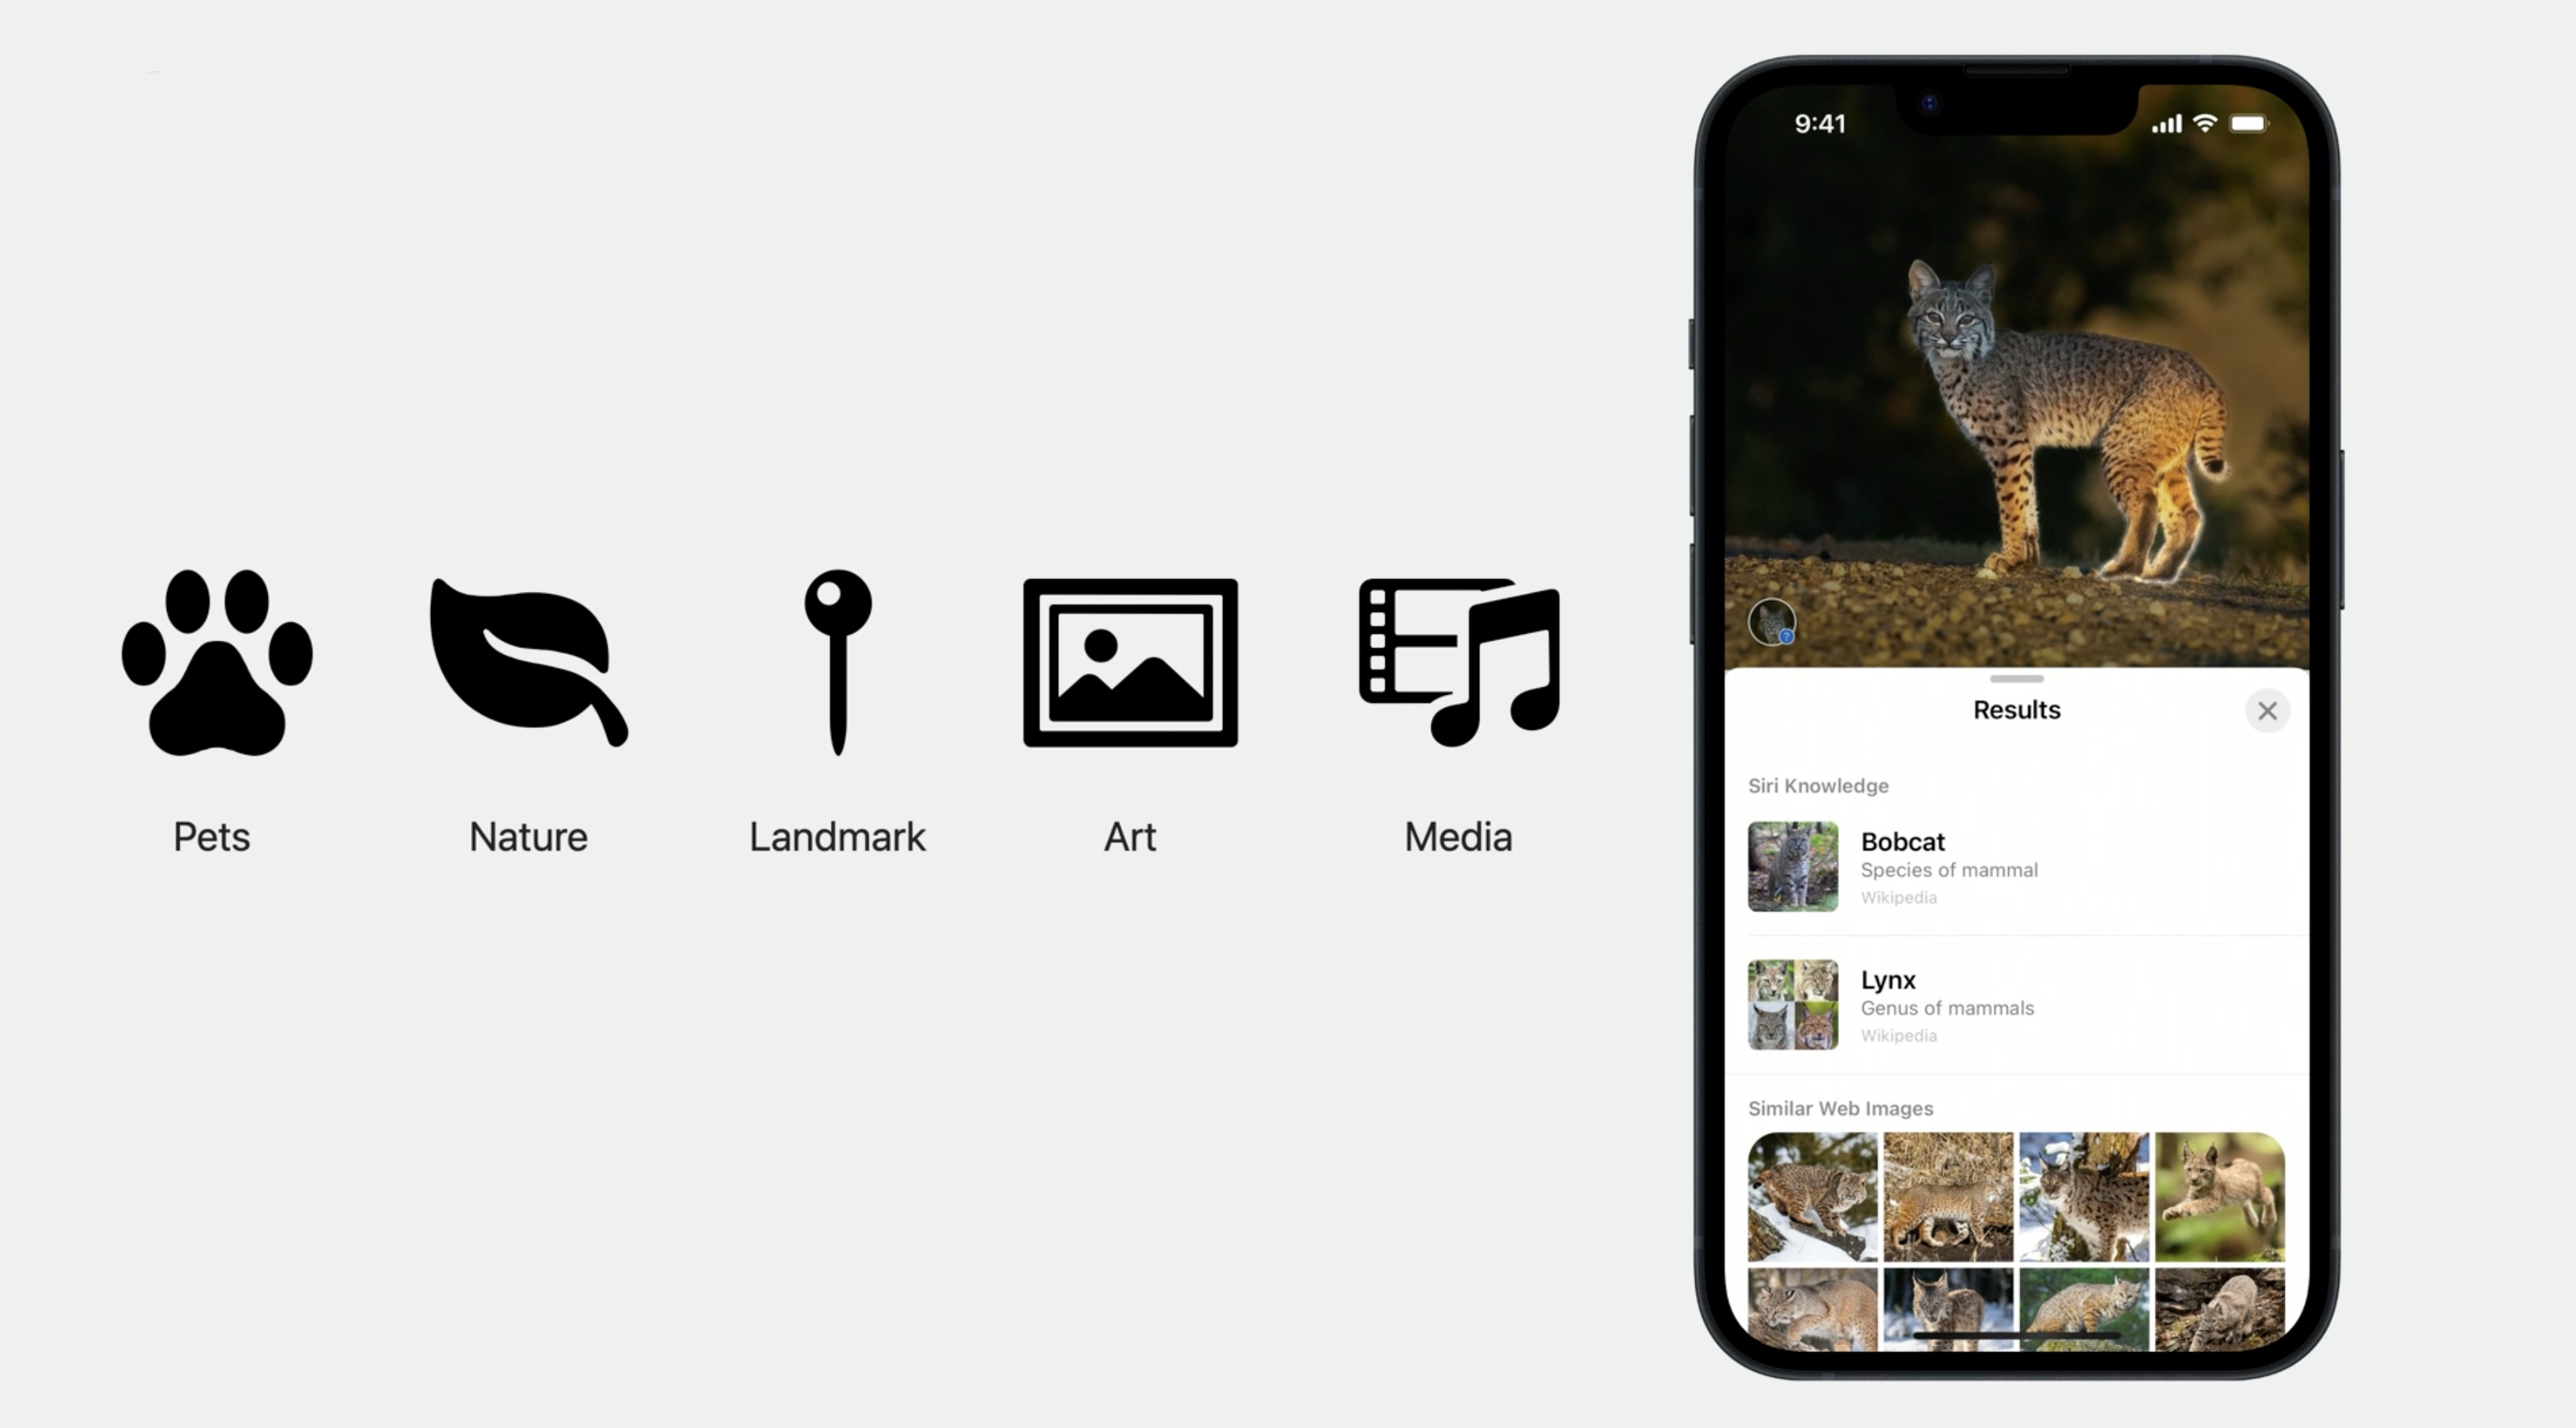
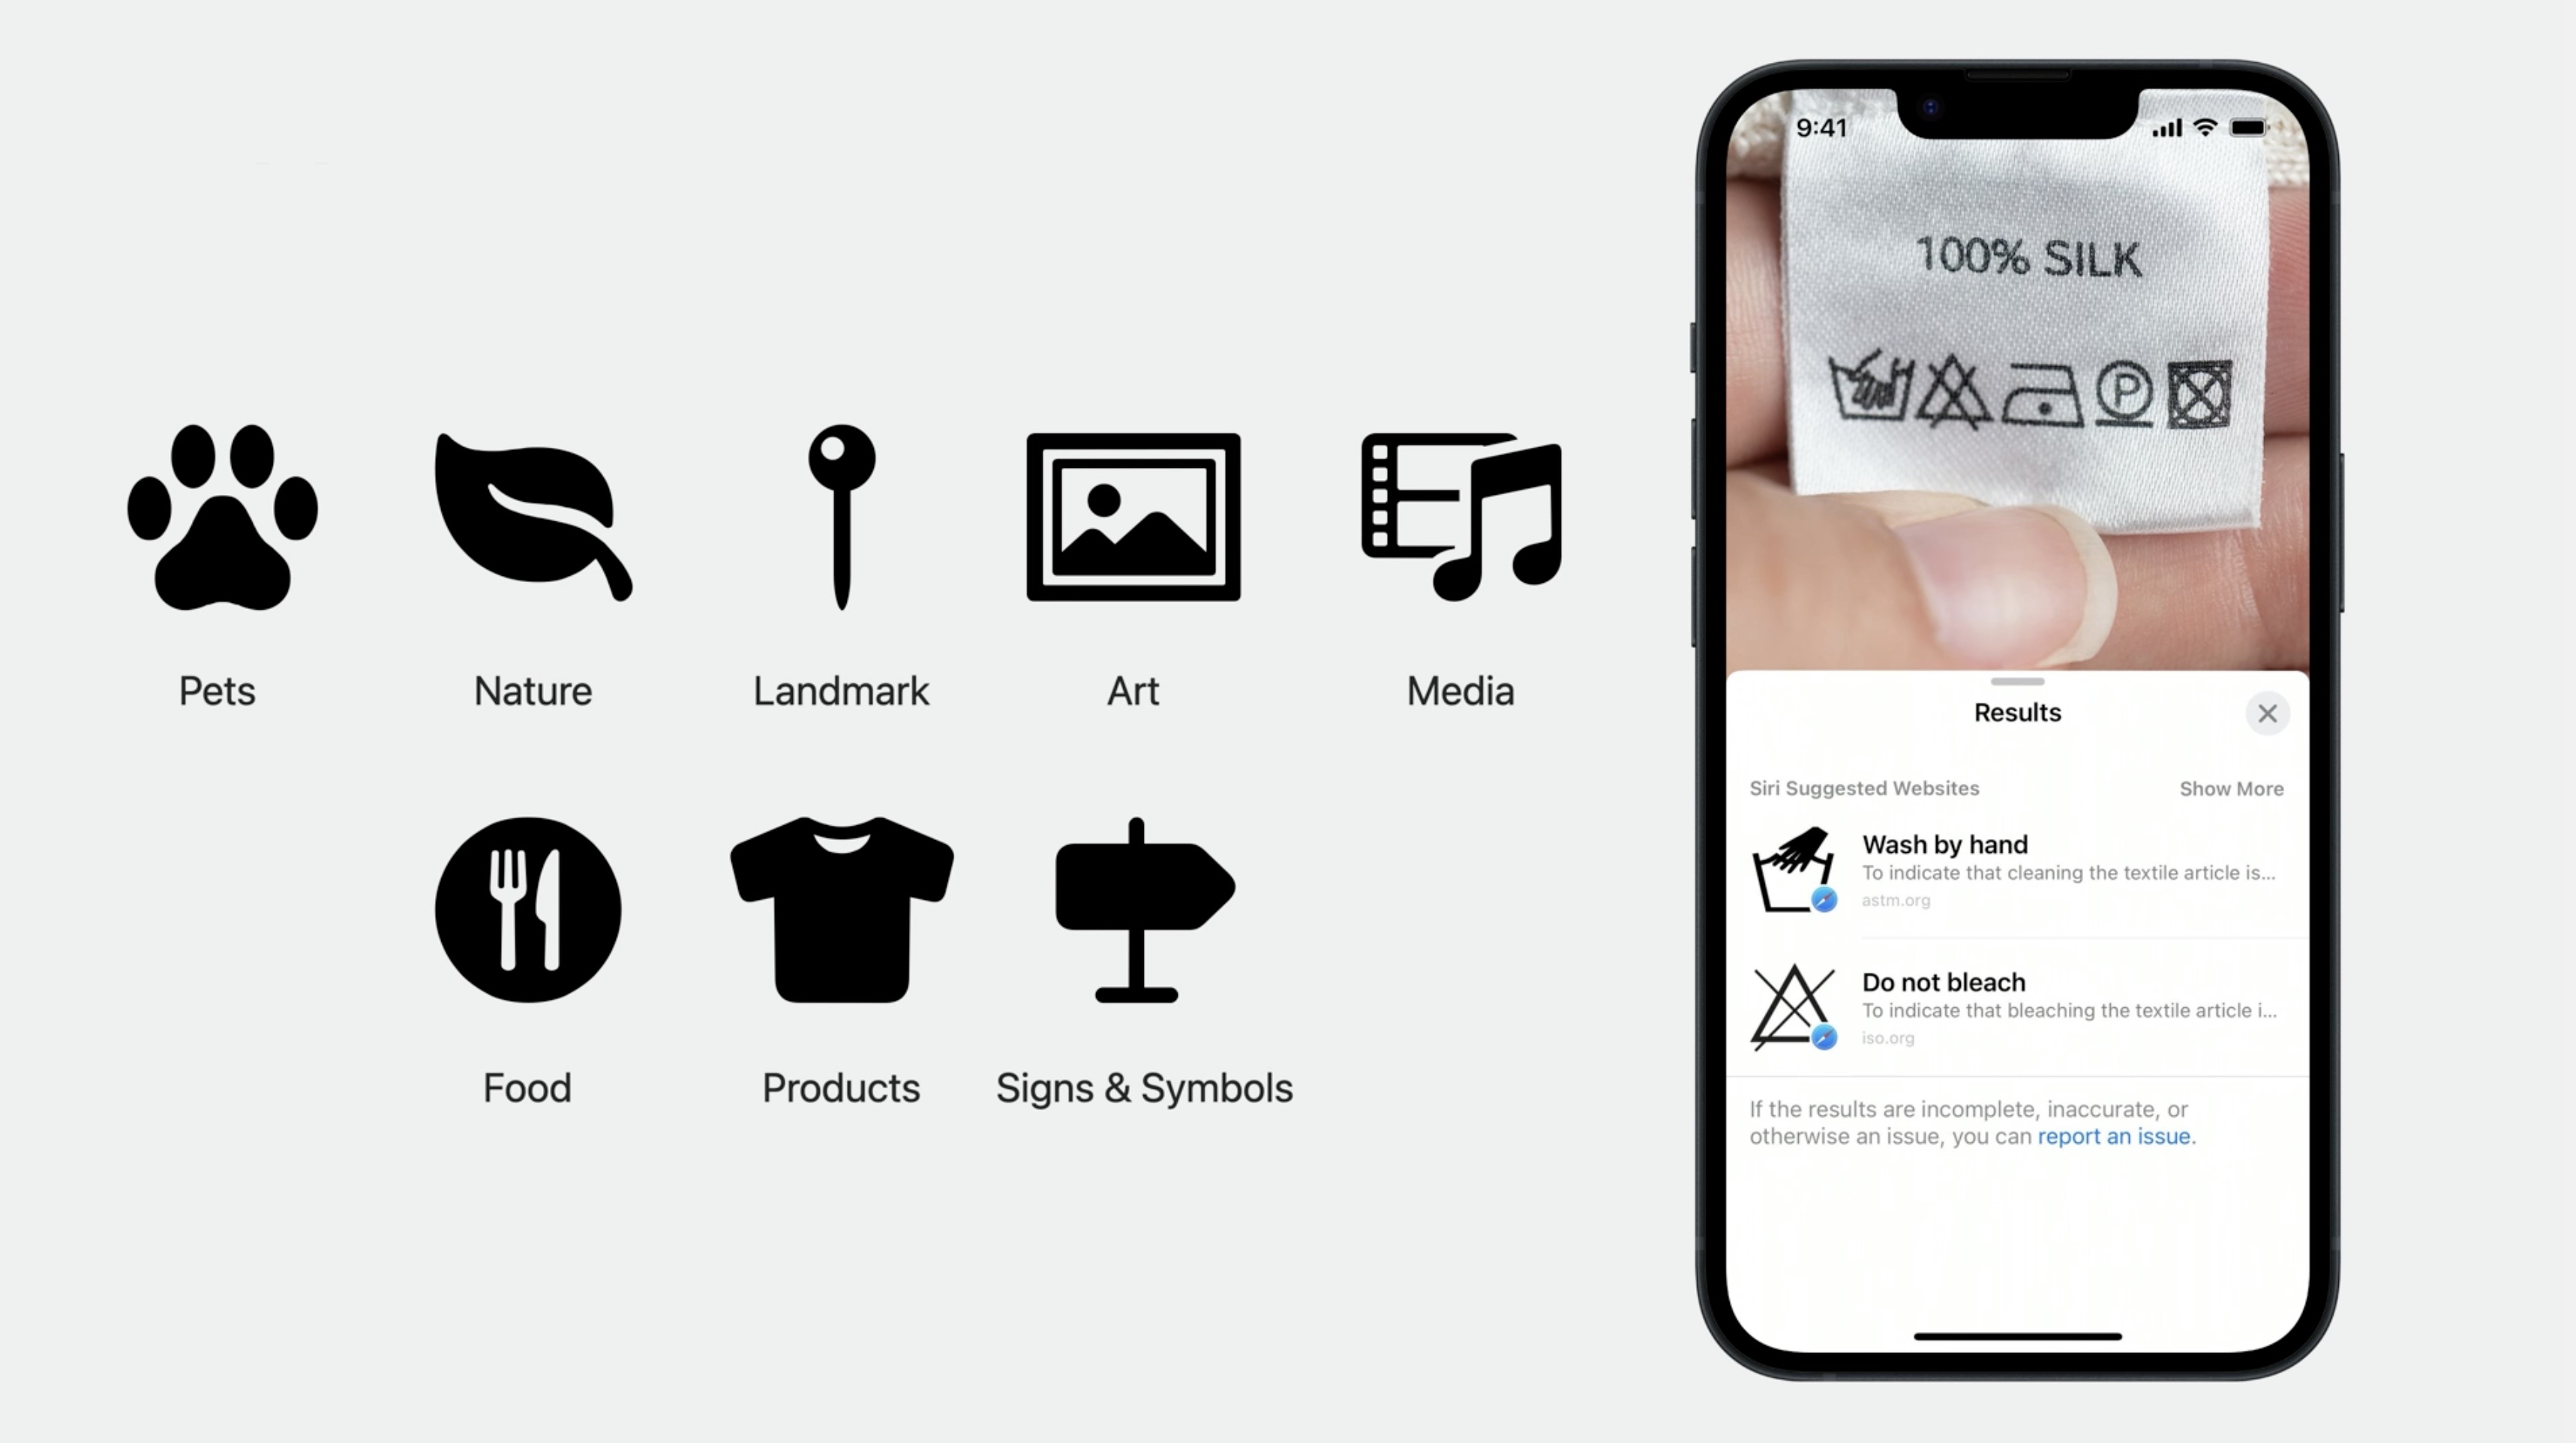
Now, finally, it's easy to look up what those symbols on your laundry tags mean. I mean, that's pretty cool!
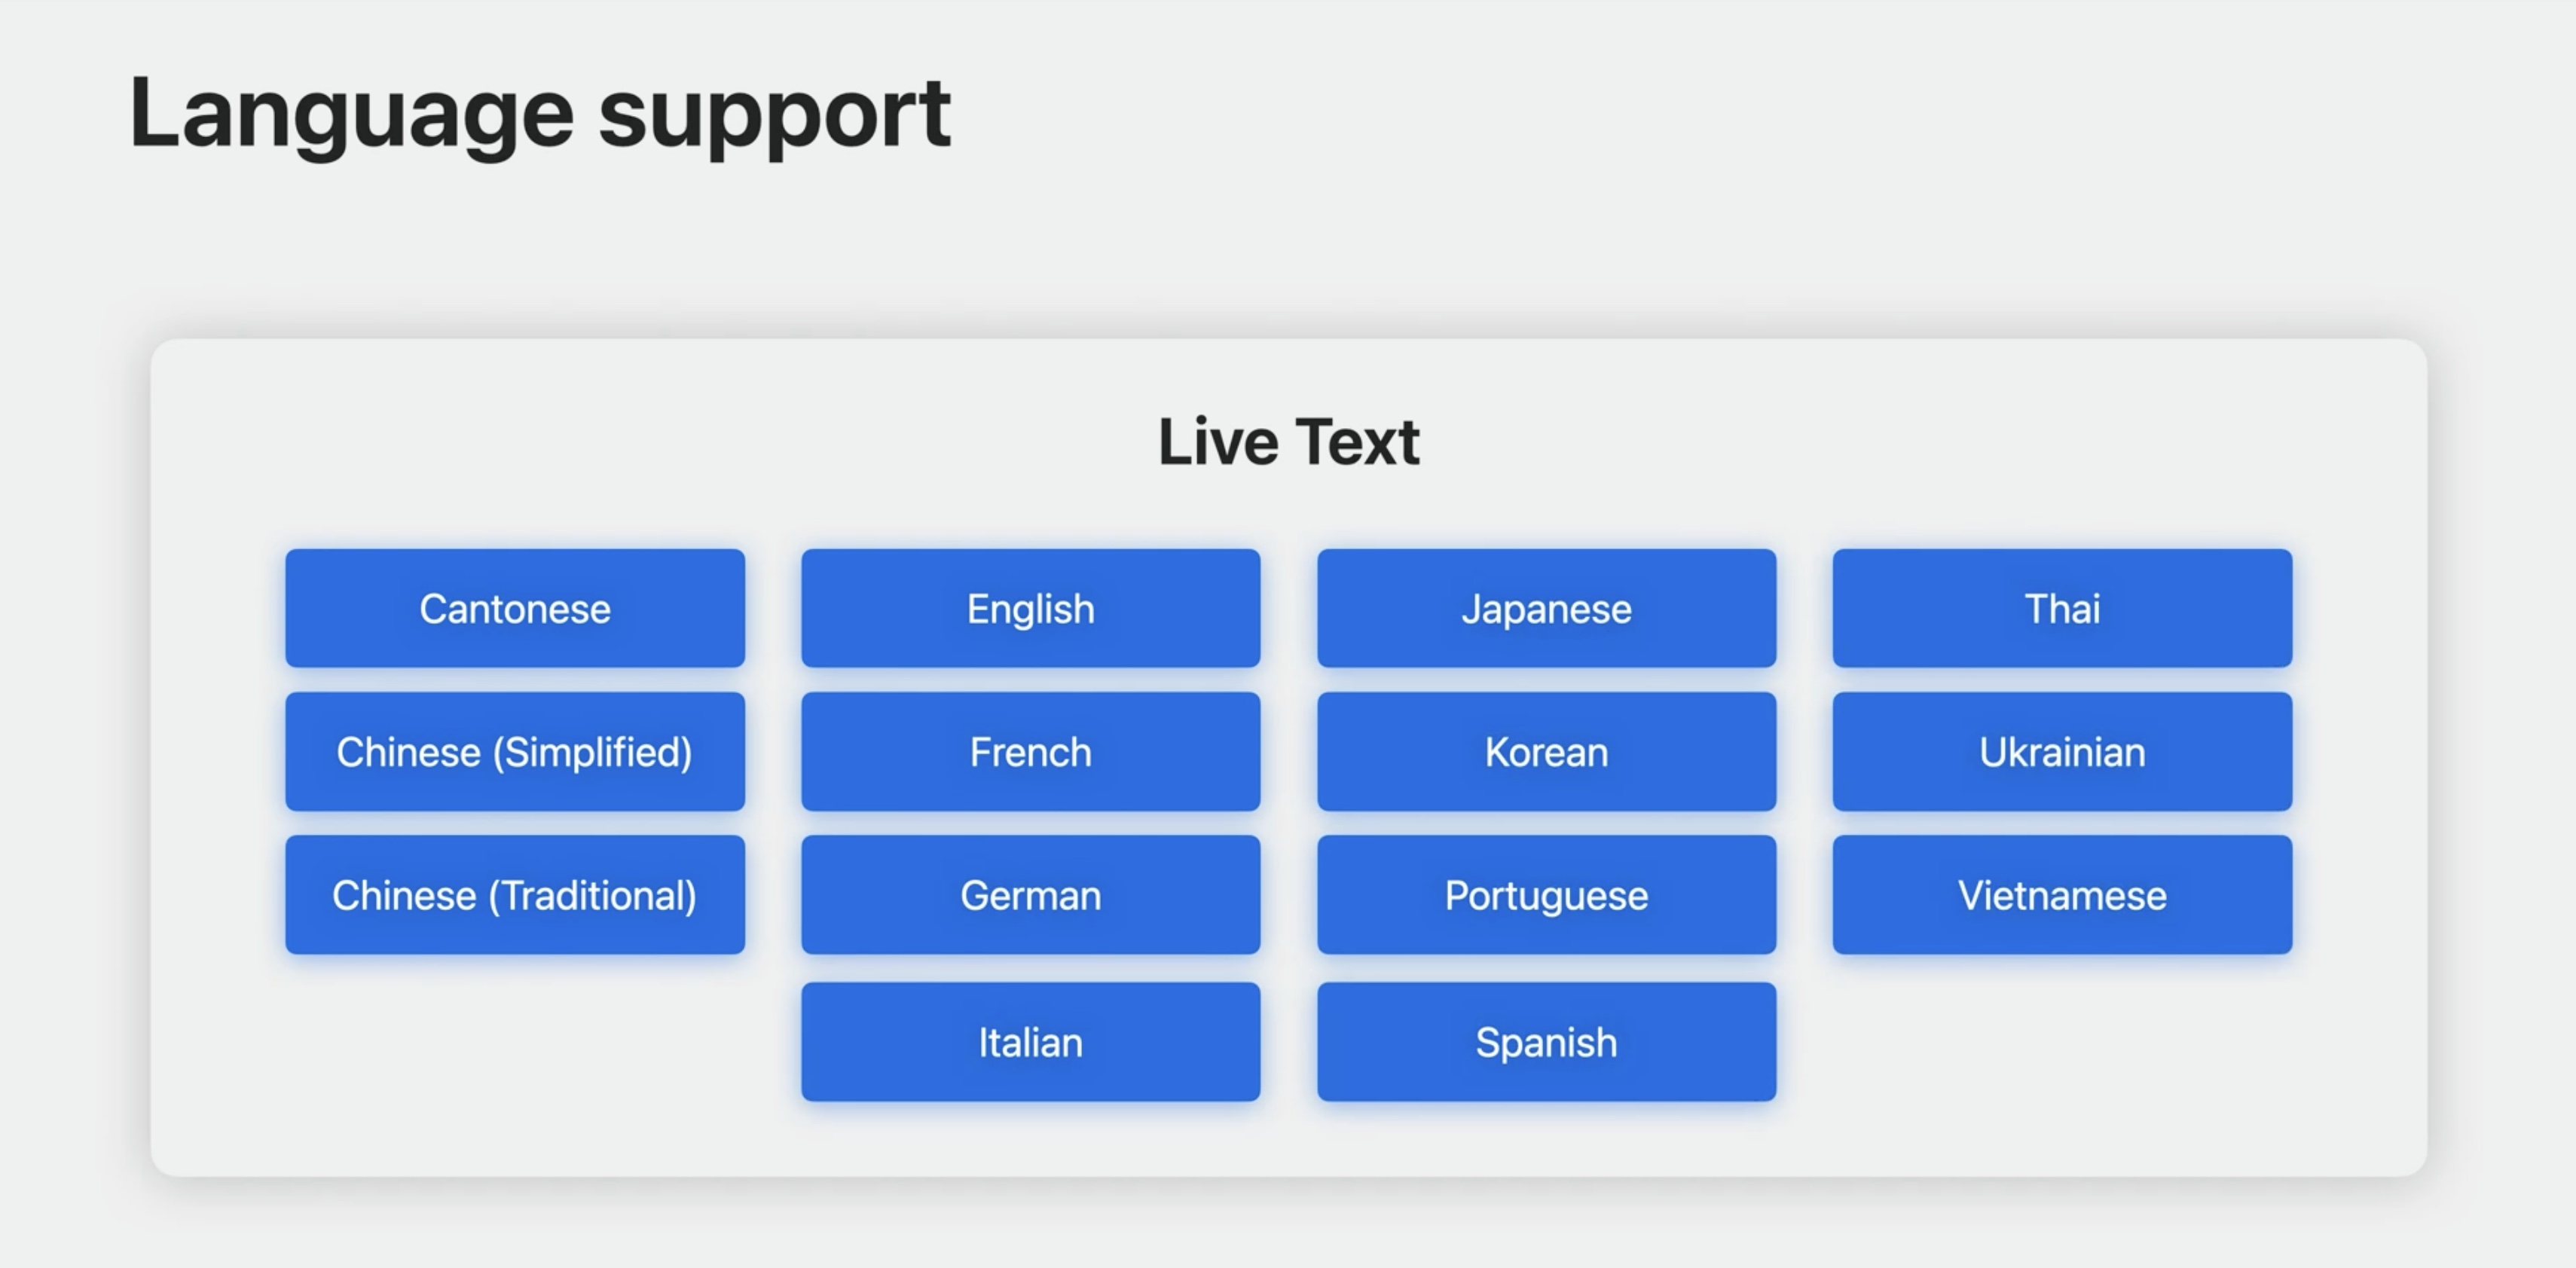
Visual Look Up availability is based on language, and is available for these languages:
- English - Italian - French - Japanese - German - Spanish
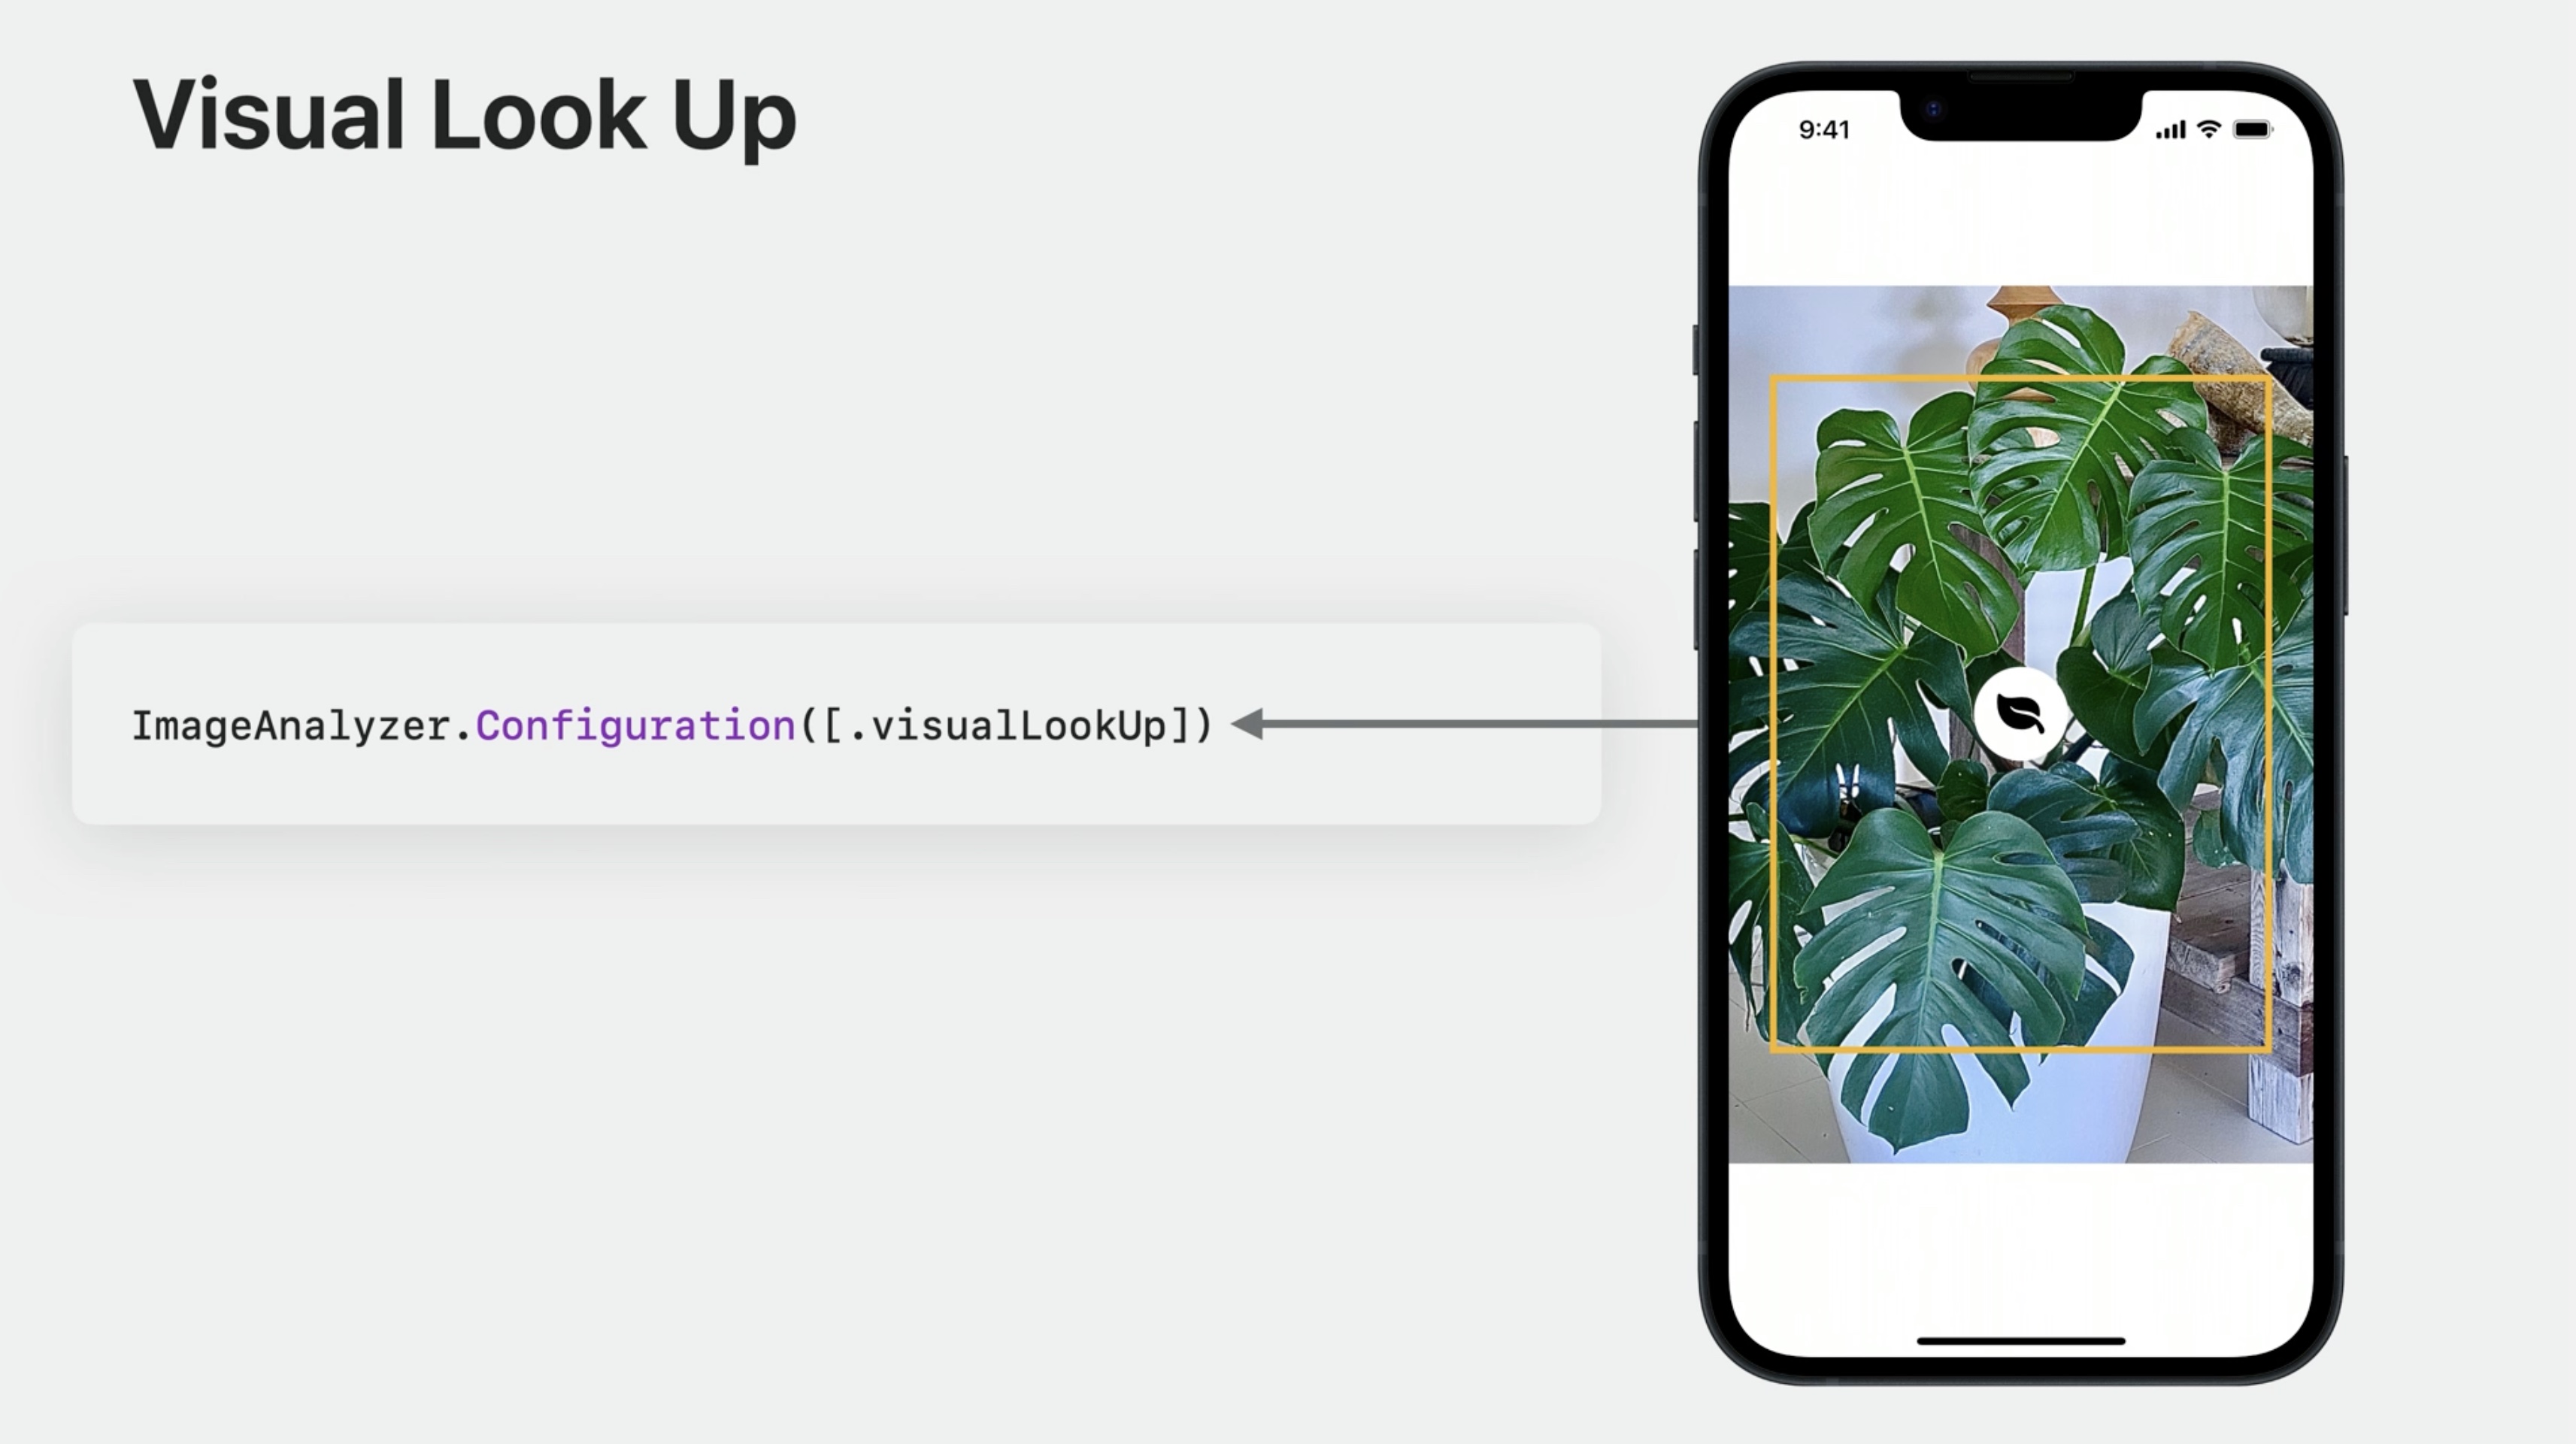
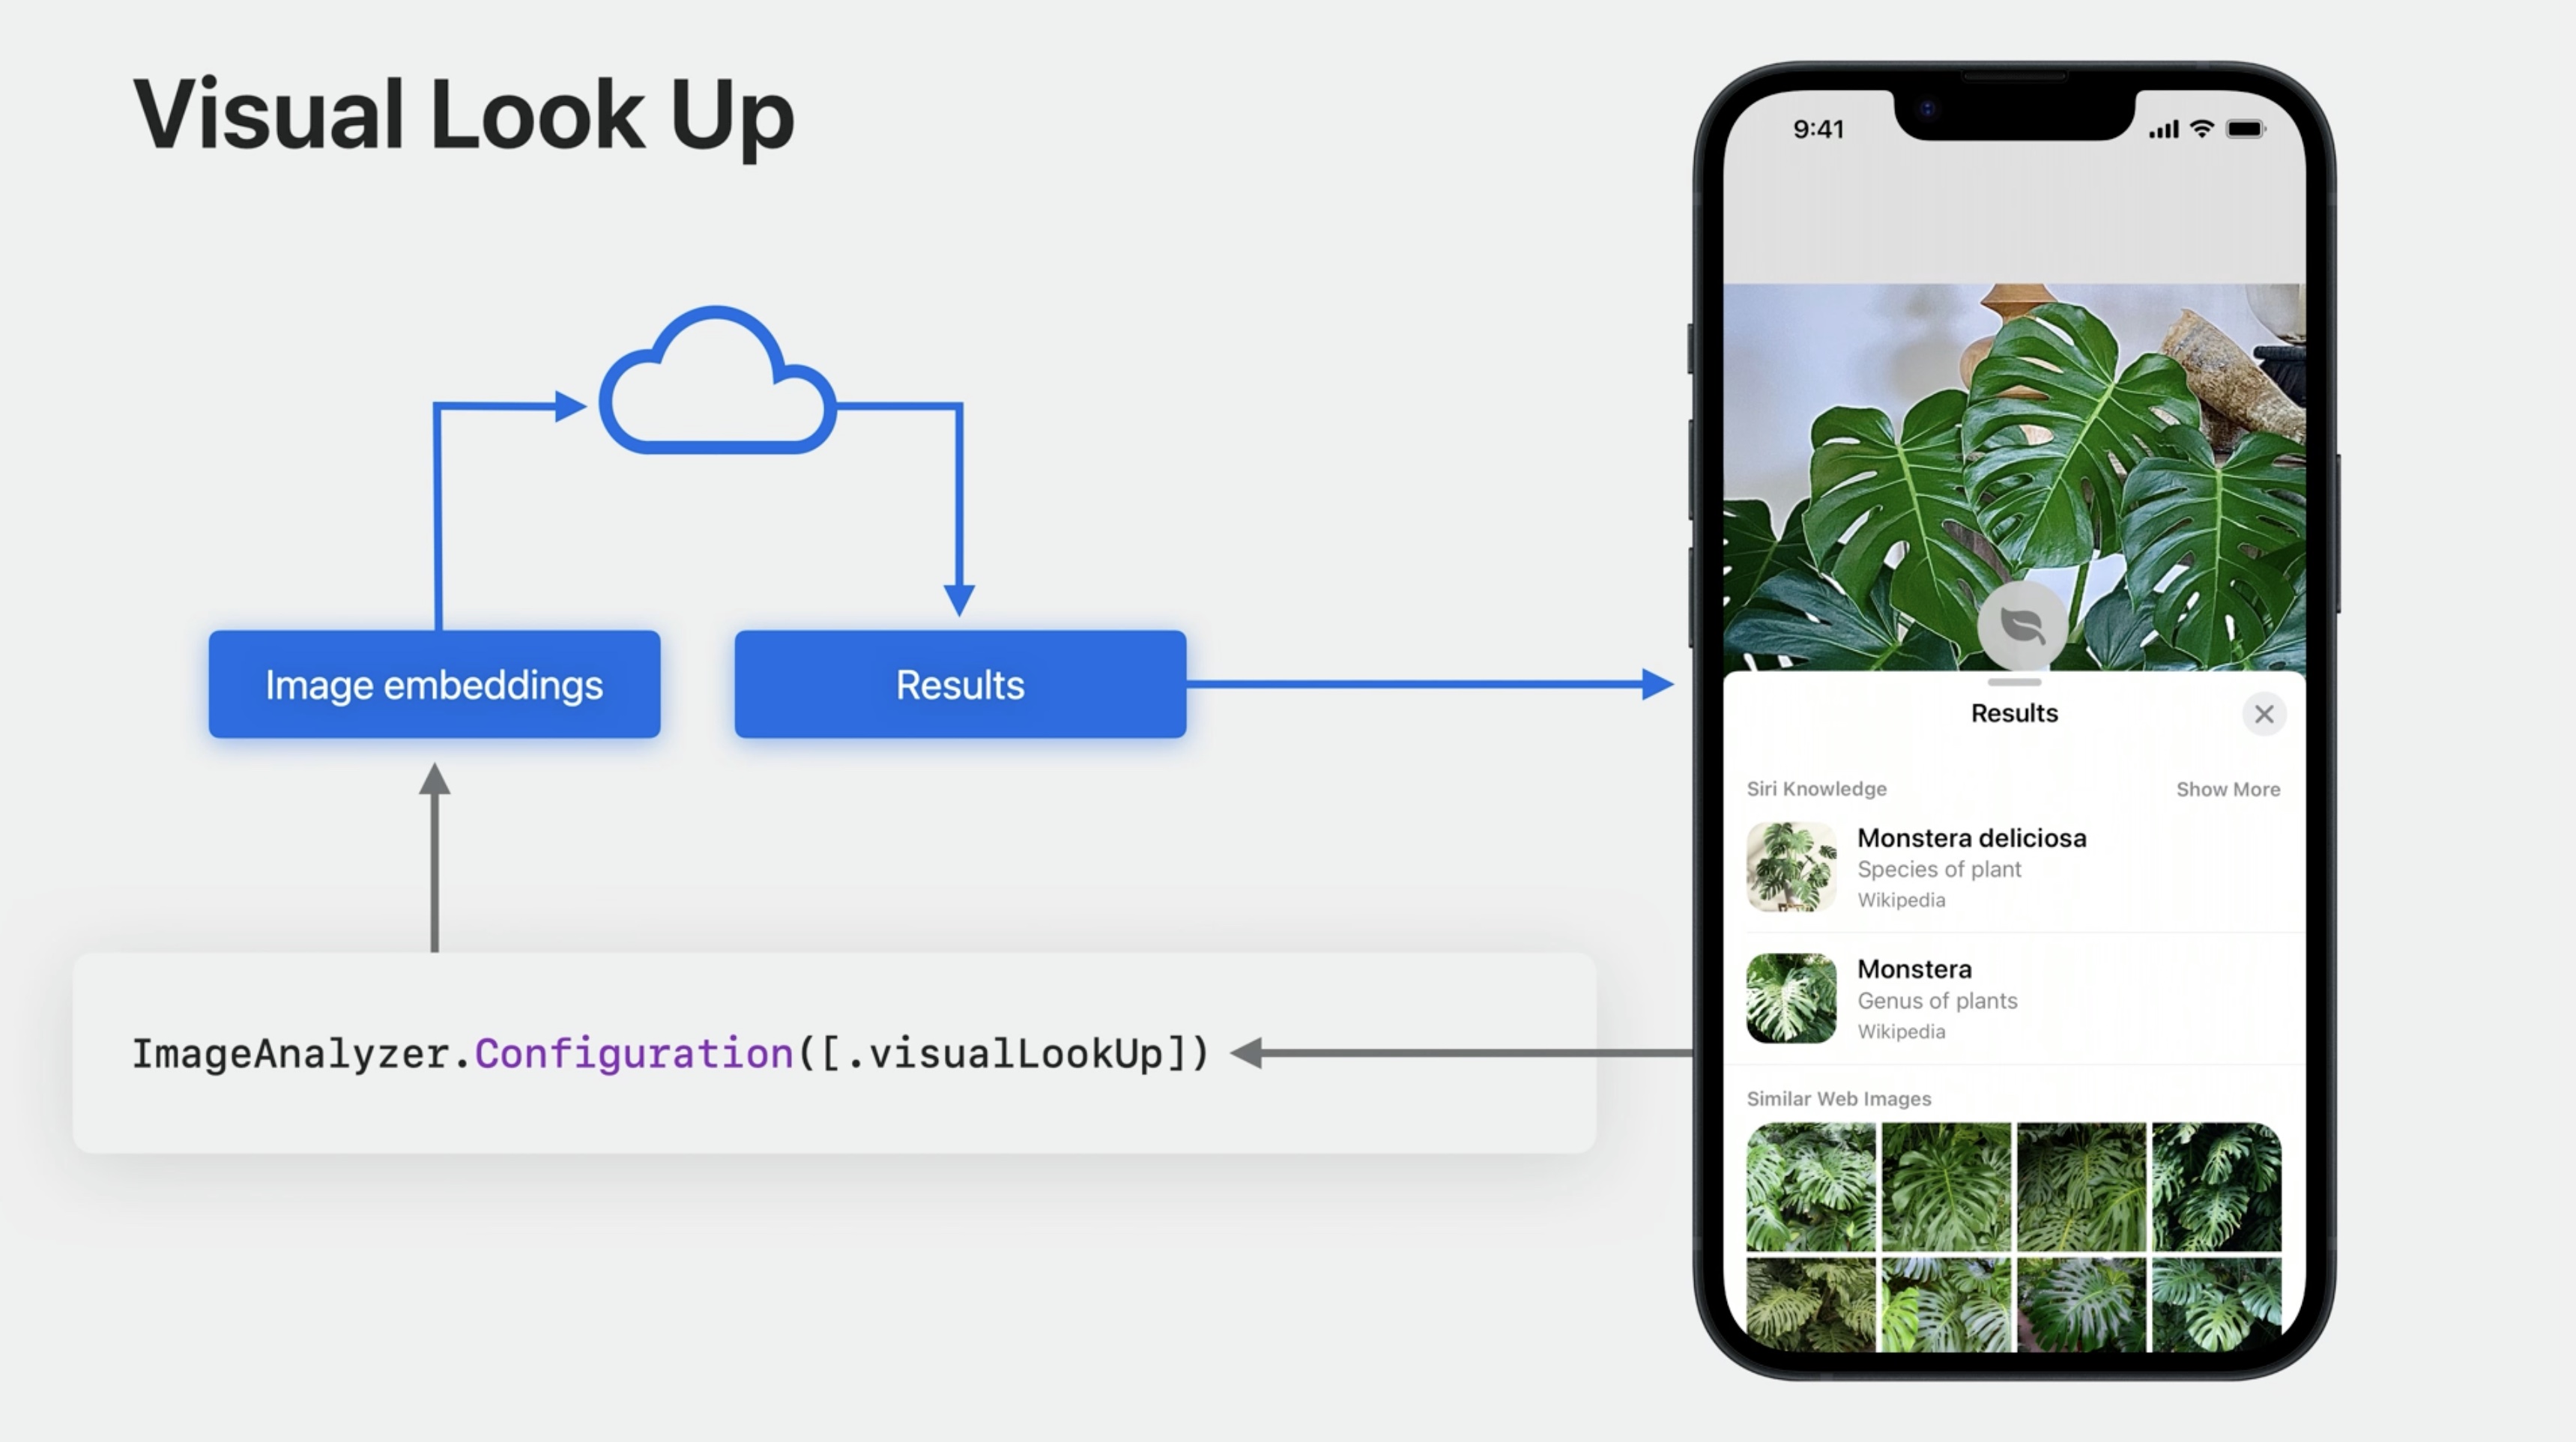
Let's take a quick peek under the hood, and explore how Visual Look Up works. It's actually a two-part process. Initial processing is accomplished entirely on device at analysis time.
If the .visualLookUp type is present in the analyzer configuration, Visual Look Up will locate the bounding box of the results, and their top level domain. For example, if it's a cat, book, or plant. This step also includes feature extraction.
Once the user requests to look up an object, then, and only then, are the domain and image embeddings from feature extraction sent to the server for additional processing.
Now you know how Visual Look Up works, let's quickly explore how to use it, and what actions you need to take to add it to your app. Visual Look Up can be invoked in two different ways. The first is in conjunction with Subject Lifting, if the current lifted subject contains one, and only one, correlated Visual Look Up result, the Look Up option will be offered in the menu,
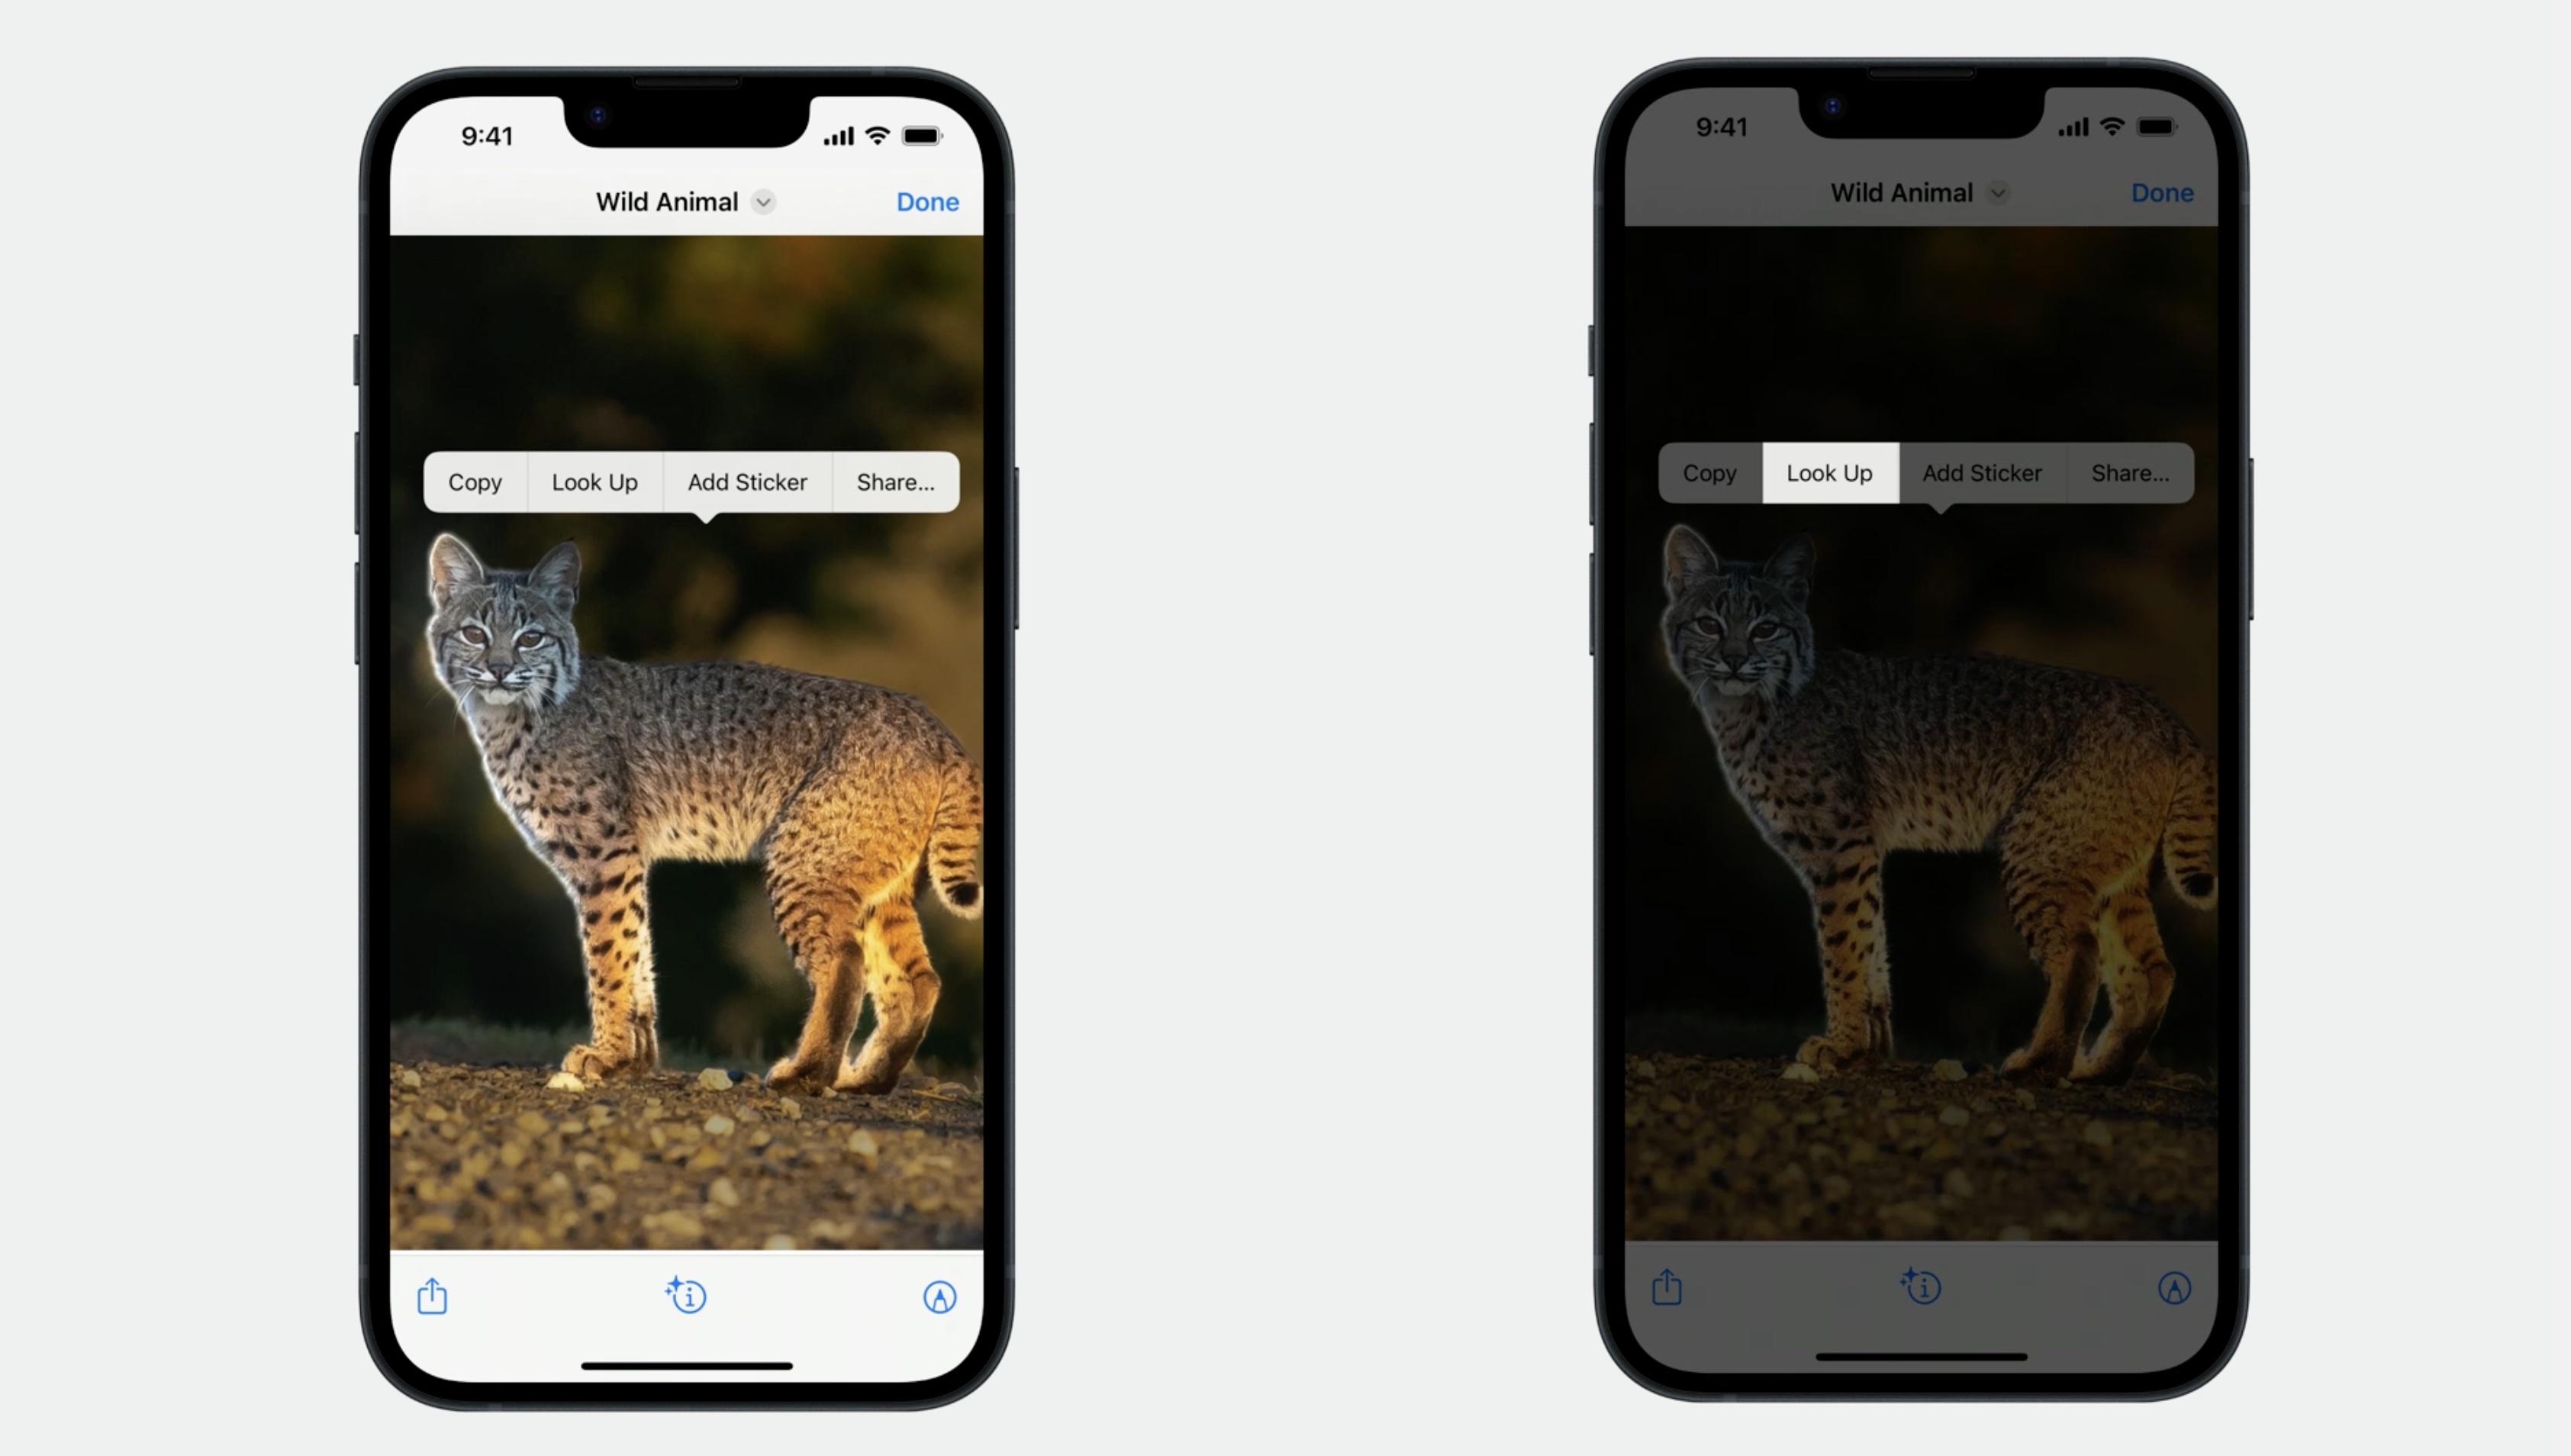
and selecting it will show the full Look Up result.
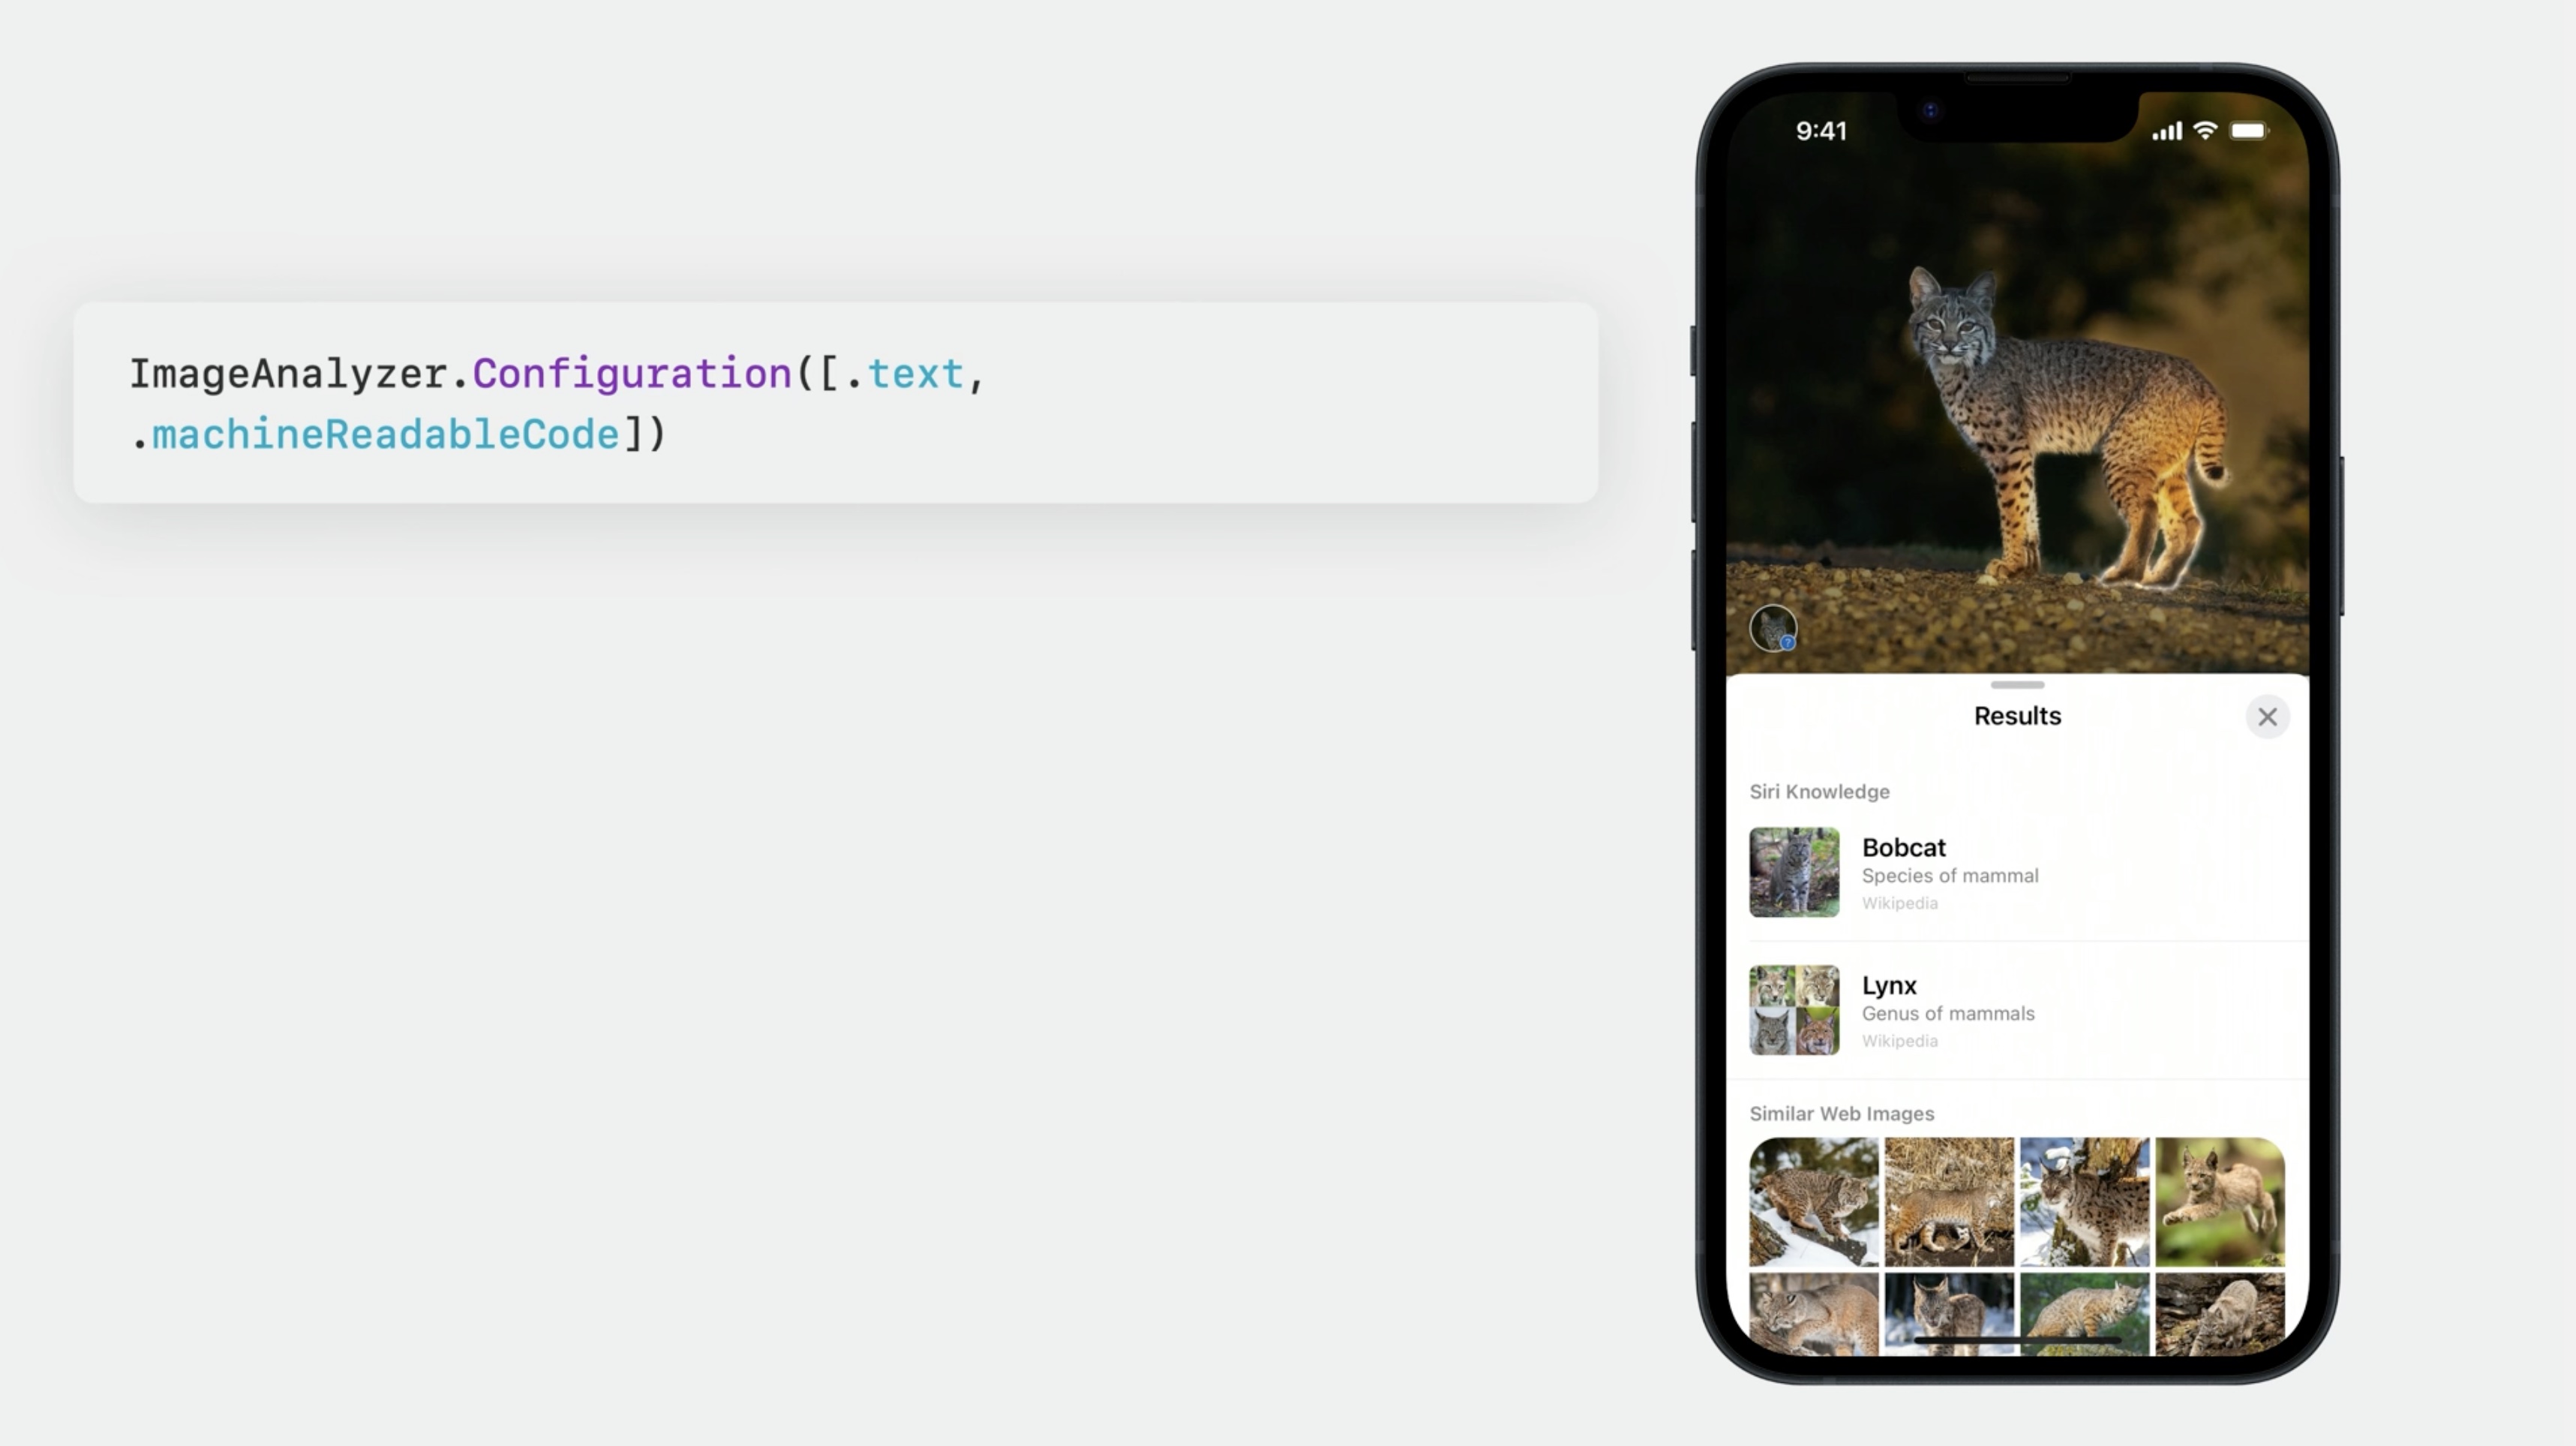
VisionKit handles this interaction for you automatically. As an adopter all you need to do is have .visualLookUp added to your analyzer configuration at analysis time.
Second, there is a modal interaction available where badges are placed over each of the visual search results. Notice how the badges move to the corner if they leave the viewport, Users can tap on these badges to show the Look Up result. This is the same interaction as clicking on the info button in the Photos app, or Quick Look, for example.
This mode is invoked by setting .visualLookUp as the preferredInteractionType on your interaction.
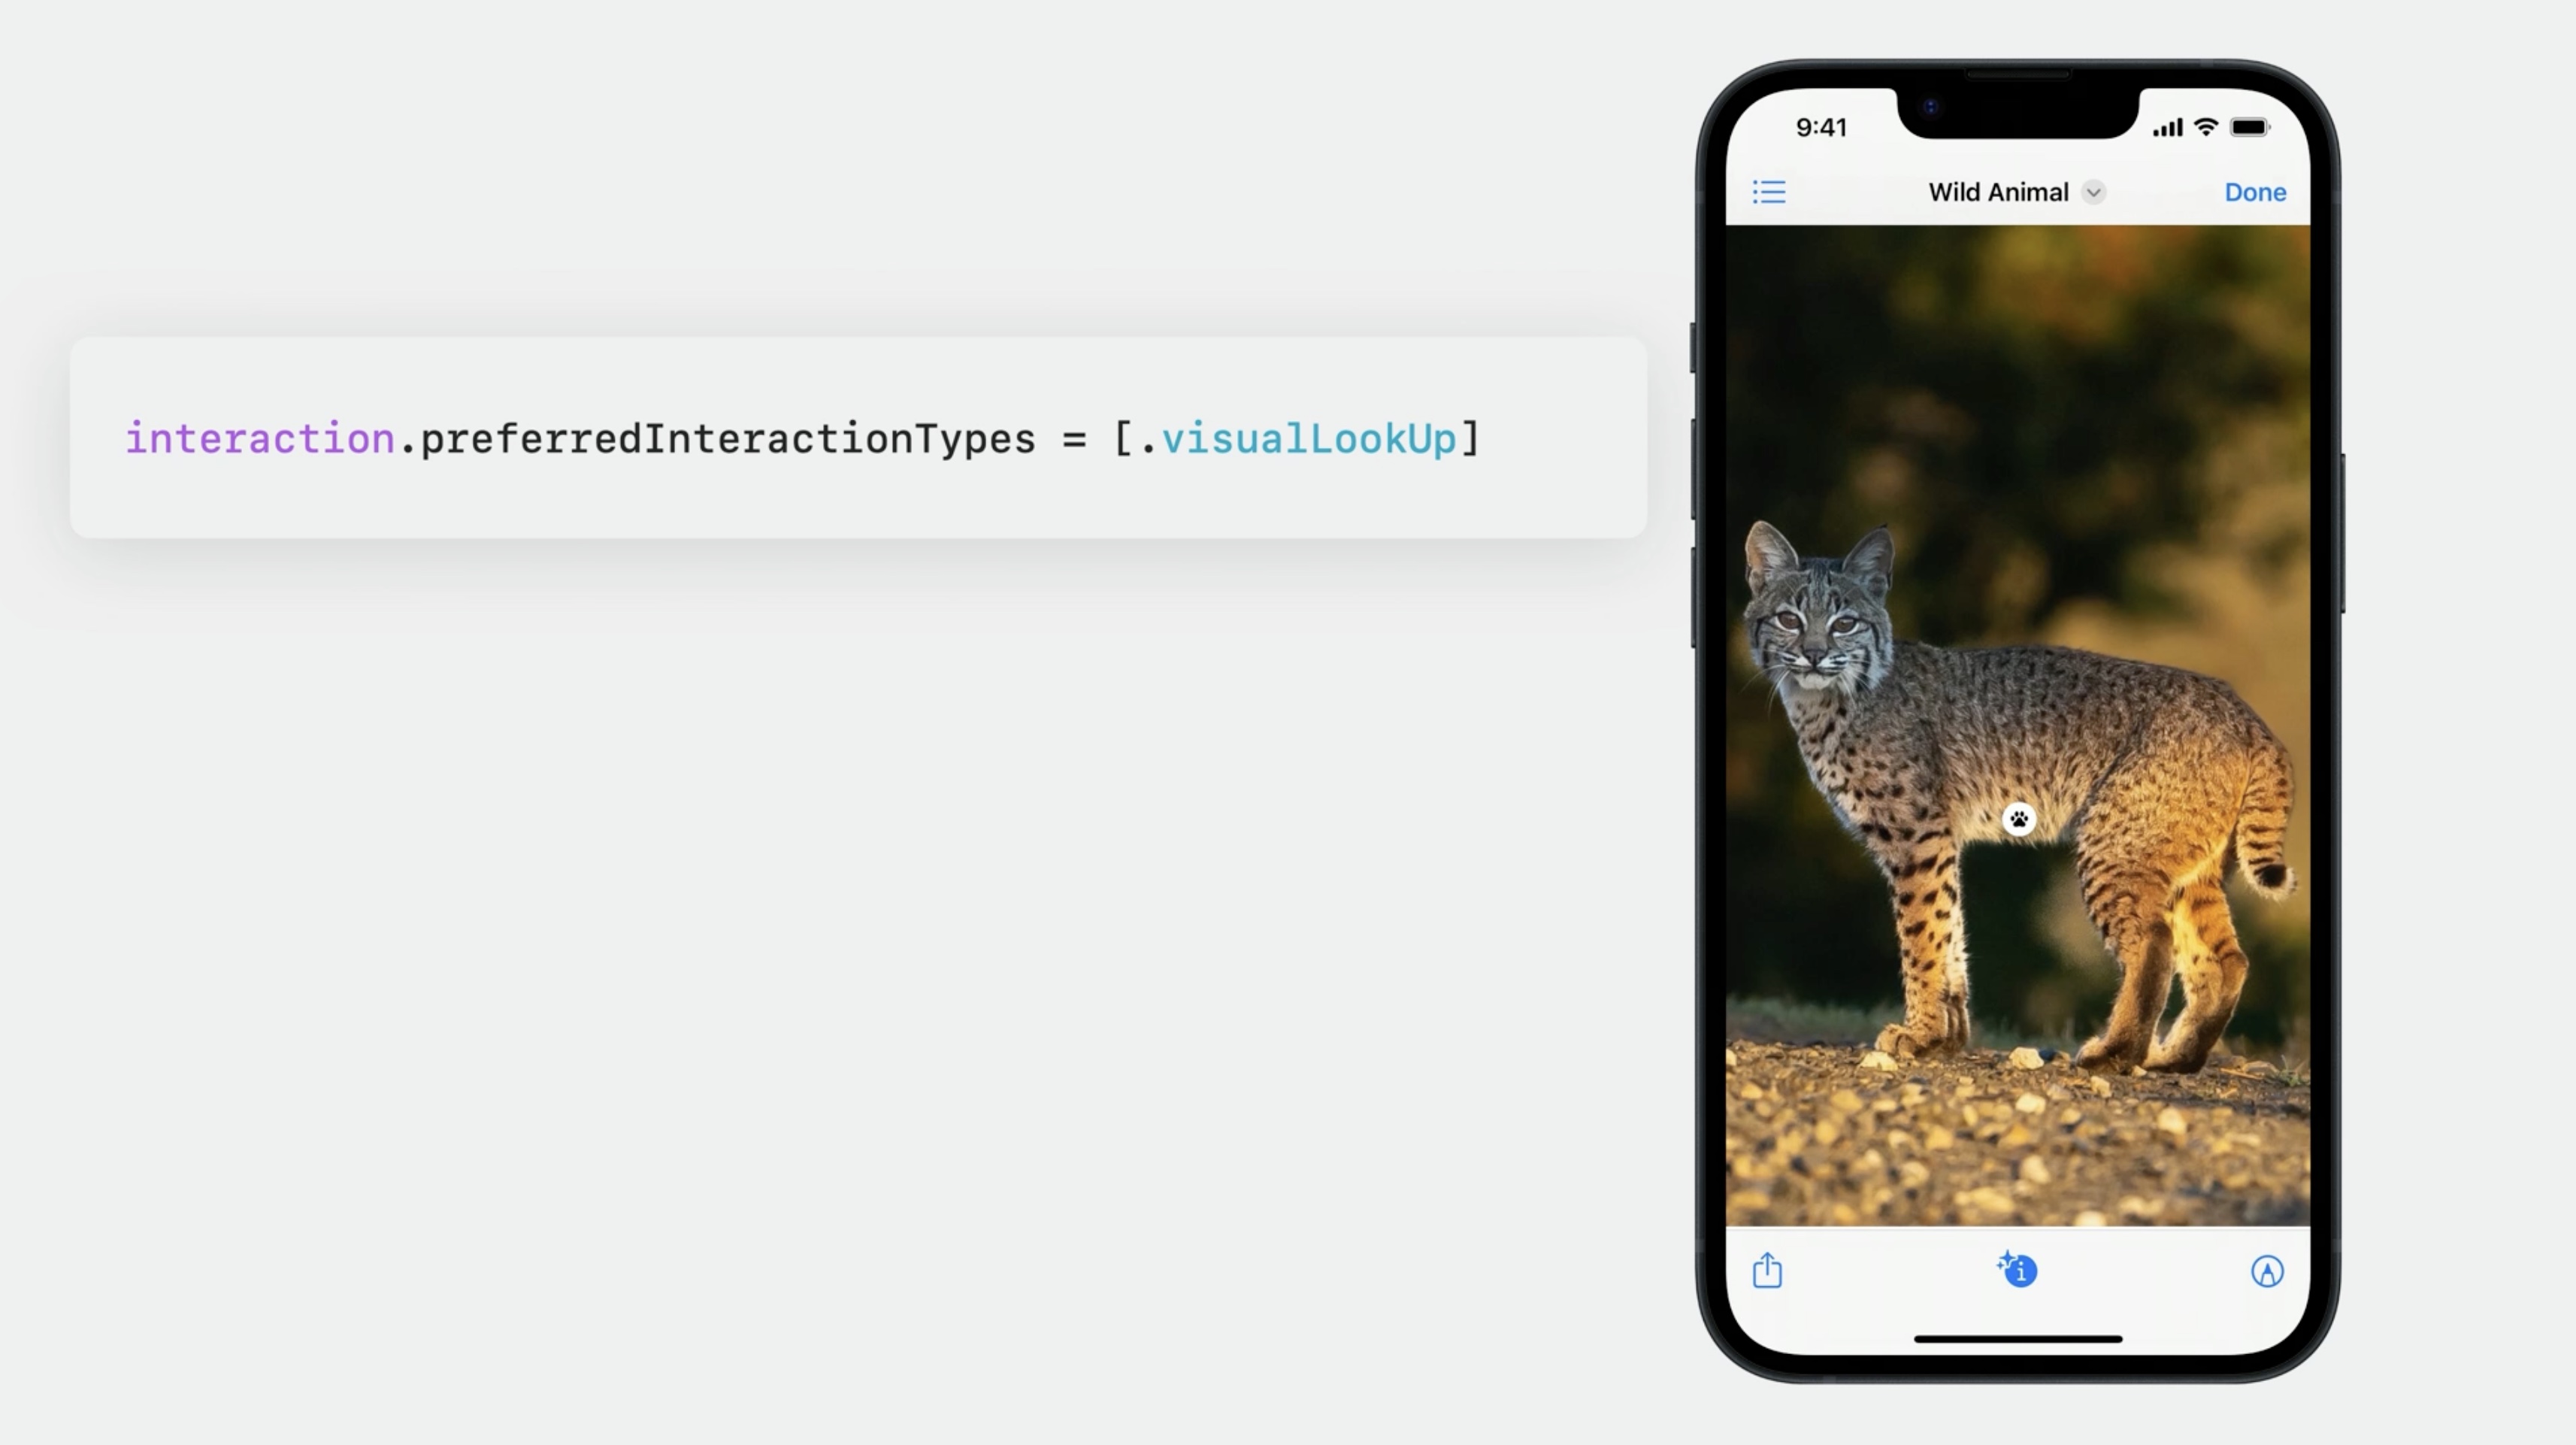
Please note: this type will have precedence over the other interaction types. For example, you cannot select text or data detectors at the same time that the visualLookup Mode is set. As such, this is normally used in conjunction with a button, or some other bespoke way to get in and out of this mode. For example, Quick Look uses the info button to enter Visual Look Up mode.
Data Scanner and Live Text
Introduced In iOS 16, the DataScannerViewController was designed to be the easiest way to use OCR with a live camera viewfinder.
New in iOS 17, it's been enhanced with:
- optical flow tracking
- currency support
Optical flow tracking can enhance text tracking for live-camera experiences.
In iOS 16 I'm scanning for text with highFrameRateTracking enabled.
But new in iOS17 with optical flow tracking the highlights feel much more stable and grounded than before.![]()
Optical flow tracking comes for free whenever you use the DataScannerViewController, however, it is only available when recognizing text, and not machine readable codes. And you're also required to scan for text without a specific text content type set. And finally, once again, ensure high frame-rate tracking is enabled. Which is, conveniently, the default.
// Recognize URLs
let recognizedDataTypes: Set<DataScannerViewController.RecognizedDataType> = [
    .text(textContentType: .URL)
]

// Present the data scanner configured without high frame-rate tracking
let dataScanner = DataScannerViewController(recognizedDataTypes: recognizedDataTypes,
                                            isHighFrameRateTrackingEnabled: false)
present(dataScanner, animated: true) {
    try? dataScanner.startScanning()
}
No matter how you configure it, the data scanner provides great text tracking; but if your use case allows for this configuration, the new optical flow tracking can enhance it even further.
Currency
Next, the data scanner has a new option allowing users to find and interact with monetary values. It's incredibly simple to enable. Just set the text content type to currency when specifying text recognition in the data scanner's initializer, just as you would other content types like email addresses or telephone numbers.
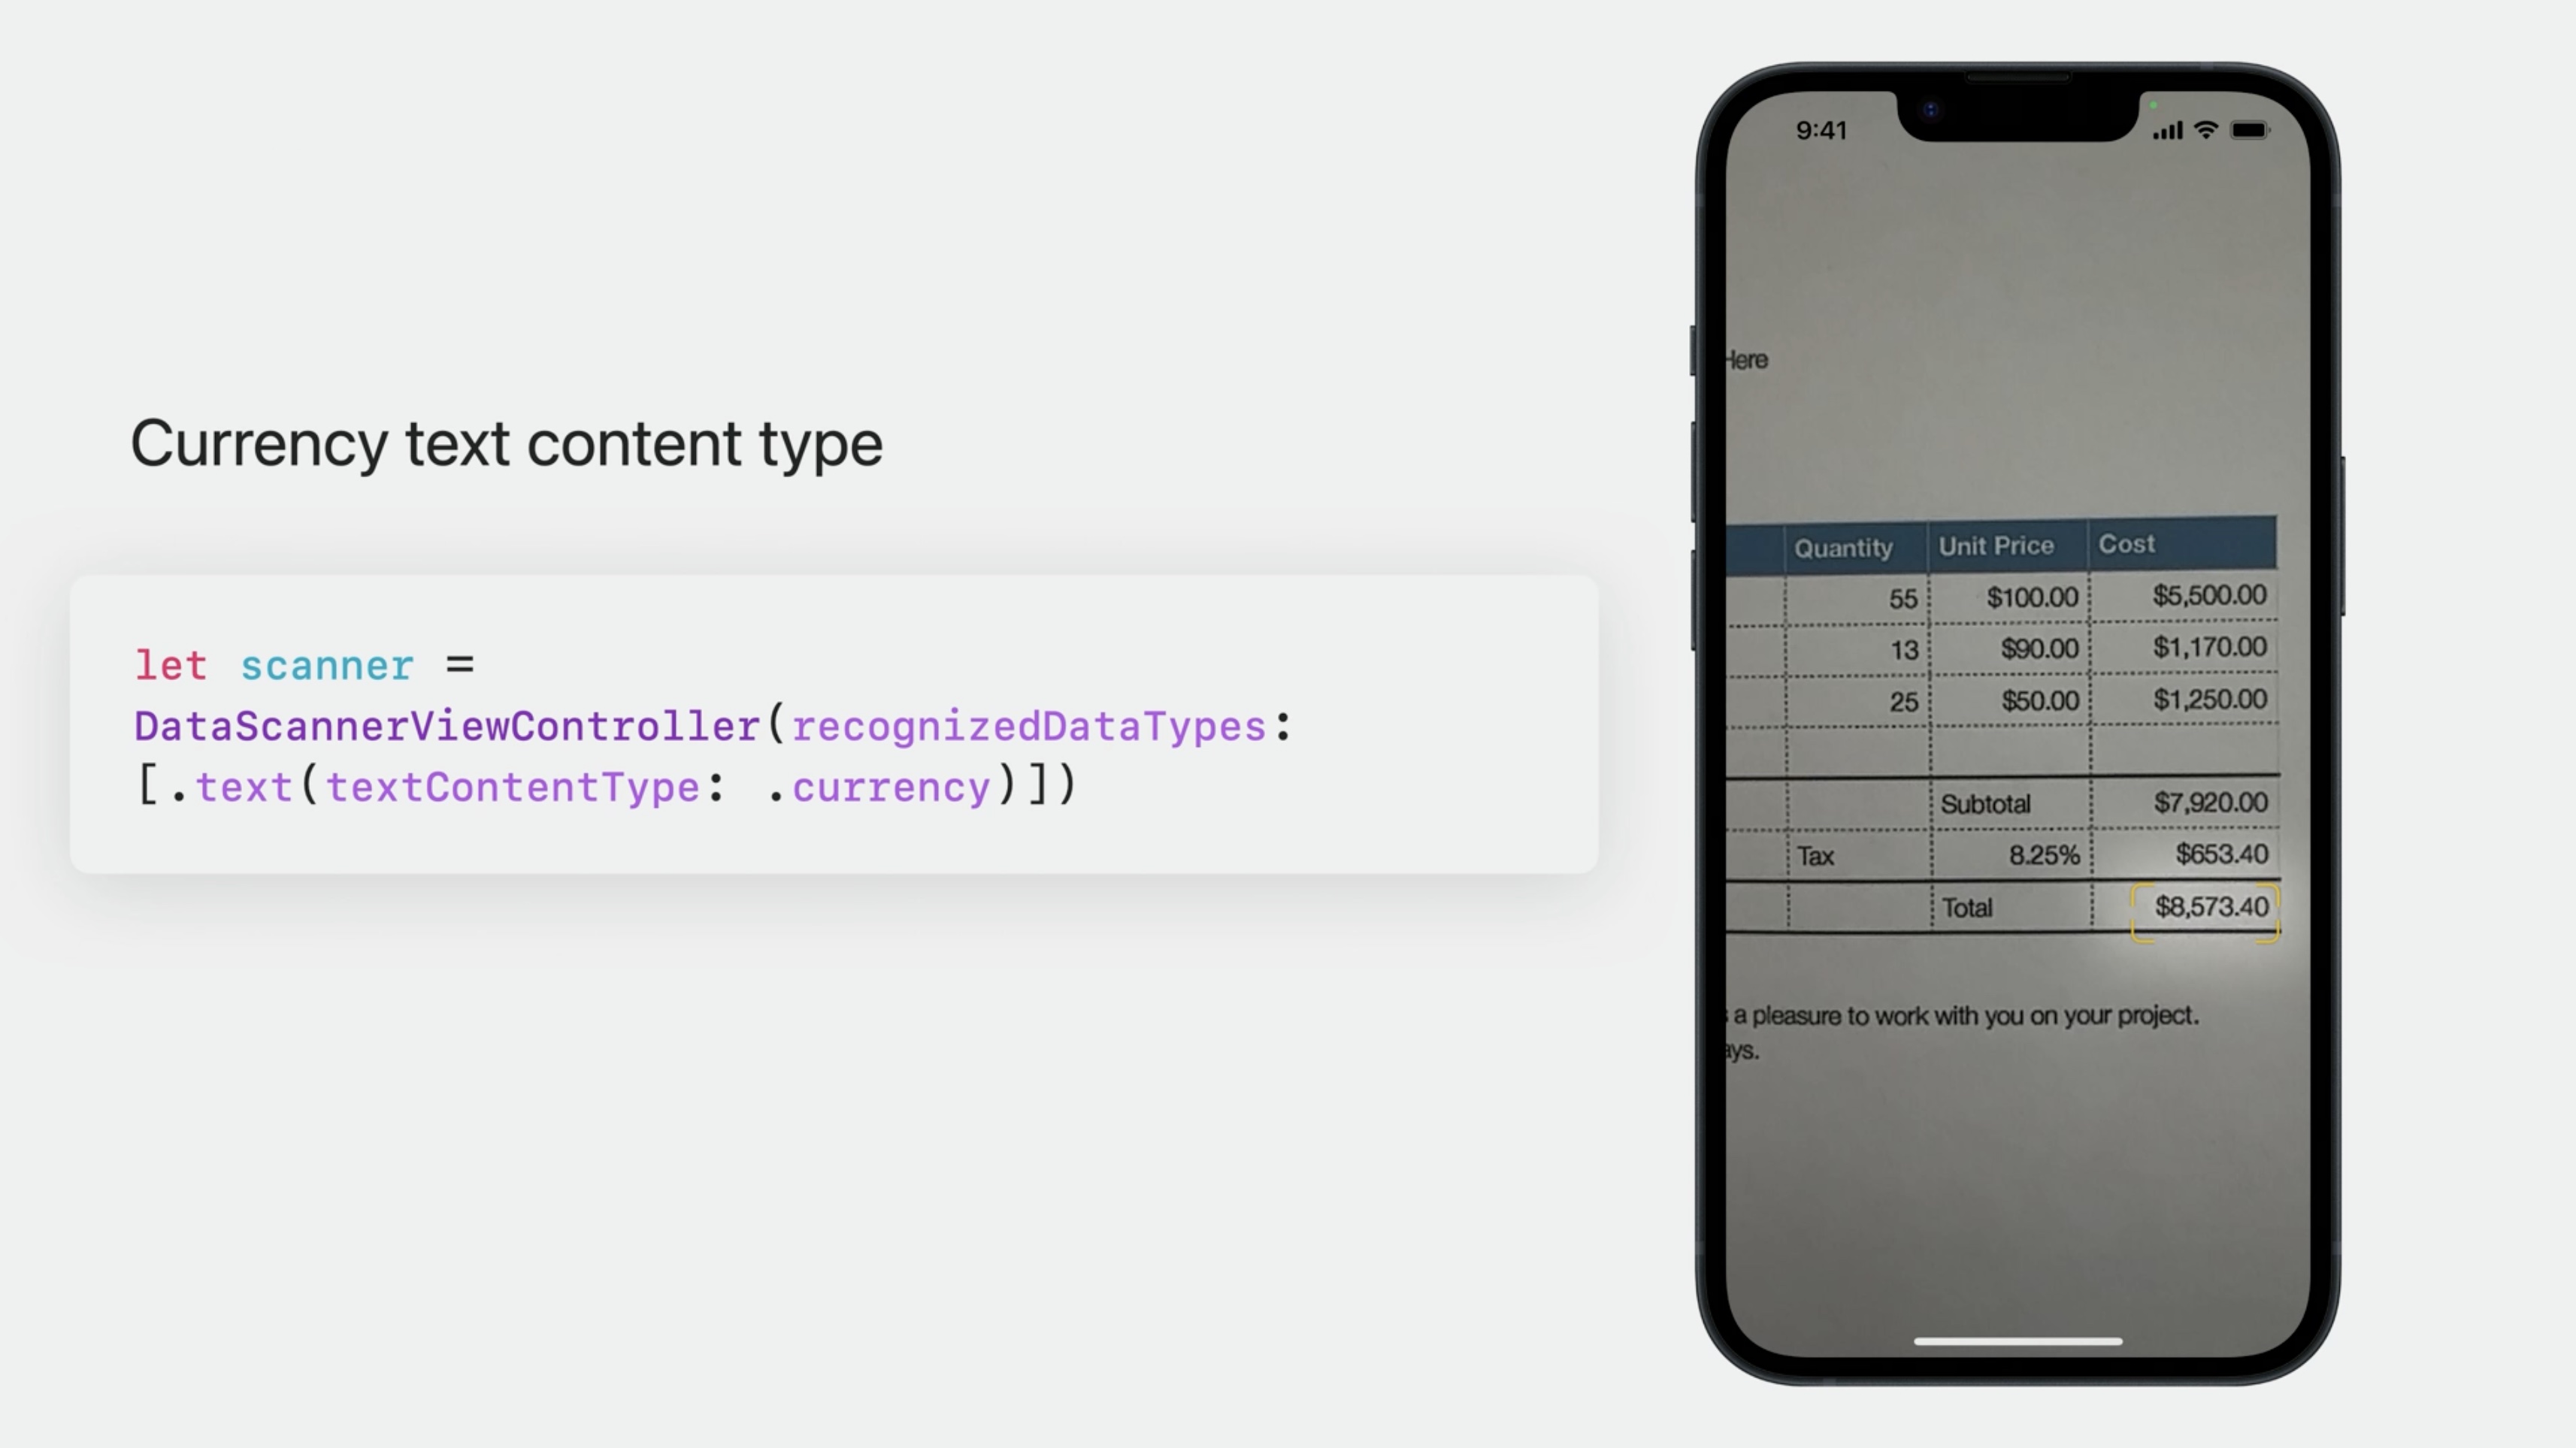
Now I'm going to explore this new type in more detail with a quick example. When the data scanner recognizes currency in text, It contains both a bounds and a transcript.

The transcript has both the currency symbol and the amount.
// Print the total of values in the current locale's currency
let formatter = NumberFormatter()
formatter.numberStyle = .currency
formatter.locale = Locale.current
guard let currencySymbol = formatter.currencySymbol else { return }

var total: Double = 0.0
for await allItems: [RecognizedItem] in dataScannerViewController.recognizedItems {
    for recognizedItem in allItems {
        if case .text(let text) = recognizedItem {
            let transcript = text.transcript
            if transcript.contains (currencySymbol),
               let value = formatter.number(from: transcript) {
                total = total + value.doubleValue
            }
        }
    }
    print("total: \(total)")
}
Here's an example where I find the total of all the values on something like a receipt. First, I get the currency symbol using the current locale.
While awaiting the data scanner's results in the recognizedItems stream, I can loop through each of the recognized items and grab its transcript. If the transcript contains the currency symbol I'm interested in, I'll go ahead and update the total value. And just like that, now you'll have the sum of all values. This is just a simple example, but this can very powerful.
Live Text enhancements
First off, Live Text is coming to more regions by expanding our supported languages to include Thai and Vietnamese.
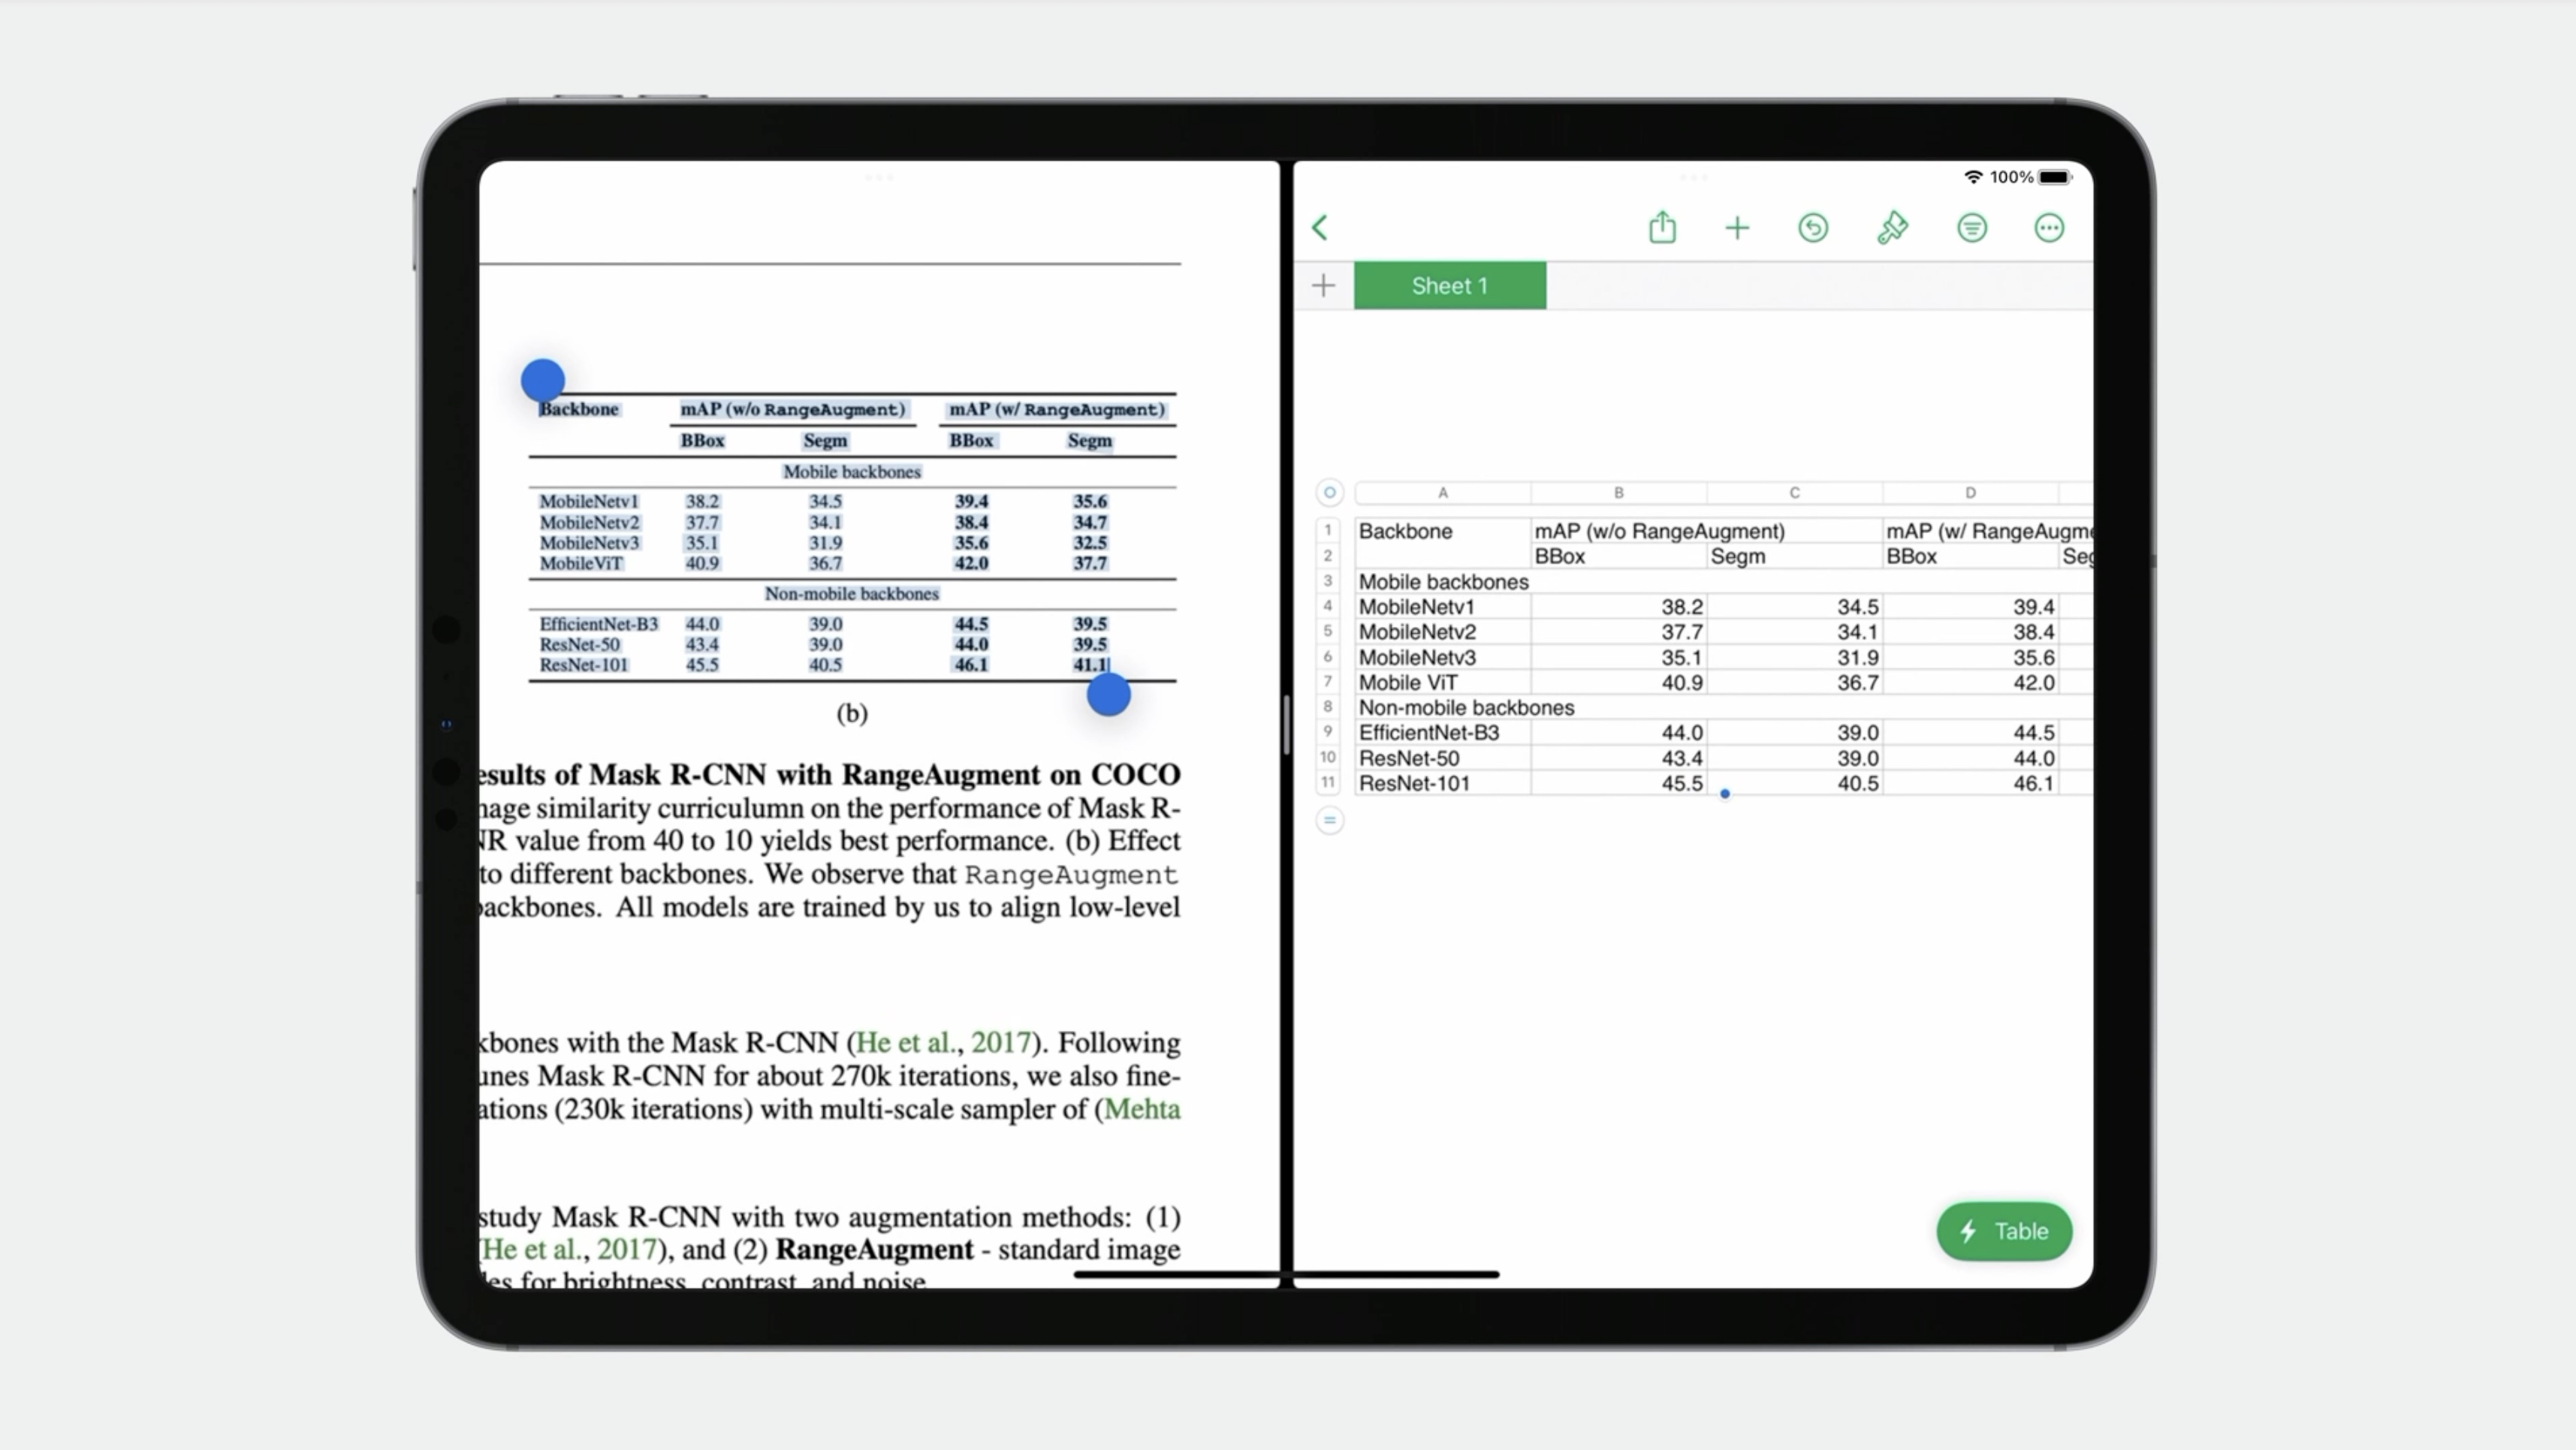
Live Text includes enhancements for document structure detection as well this year. As an example, in iOS 16 Live Text supported list detection. This allows you to easily copy and paste a list into an app that understands lists, such as Notes, and the list formatting will be maintained.
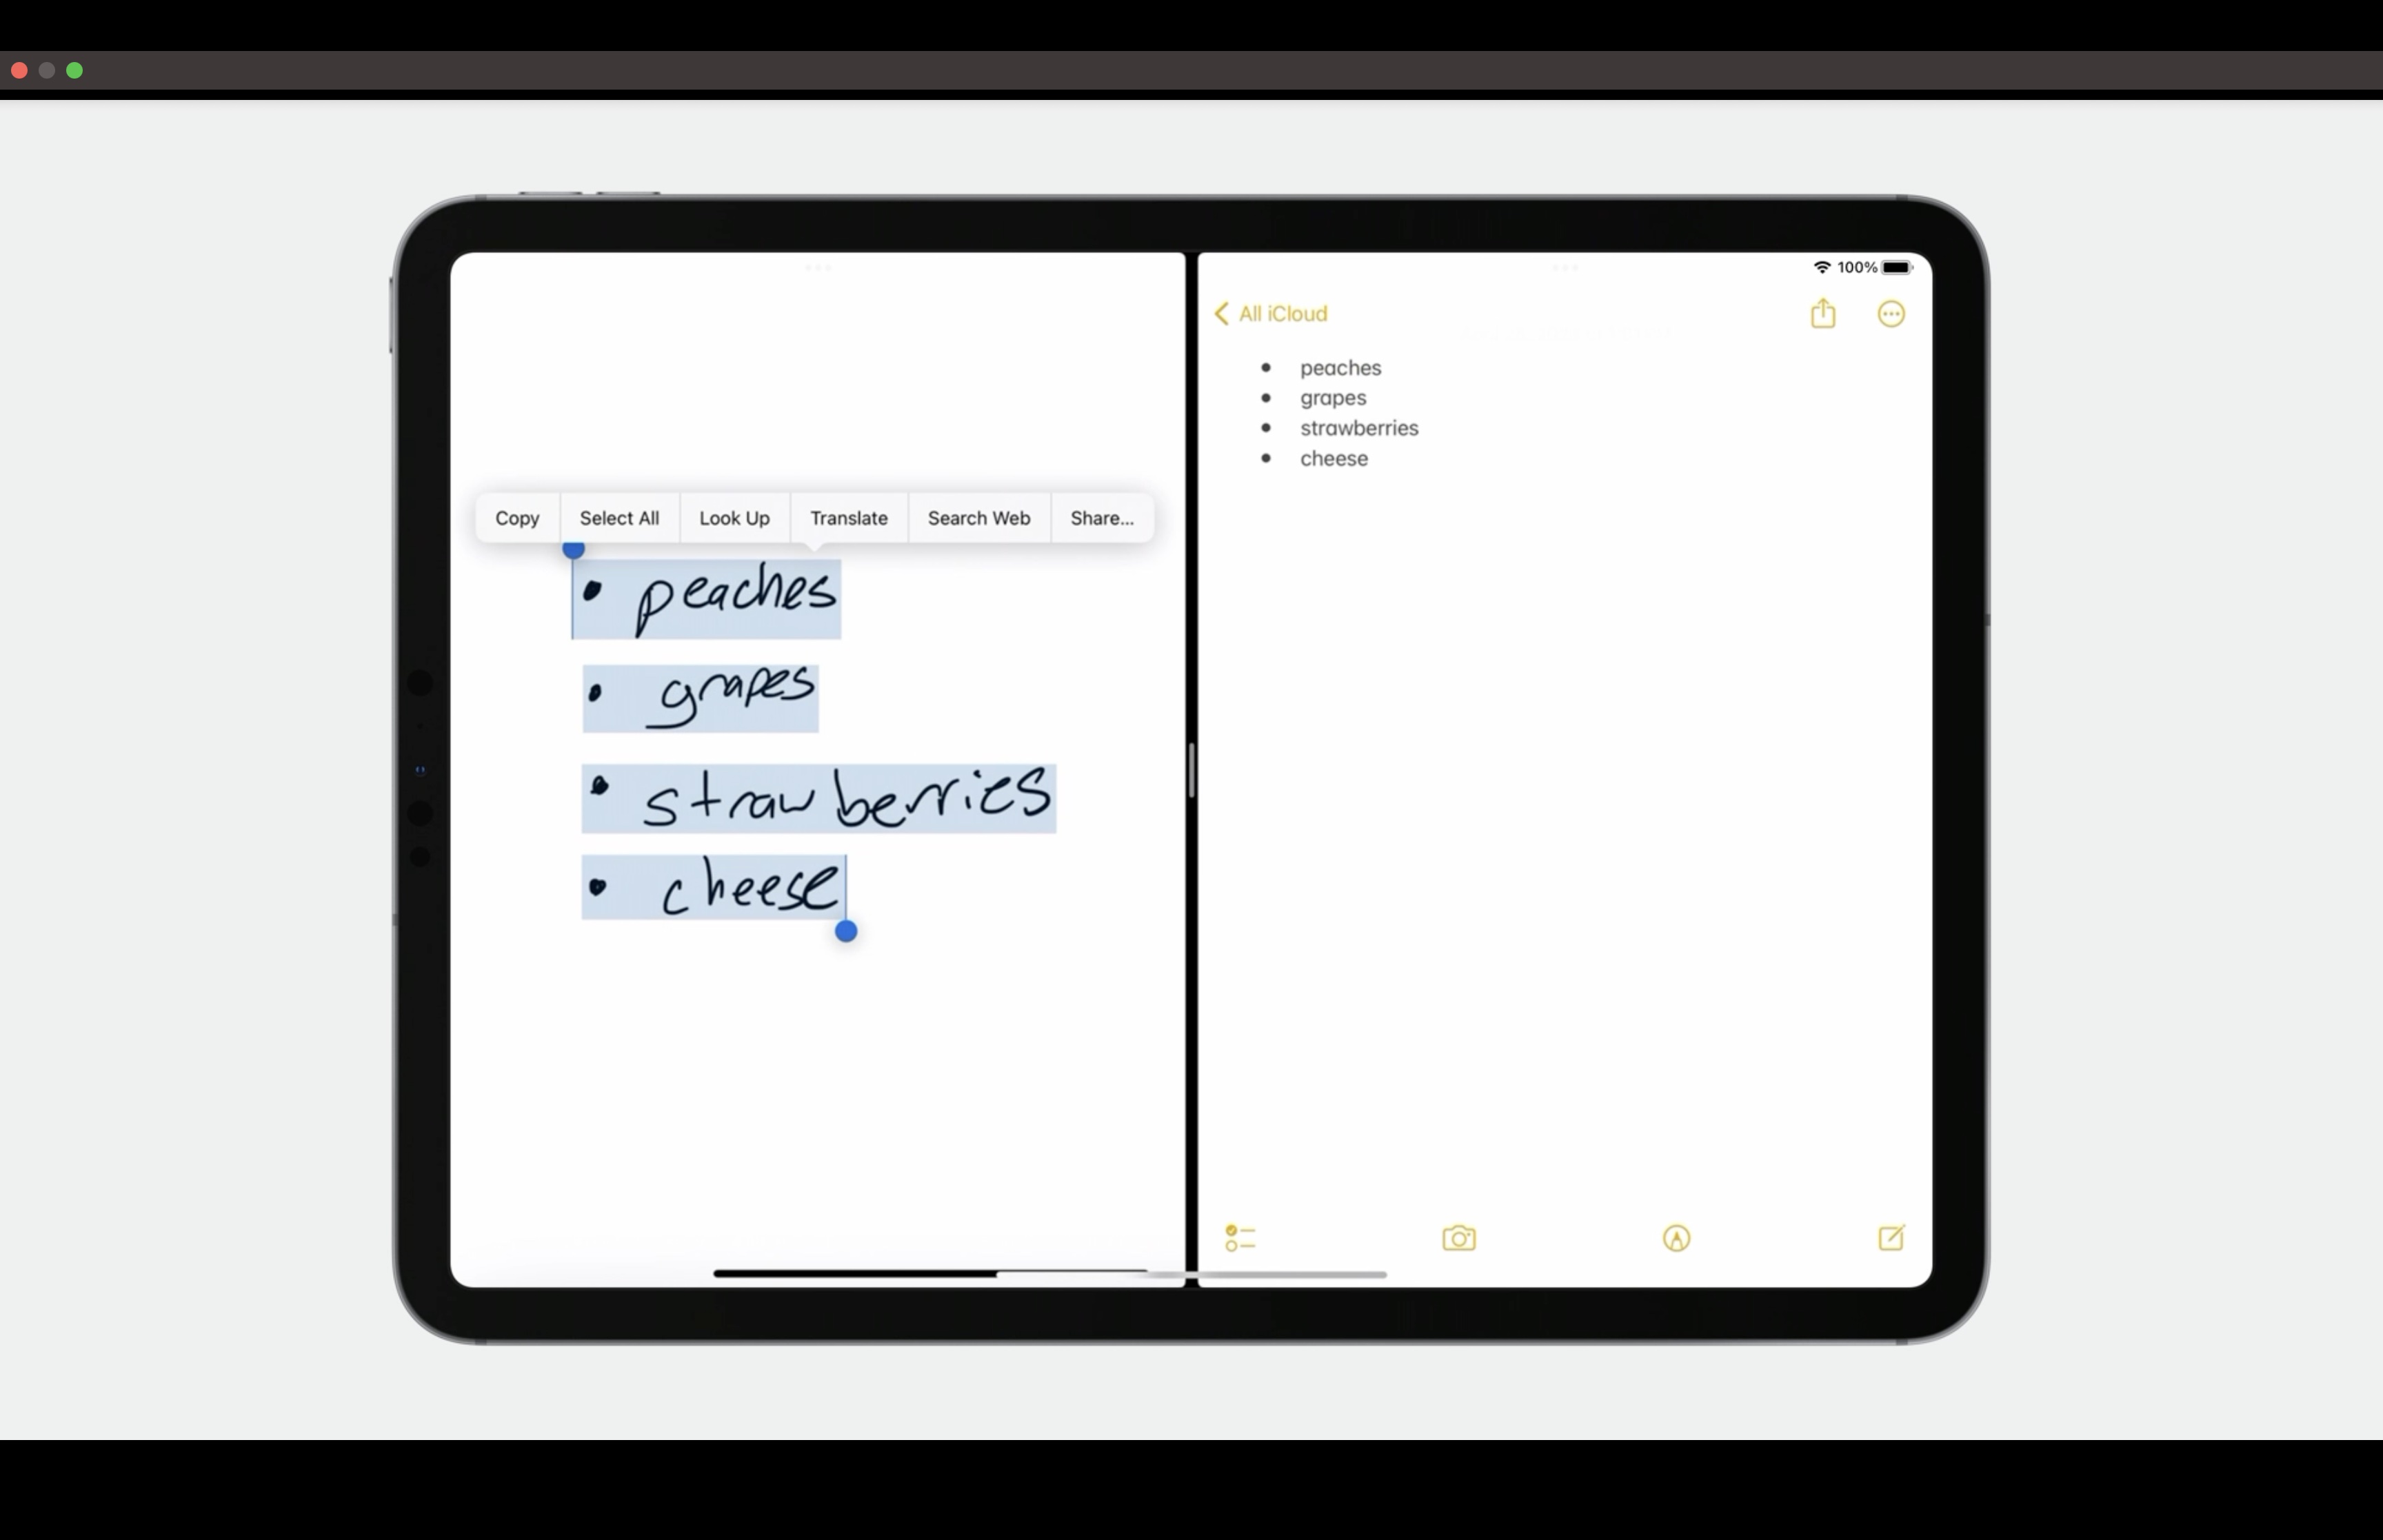
Live Text handles several list styles, such as numbers or bullets.
And now, Live Text is offering the same support for Tables, making it far easier to get structured table data from an image into applications like Notes or Numbers. Now I can select, copy, and paste this table into Numbers, and the structure is maintained. Notice how it merges cells automatically if necessary.
Context Aware Data Detectors
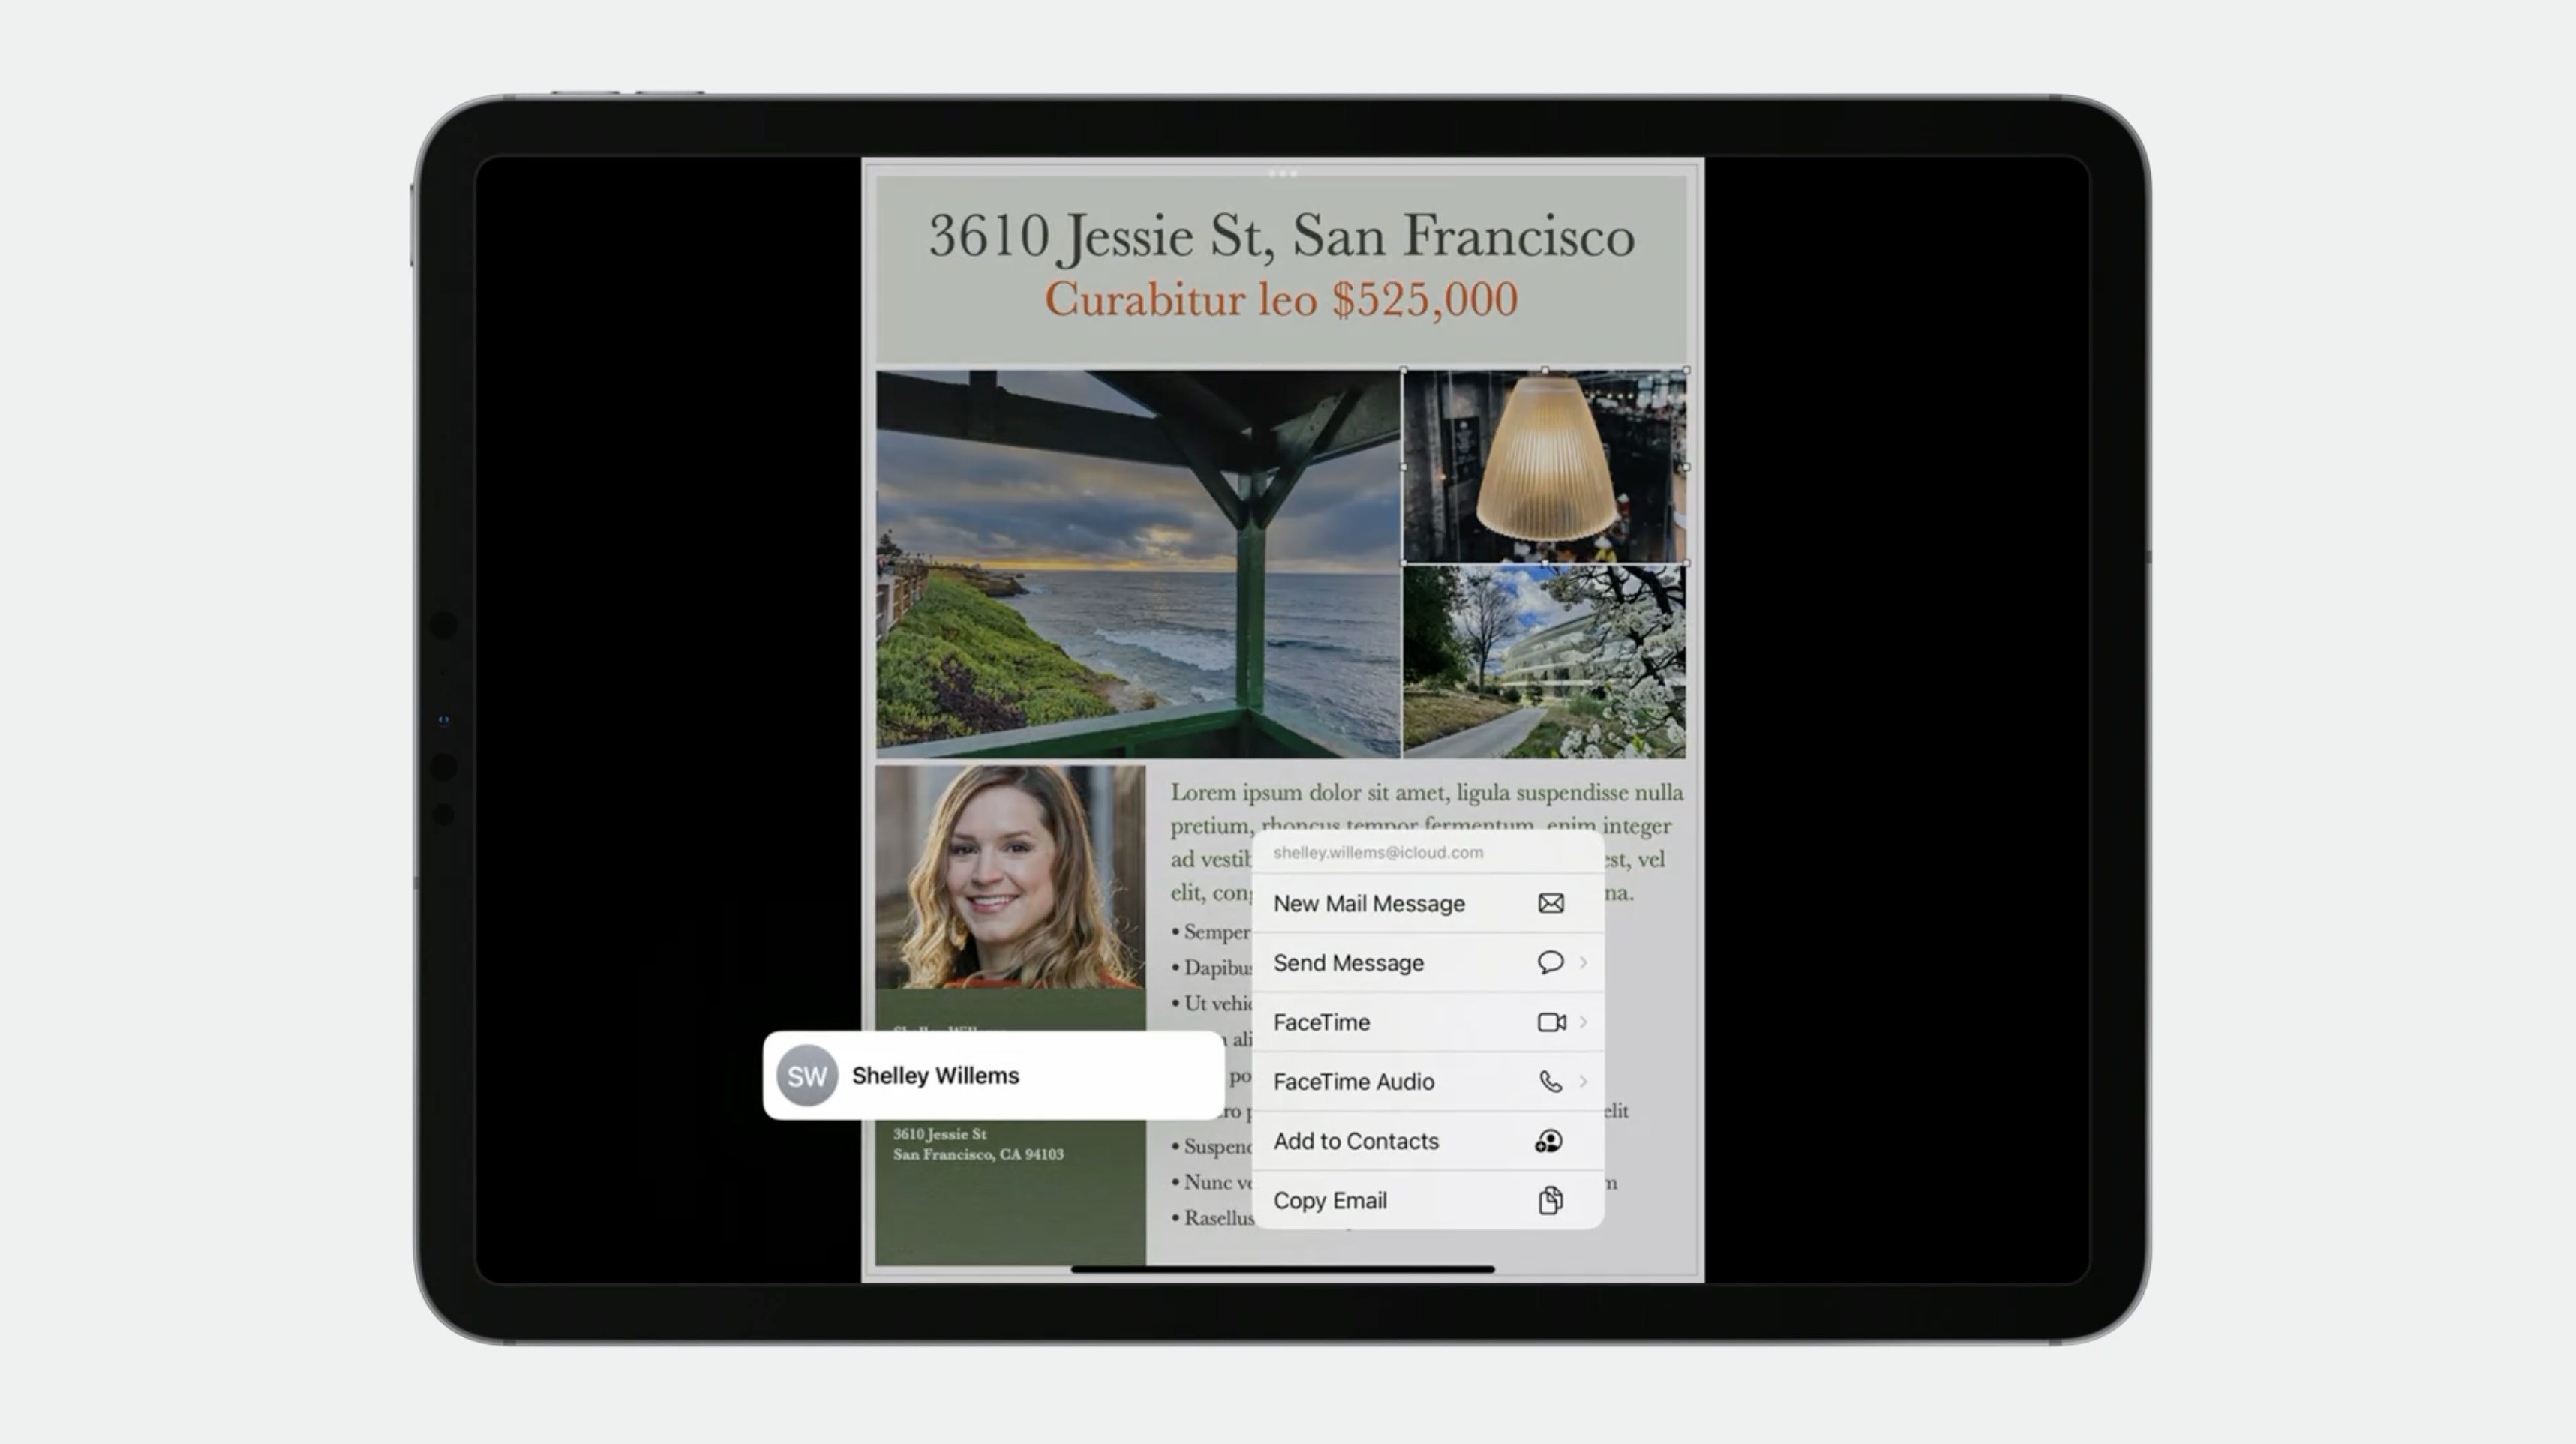
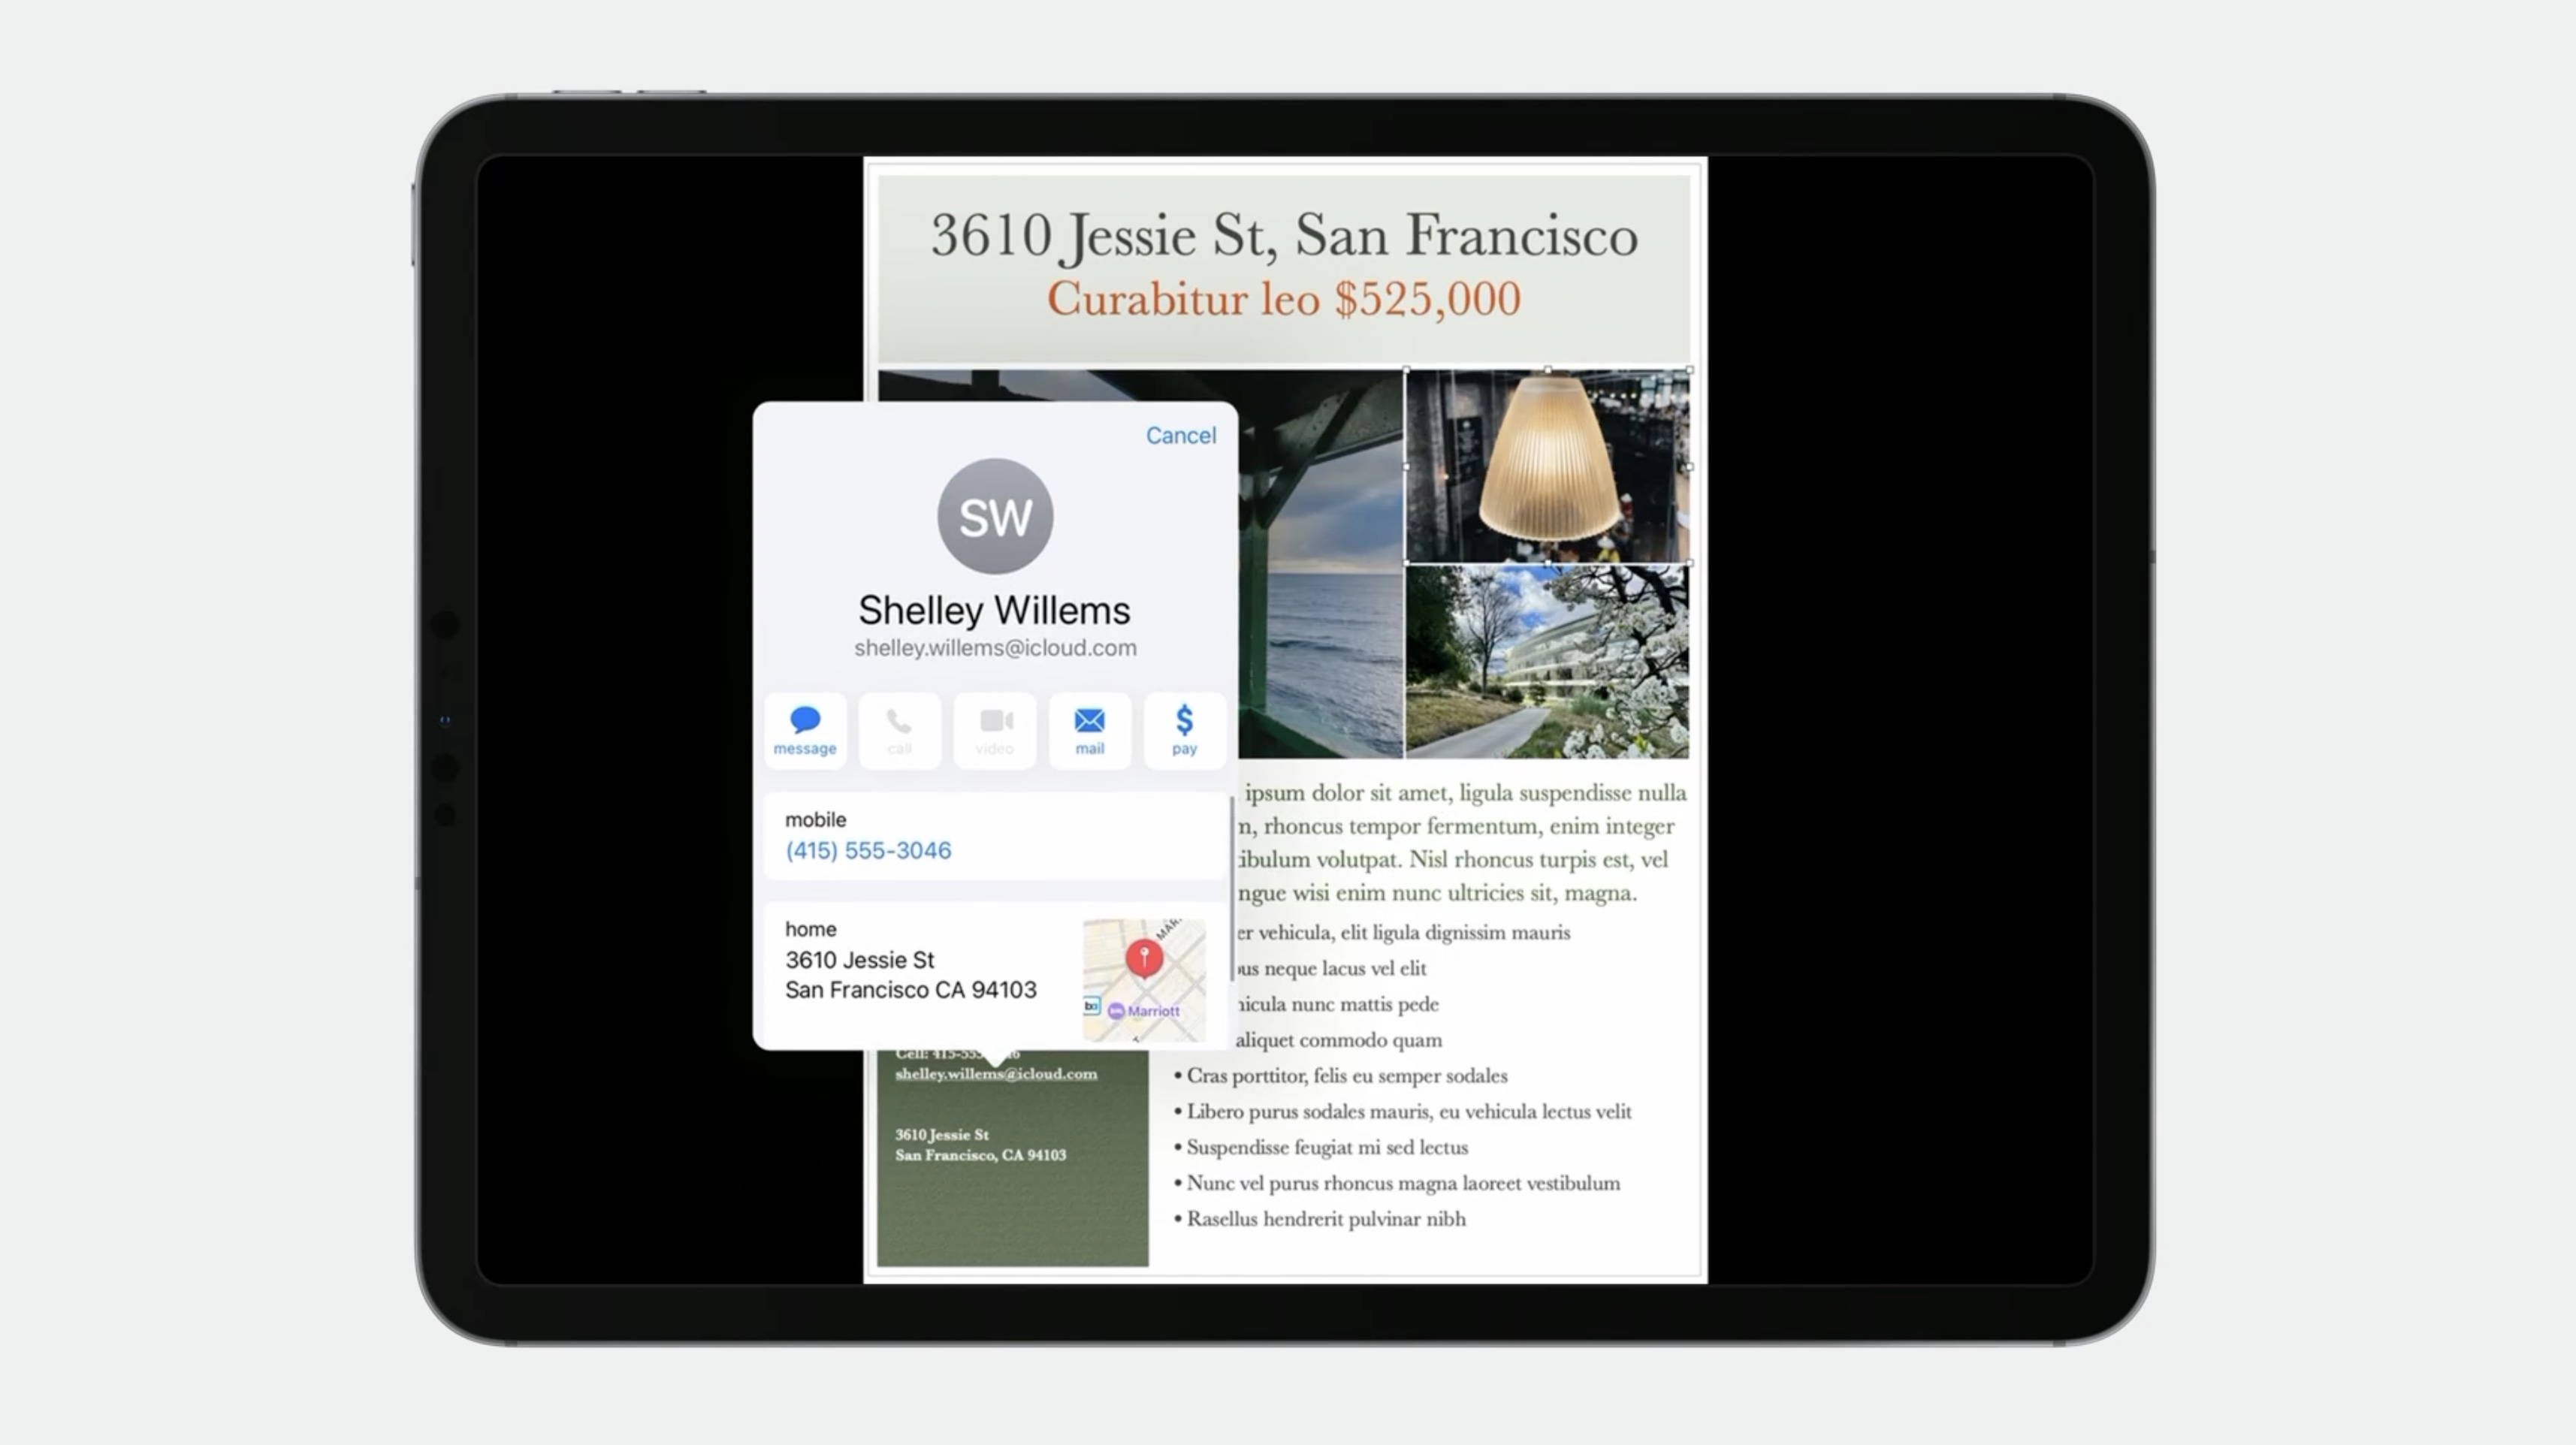
We are also adding Context Aware Data Detectors in Live Text. For this feature, data detectors and their visual relationships are used when adding contacts. Notice how when I add this contact from an email address, additional information from surrounding data detectors are now included, allowing me to easily add all this information at once. Adding a contact from a business card or flyer has never been easier.
In addition to these great features you are also getting for free, VisionKit also has some new APIs specifically for text. Last year, you could get the entire text contents by accessing the transcript property on the image analysis.
ImageAnalysis
    .transcript
You now have full access to plain and attributed text, selected ranges, and easy access to selected text. There is also a new delegate method so you can be aware when the text selection changes and update your UI as appropriate.
ImageAnalysisInteraction
    .text
    .selectedText
    .selectedRanges
    .selectedAttributedText

ImageAnalysisInteractionDelegate
    textSelectionDidChange(_ interaction: ImageAnalysisInteraction)
It is now easy to add features that rely on what the user has selected. For example, using the menu builder API, you could insert a menu item that creates a reminder based on the current text selection.
override func buildMenu(with builder: UIMenuBuilder) {

    let text = interaction.selectedText
    if text.length > 0, builder.system == UIMenuSystem.context {
        let command = UICommand(title:"Create Reminder", action:
                                    #selector(handleCreateReminder))
        let menu = UIMenu(options: .displayInline, children: [command])
        builder.insertSibling(menu, afterMenu: .share)
    }

    super.buildMenu(with: builder)
}
@obic func handleCreateReminder() {
    createReminder(interaction.selectedText)
}
Start in the view controller that owns your image analysis interaction. First grab the selected text, and ensure it isn't empty. Then create a command that calls our handler when chosen, Now create a menu object that holds the command. And finally, insert that menu as a sibling after the share menu option. Now you have a custom menu alongside system items like copy and share.
Expanded platform support
And this year, it's all about the Mac. We are rolling out Catalyst support to easily bring Live Text from your iOS apps over to the Mac. And if you're new to the native macOS API and the ImageAnalysisOverlayView, stay tuned, because I'm going to go over some specifics, as well as some tips on adopting them.
Finally, I am going to talk about a new system for menus, offering simple and seamless integration of VisionKit into your contextual menus.
Catalyst
Catalyst adoption is very straightforward. It should be a simple recompile to get the image analysis interaction working in Catalyst. We support, Live Text, Subject Lifting and Visual Look Up, but unfortunately QR code support is unavailable in either the Catalyst environment or native macOS API for VisionKit. However, I wanted to let you know that if you have a shared implementation, leaving the .machineReadableCodes in your analyzer configuration for Catalyst is perfectly safe, and just becomes a no-op. Also, please note that QR detection support is available in the Vision Framework if you need this functionality on the Mac.
Please see also: Extract document data using Vision - WWDC21
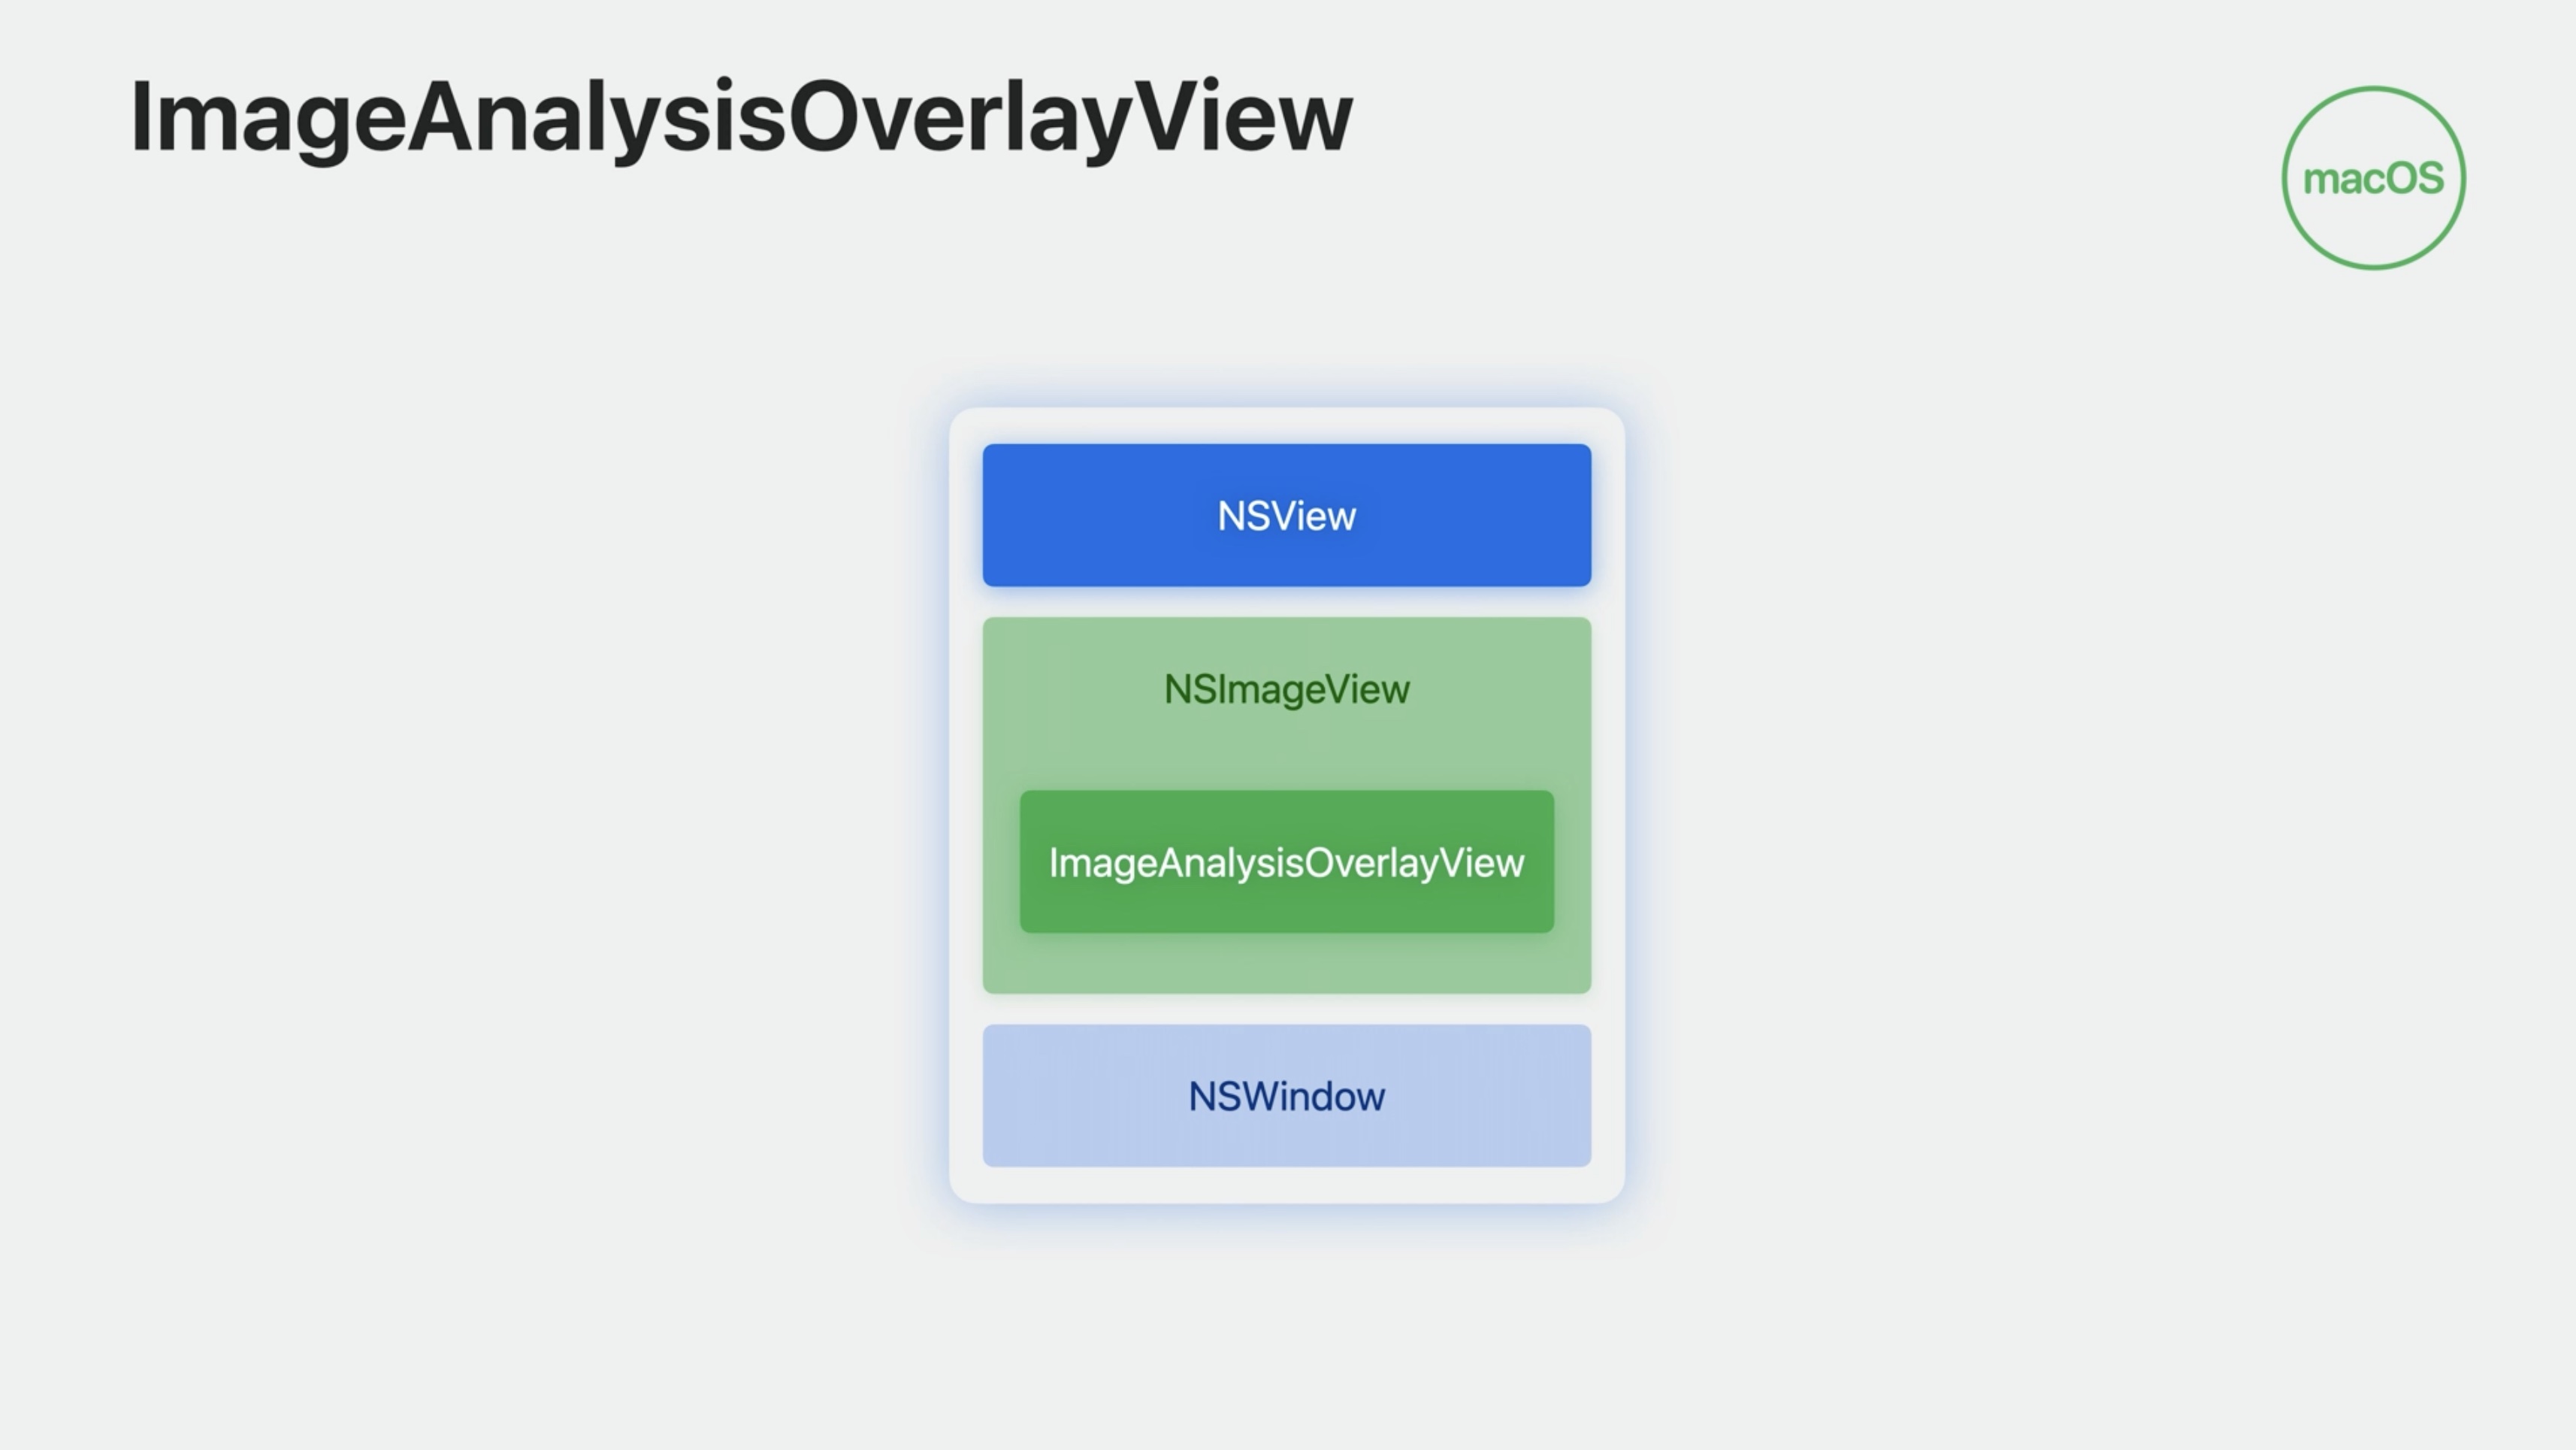
The native macOS API
As with iOS, there are two major classes you need to be aware of when adopting VisionKit: - The ImageAnalyzer - The ImageAnalysisOverlayView.
First, the easy part. The Image Analyzer and analysis process for the Mac is identical to iOS. With the exception of machine readable codes being a no-op, as I mentioned earlier, everything is the same and is used in the same way. The main difference between the iOS ImageAnalysisInteraction, and macOS's ImageAnalysisOverlayView is how the interaction is added to your application.
For iOS, the ImageAnalysisInteraction is a UIInteraction that is added to a view, already existing in your apps view hierarchy.
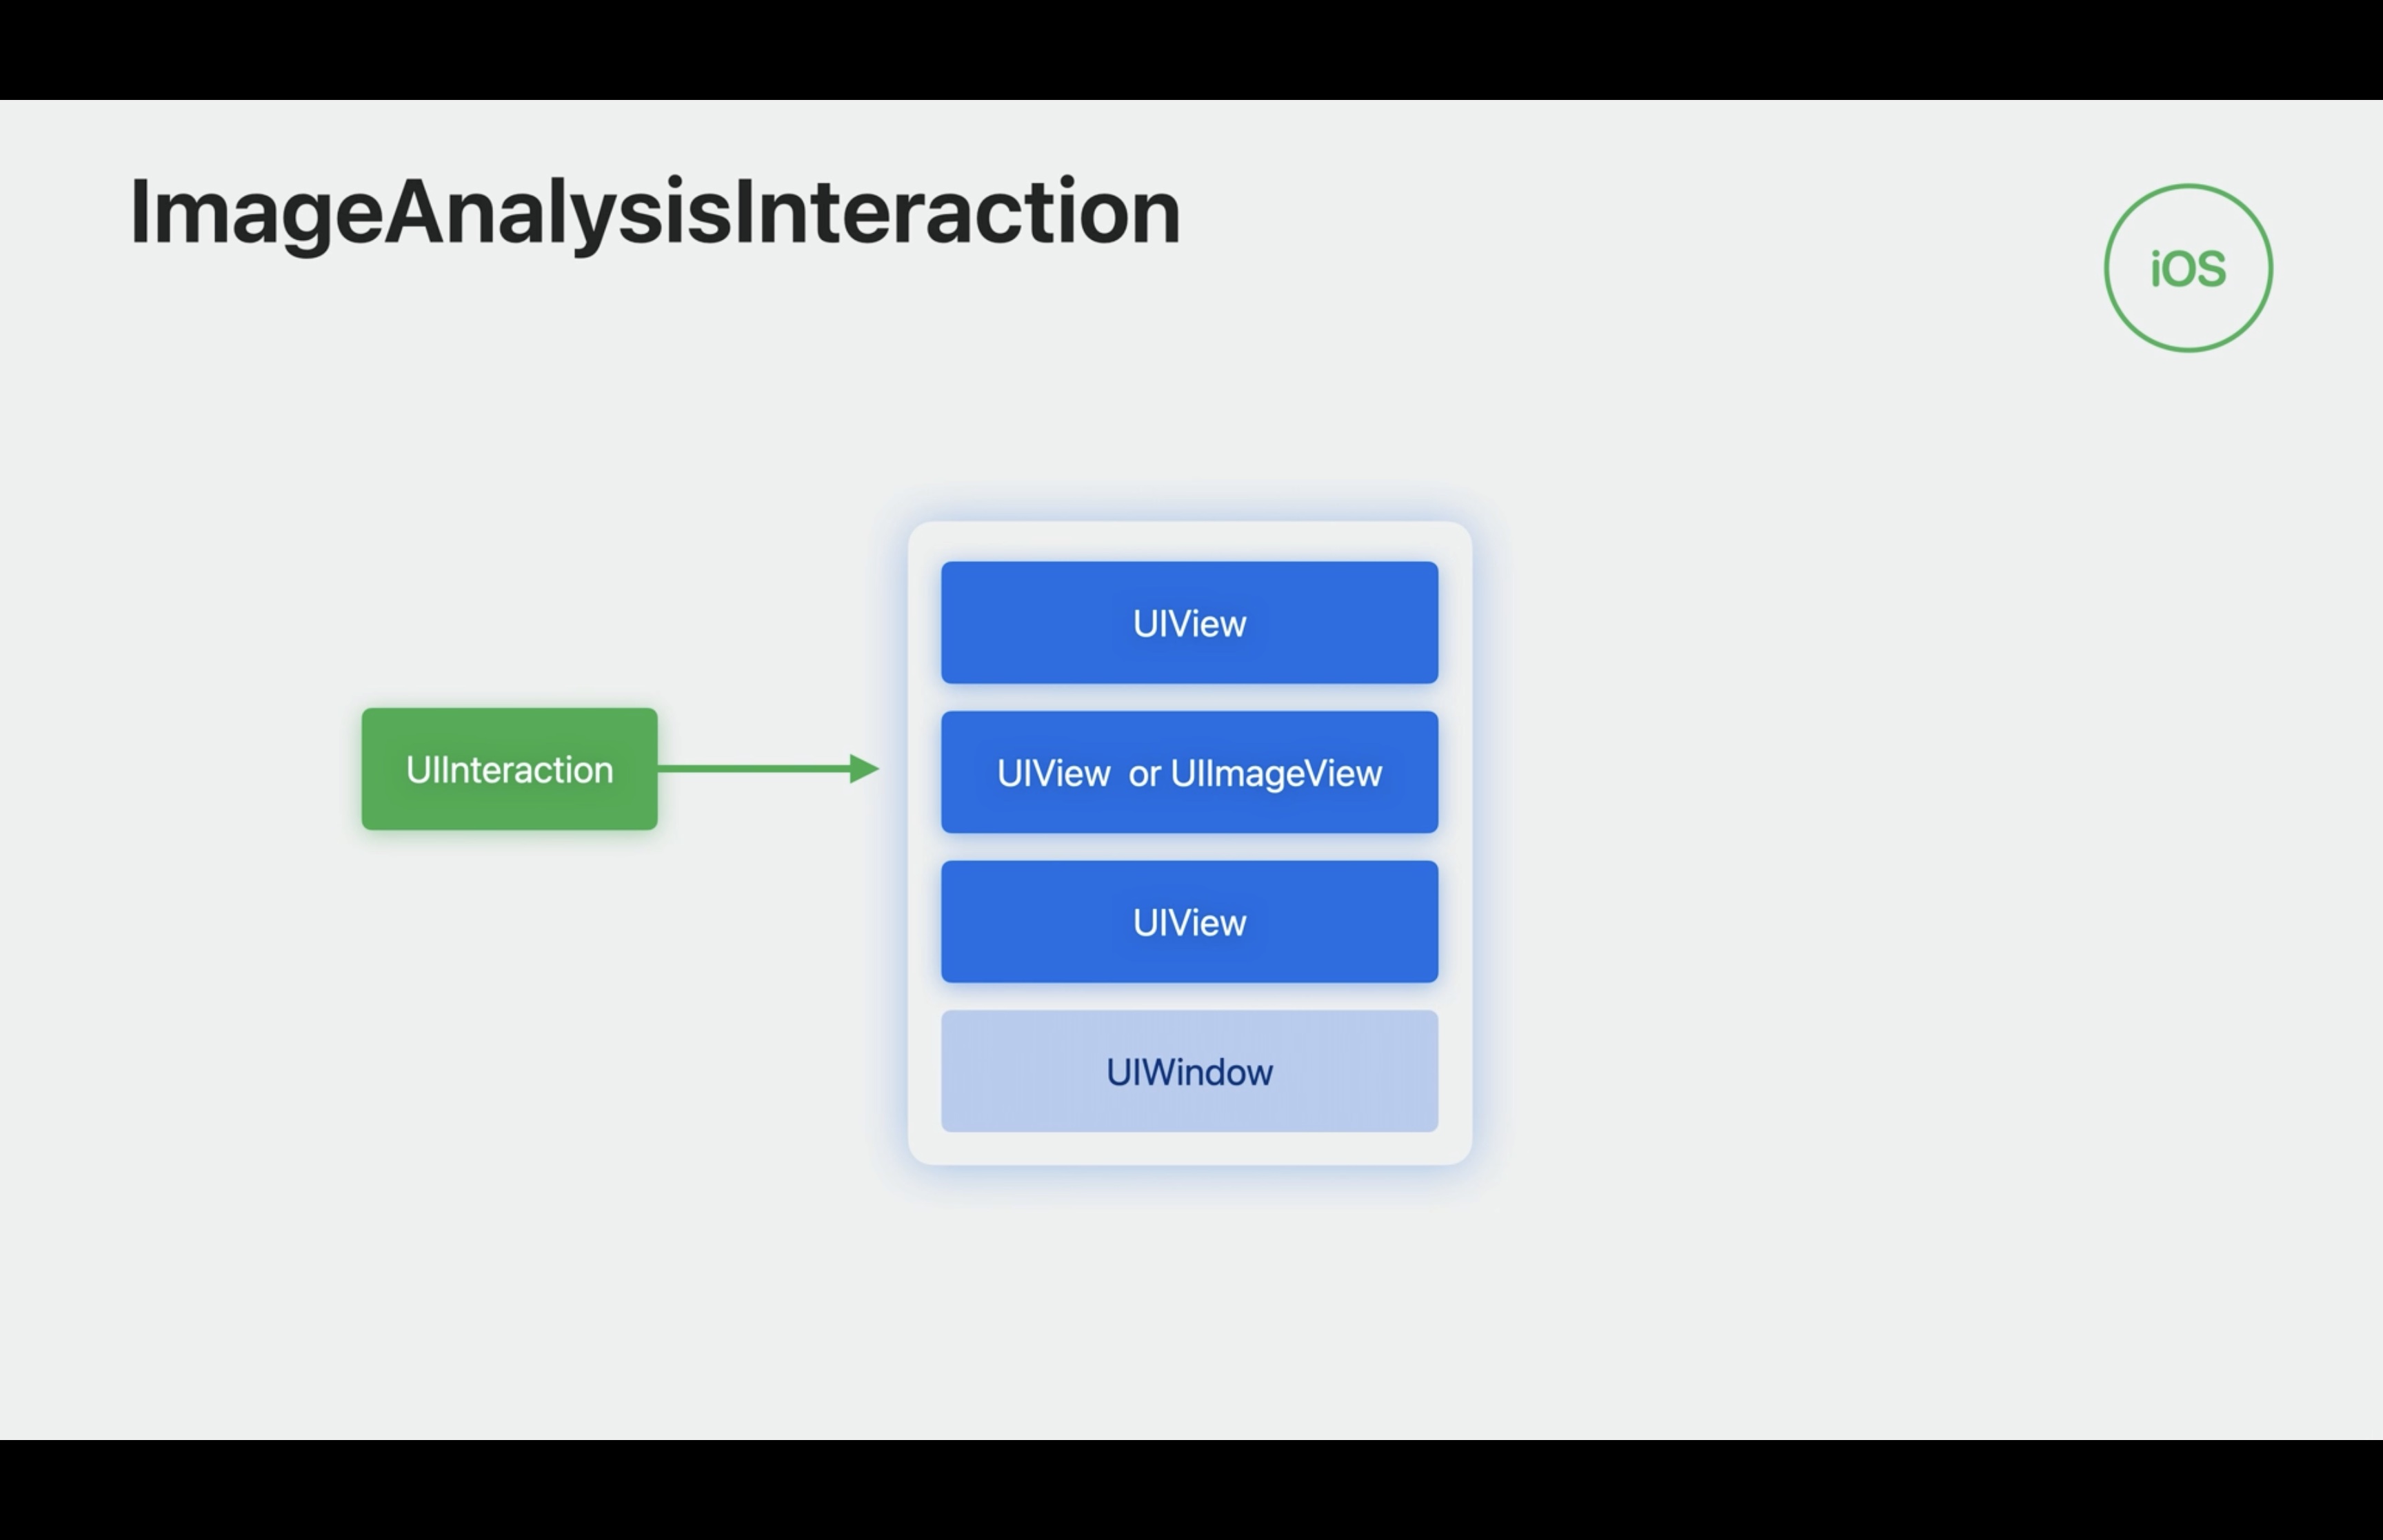
But UIInteraction does not exist on the Mac. So what do you do? In this case, as the name suggests, the ImageAnalysisOverlayView is a subclass of NSView. I simply need to add the overlay view in my view hierarchy above my image content.
The simplest way is to add it as a sub view of my content view. Any way you choose is perfectly fine, but I've found adding it as a subView is generally simpler, and easier to manage as you don't have to handle repositioning the overlay view when the contents view position changes.
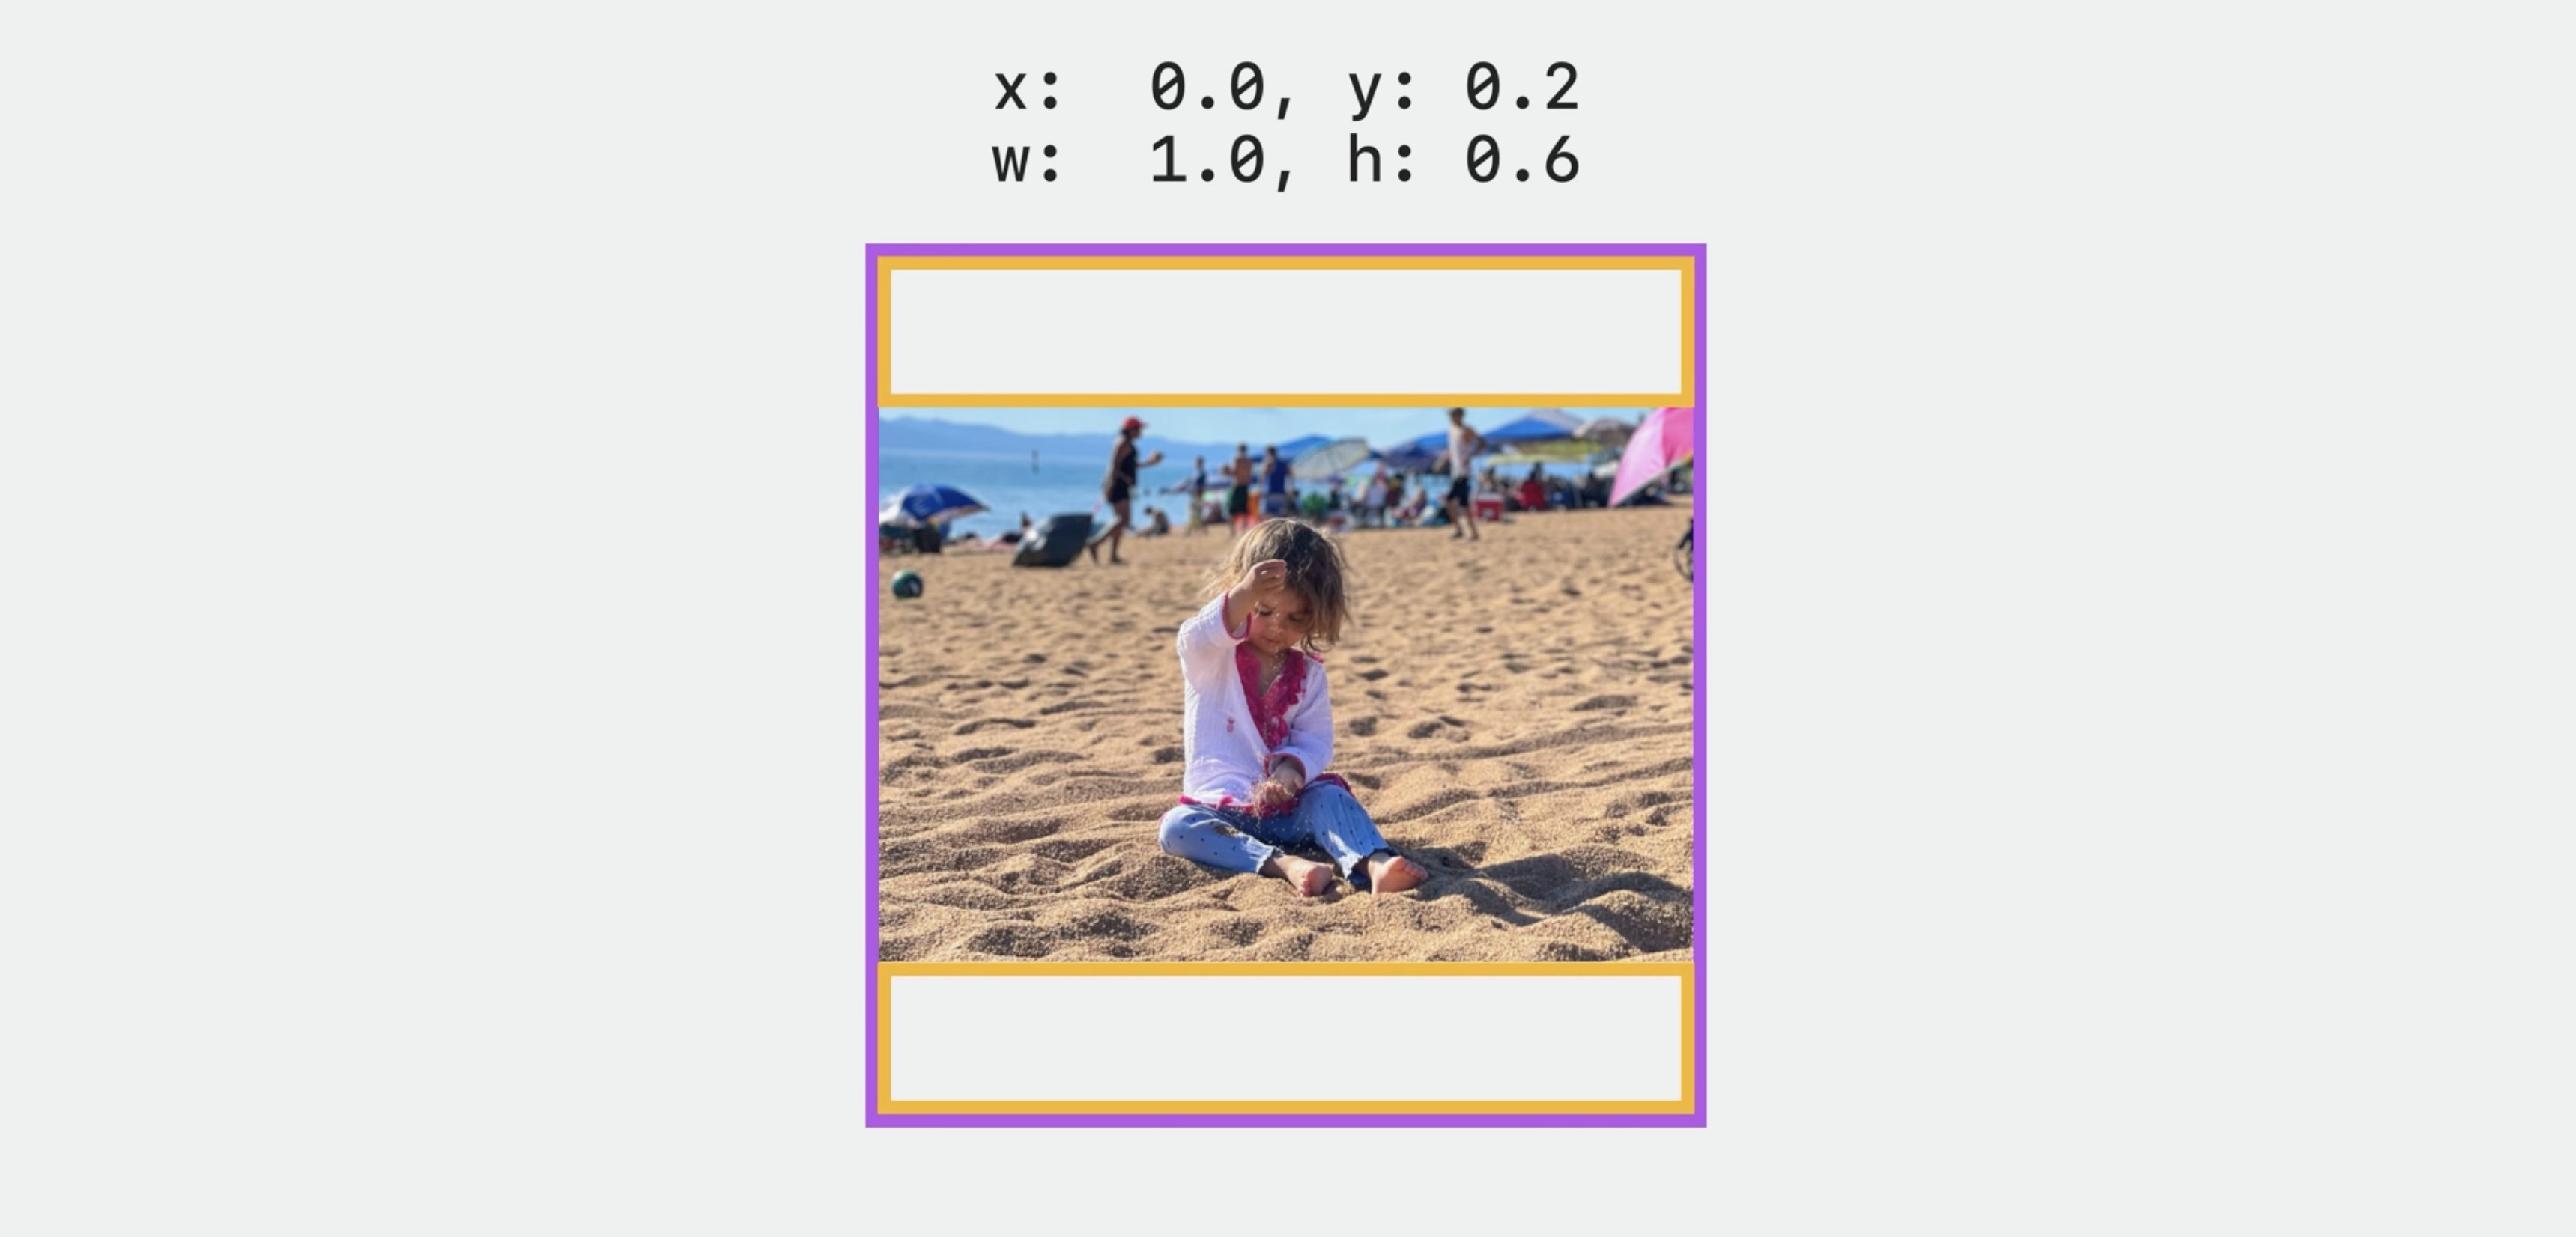
Contents rect
Since the OverlayView doesn't host or render your content, it needs to know exactly where the content exists in relation to its bounds. This is described by the contentsRect, which is in unit coordinate space with the origin at the top left.
Since the overlay view is placed directly over the imageView, they have same bounds. I'll show the bounds with this rectangle. And I'll also add its matching contents rect. Easiest case is if the content matches the bounds. Here it's simply the unit rectangle.

Now, here is an aspect fit.
Notice this portion of the imageView now has no content underneath it. And is reflected in the contents rect.
And here is an aspect fill. This portion of the image is no longer visible to the user, Notice how the contents rect changes here.

Just as with UIImageView on iOS, if you are using NSImageView, you can simply set the trackingImageView property on the overlay view, and it will calculate all of this for you automatically.
override func viewDidLoad() {

    super.viewDidLoad()
    overlayView = ImageAnalysisOverlayView(frame: imageView.bounds)
    overlayView.autoresizingMask = [.width, .height]
    overlayView.delegate = self;

    imageView.addSubview(overlayView)
    overlay.trackingImageView = imageView
}
If you are not using NSImageView, no worries. You can provide the contents rect by implementing the delegate method contentsRect(for overlayView:)
The overlay view will ask for this during layout when its bounds change. However, you can manually request this be updated by calling setContentsRectNeedsUpdate on the overlayView.
func contentsRect(for overlayView: ImageAnalysisOverlayView) -> CGRect {
    return calculateOverlayContentsRect()
}

setContentsRectNeedsUpdate()
Contextual menus
Contextual menus are a huge part of the Mac experience. Now Its now easy to add VisionKit provided functionality directly into your menus, for features such as Live Text, Look Up, and Subject Lifting, and more. One question you may have is, why? Let's examine the macOS Photos app. If I were to right click on the text for this iconic road sign, I would just be presented with only the VisionKit text menu.
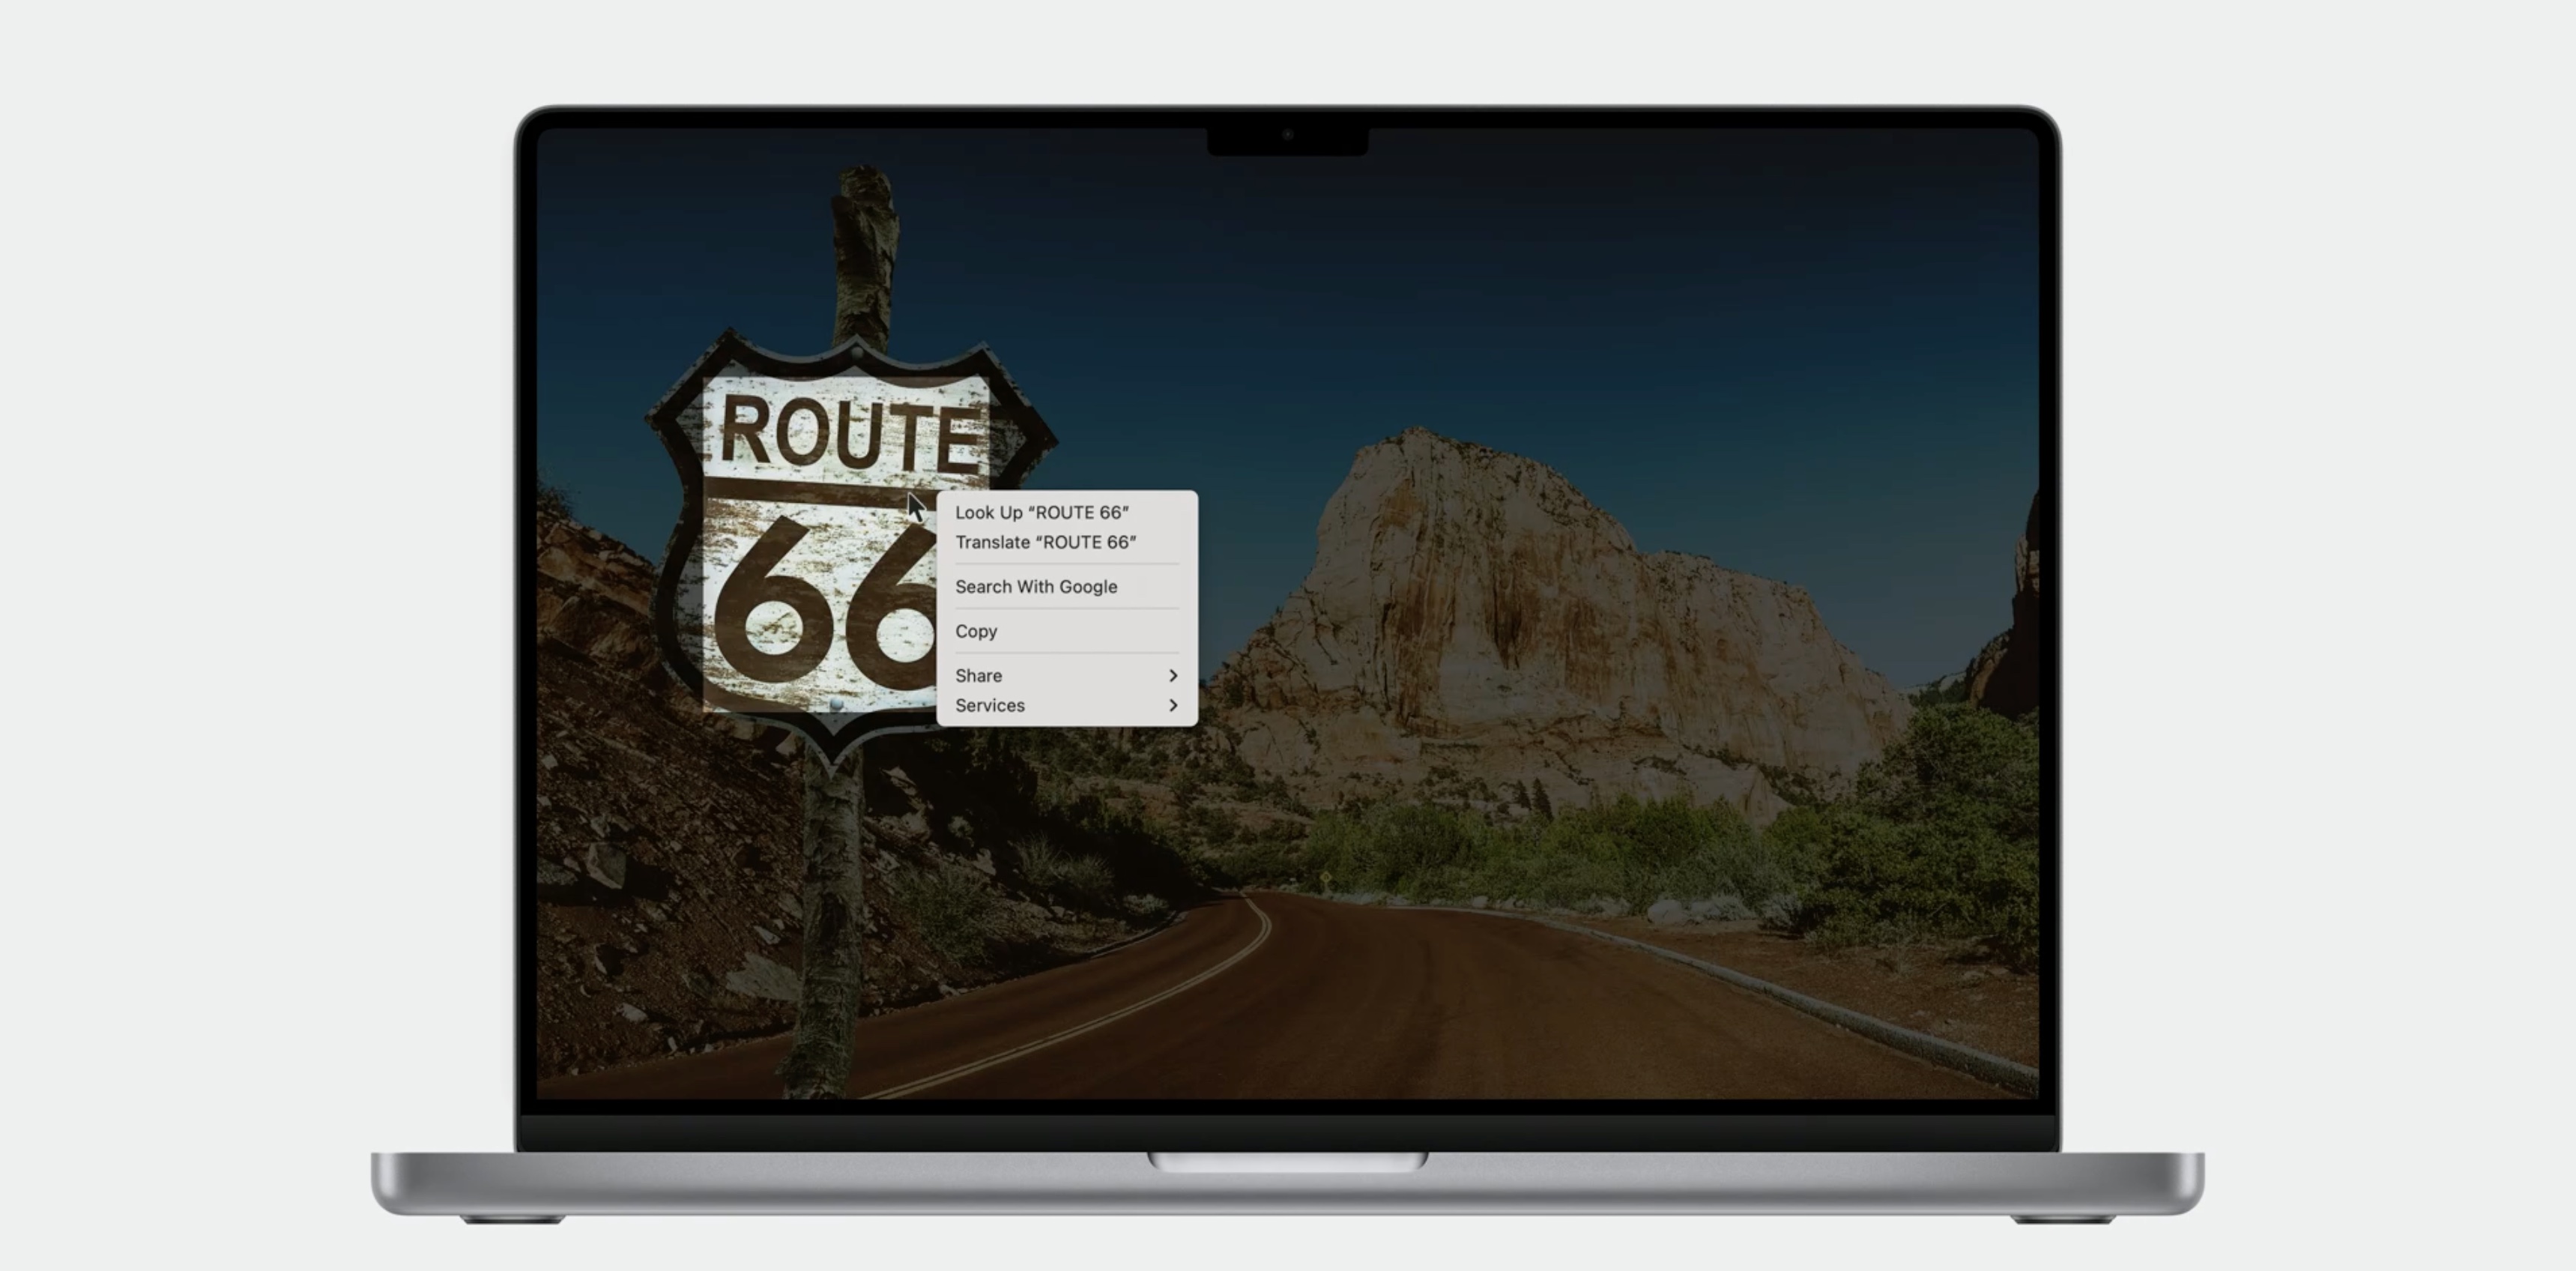
If it were not over text, I would be offered the app menu instead, without any text items. This is not ideal. Now in macOS Sonoma, items can be combined into the same menu. You can easily get to both text and image functionality, no matter where the menu event was initiated.
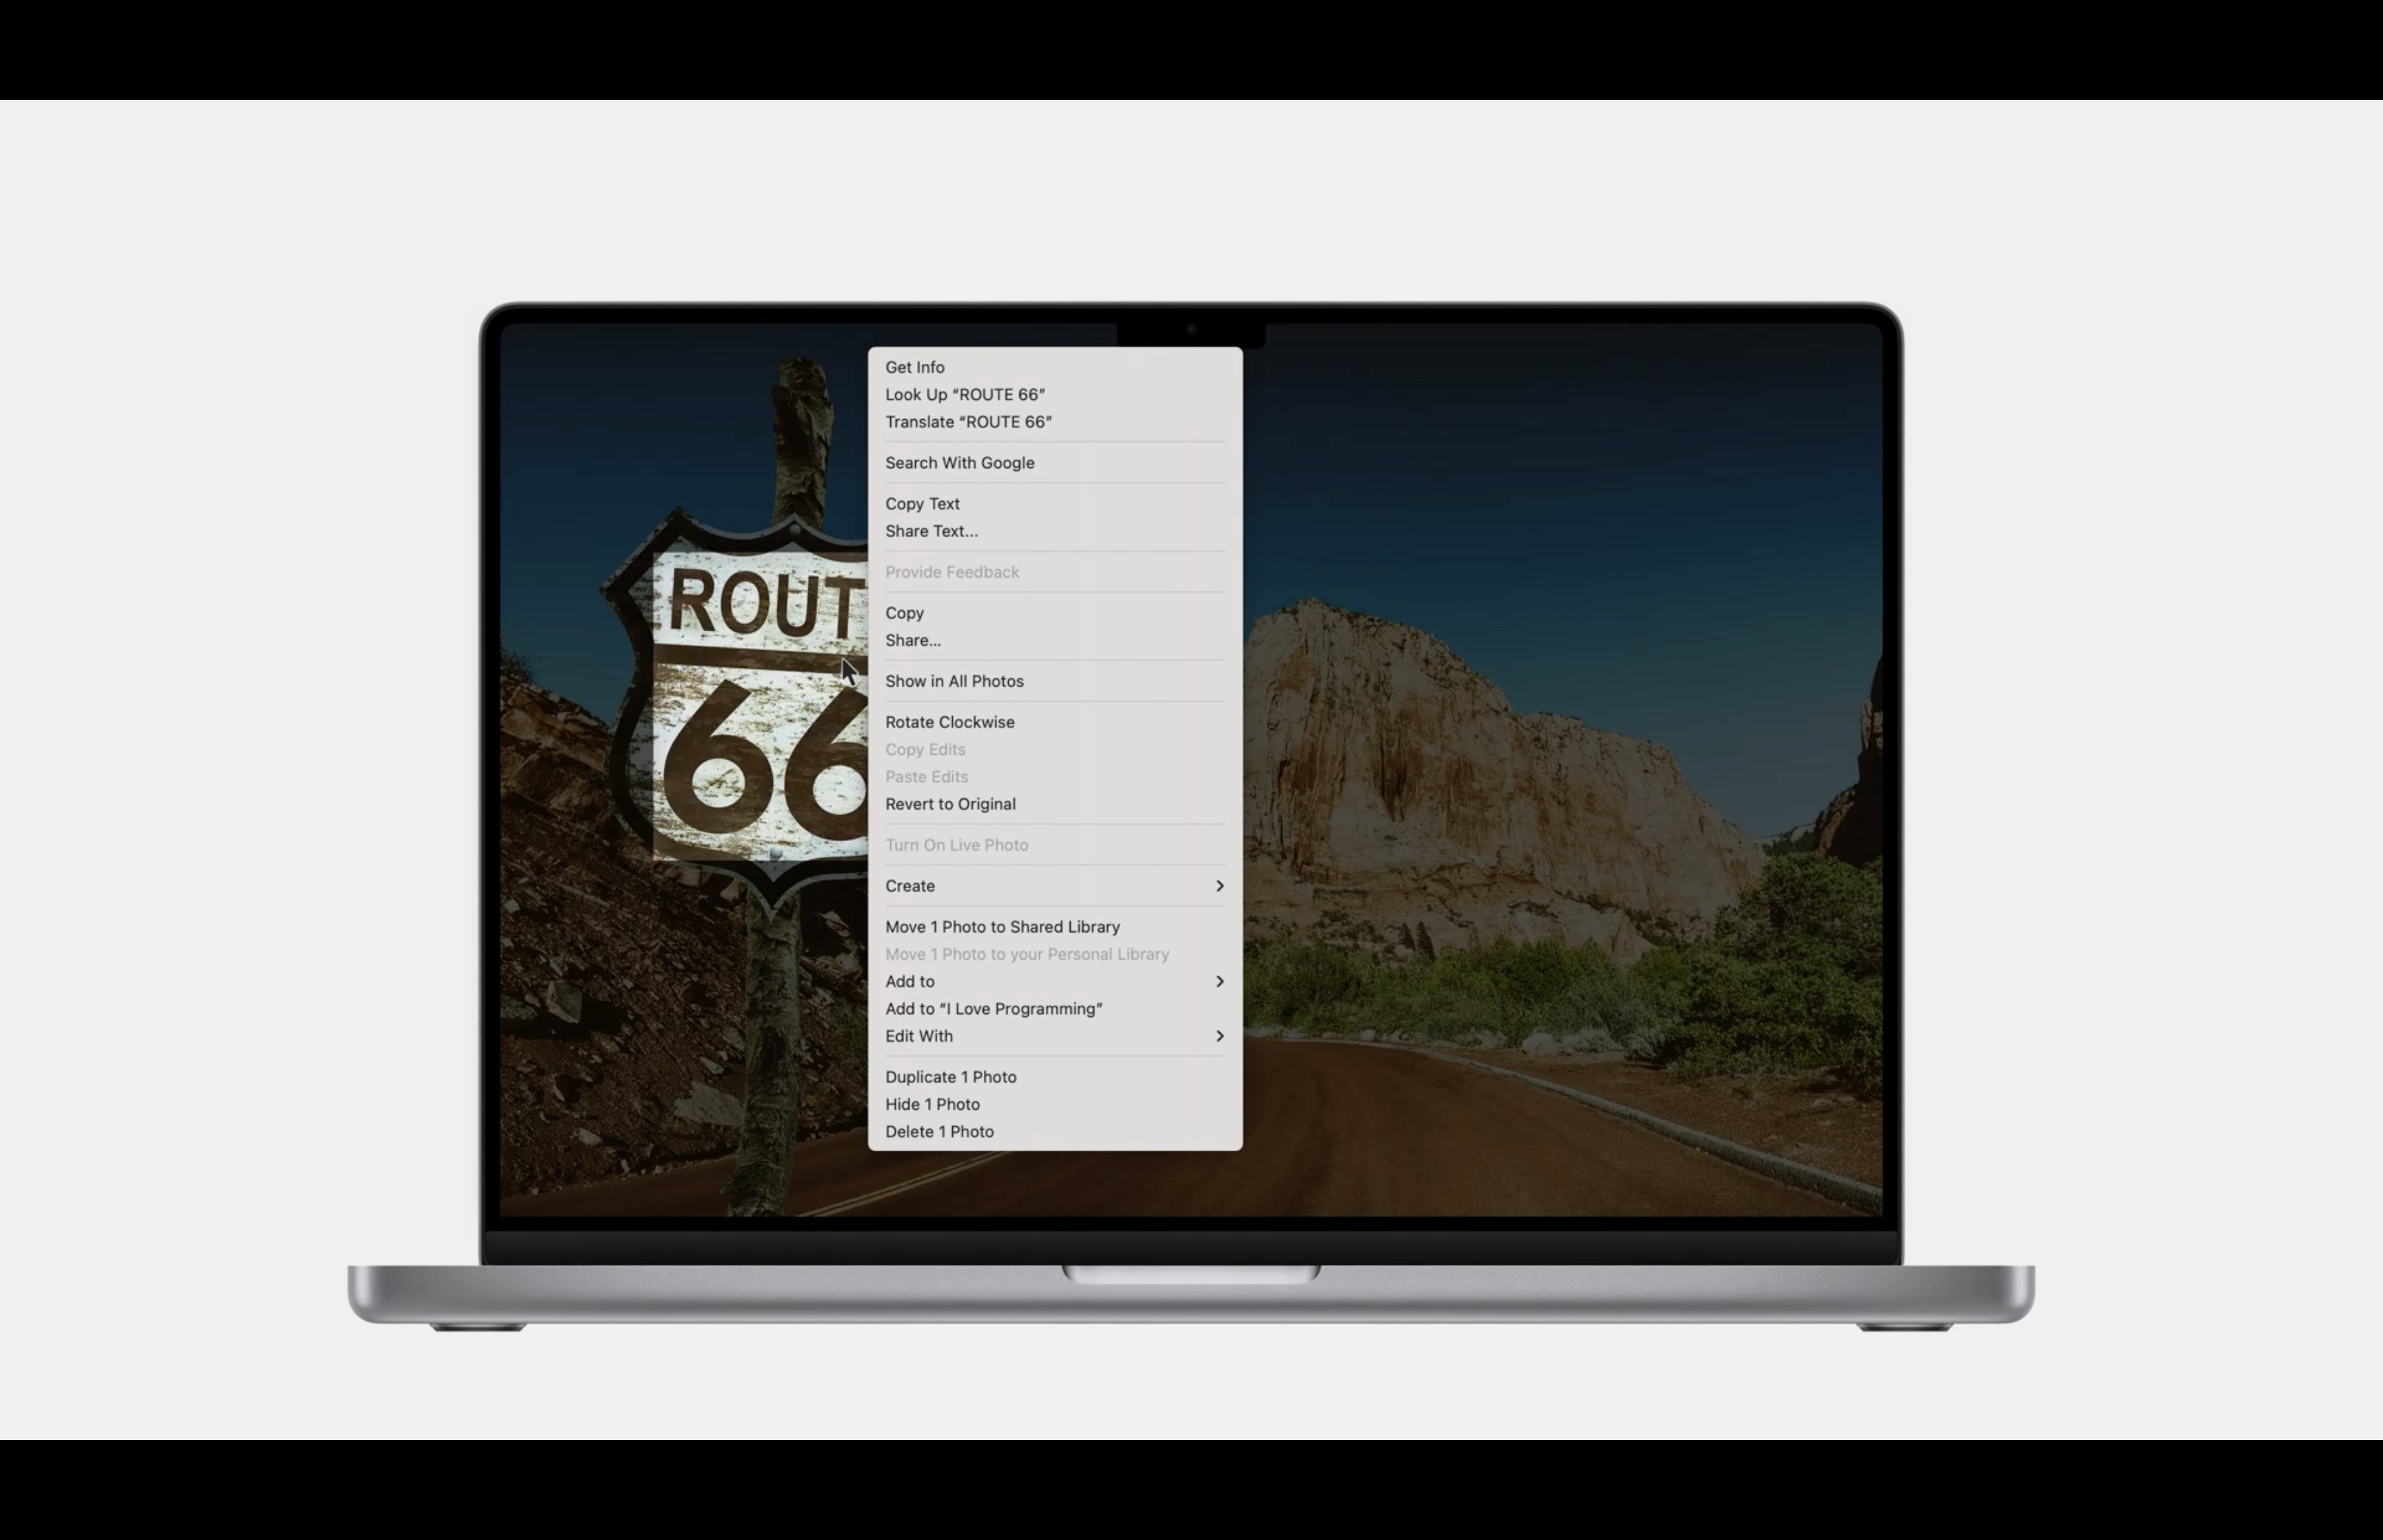
This is a far better experience for the user, and is simple to implement. Let's explore how this can be accomplished in your own app. You now have a new delegate method available, overlayview:updatedmenu:forevent:atpoint.
func overlayView(
    _ overlayView: ImageAnalysisOverlayView,
    updatedMenuFor menu: NSMenu,
    for event: NSEvent,
    at point: CGPoint
    ) -> NSMenu { return menu }
The arguments include the event that triggered the menu, and the point in the overlay view bounds coordinate space, so you can create any menus you need. From there, you simply need to return the menu that you would like to display. The default implementation returns the VisionKit menu. However, you may wish to add your own items to that menu, or take items from that menu and add it to yours.
Menu Tags
VisionKit menu items are identified by tags, and there is a struct available that contains these tags. We have several items available for copying and sharing the image and subjects, and one for Look Up. We also have a special item you can use to find the suggested index to add items to the VisionKit provided menu, but more on that later.
ImageAnalysisOverlayView.MenuTag
    .copyImage
    .shareImage
    .copySubject
    .shareSubject
    .lookupItem
    .recommendedAppItems
Here are some examples of how this is used. If I had an existing menu and all I were interested in was adding the copySubject item, it could be easily added like this. First, get your apps menu. Then get the item you are interested in. In this case, copySubject. And insert it in your menu. Now, it's important to remember that Items will only be available if they are actually valid. For example, if there's no subject interaction capable type present, the copySubject item will not be in the menu. Also, for system provided text items, they are included if applicable, but not all are identifiable by tag. You can even customize these items however you would wish. For example, I've changed the item from copy image to copy photo. And worry not about changing these properties. These items are re-created each time and you can change them however you'd like.
func overlayView(_ overlayView: ImageAnalysisOverlayView,
    updatedMenuFor menu: NSMenu,
    for event: NSEvent,
    at point: CGPoint) -> NSMenu {
        let myMenu = self.menu(for: event)
        if let item = menu.item(withTag: ImageAnalysisOverlayView.MenuTag.copySubject) {
                item.title = NSLocalizedString("Copy Photo",
                                "Copy Photo menu title")
                myMenu.insertItem(item, at: (someIndex))
            }
        return myMenu
    }
Now that I've covered adding items to your existing menu, I'm going to explore an example of how to add items to the VisionKit menu.
func overlayView(_ overlayView: ImageAnalysisOverlayView,
    updatedMenuFor menu: NSMenu,
    for event: NSEvent,
    at point: CGPoint) -> NSMenu {
        let recommendedIndex = menu.indexOfItem(withTag: .recommendedAppItems)
        menu. insertItem(myItem, at: recommendedIndex)
    return menu
}
As mentioned earlier, the overlayView will provide an item with a tag at the recommended index to insert your items called recommendedAppItems. You simply ask for the index of this item and insert your items at that index. Using this index is optional and not required. However, it is a good way to keep things consistent for your users.
You will notice that some of these menu items have special properties. For example, when the subject related menu item are highlighted, the area surrounding my cat KiKi here dims and the glow animation begins, indicating the subject to the user before it is copied or shared.
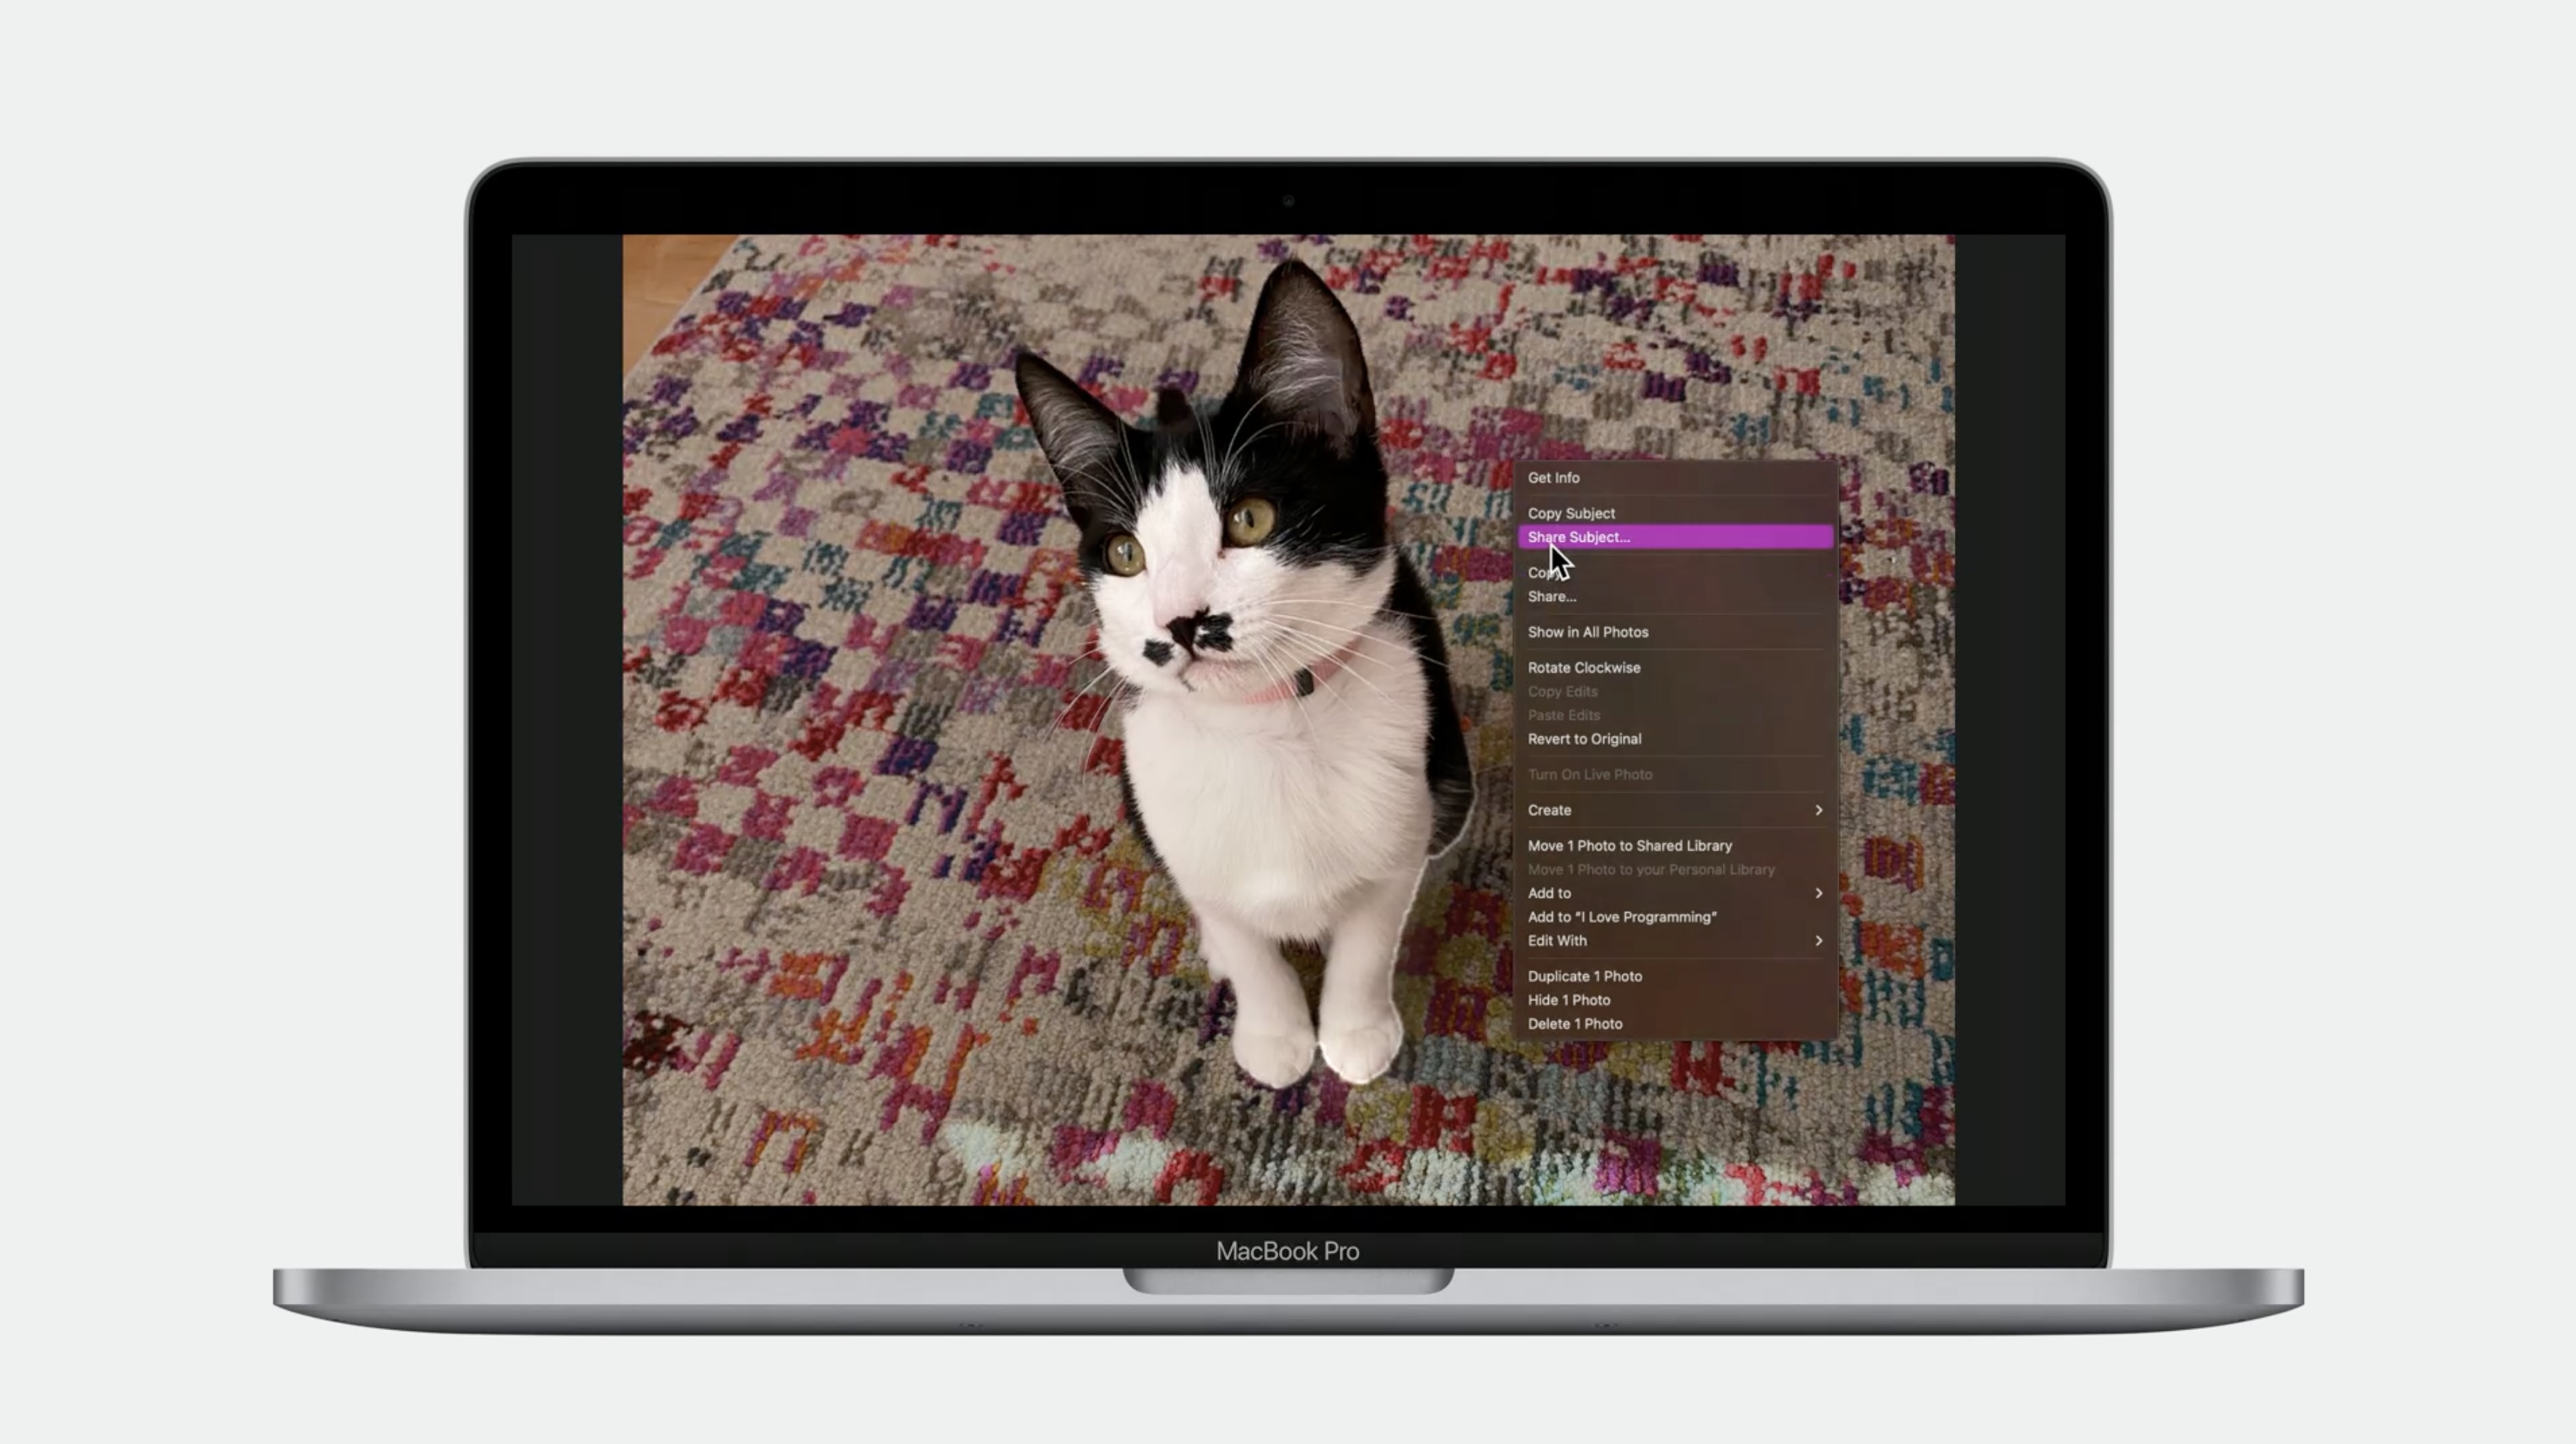
VisionKit uses the menu appearing as a trigger to begin subject analysis, if it hasn't began already. This is all handled for you automatically. In order to provide these features, VisionKit will set itself as a delegate for any menu you return from the update menu method. If you were previously relying on these NSMenuDelegate callbacks, VisionKit now provides its own Delegate callbacks allowing you to retain functionality with your menu items if you were using that previously.
NSMenuDelgate
    menuNeedsUpdate (NSMenu)
    menuWill0pen (NSMenu)
    menuDidClose (NSMenu)
    menu(NSMenu, willHighlight: NSMenuItem?)

ImageAnalysisOverlayViewDelegate
    overlayView(ImageAnalysisOverlayView, needsUpdate: NSMenu)
    overlayView(ImageAnalysisOverlayView, willOpen: NSMenu)
    overlayView(ImageAnalysisOverlayView, didClose: NSMenu)
    overlayView(ImageAnalysisOverlayView,menu: NSMenu, willHighlight: NSMenuItem?)
And here's a quick tip. If you are in this situation, depending on where the menu was initiated from, it may not come from VisionKit. So you'll likely want to keep your existing implementation around.
func menuWillOpen(_ menu: NSMenu) {
    // Your fancy code.
}

func overlayView(_ overlayView: ImageAnalysisOverlayView, willOpen menu: NSMenu){
        menuWillOpen(menu)
}
Generally, the simplest way to keep this all in sync is to have your OverlayViewDelegate implementation call your matching NSMenuDelegate implementation, adjusting as necessary. Of course, ensure this makes sense for your app, but in general, this usually does the trick. And that's a quick overview of what's new in VisionKit.
Check out also
Add Live Text Interaction to Your App - WWDC22
Capture machine-readable codes and text with VisionKit - WWDC22
Lift subjects from images in your app - WWDC23
Extract document data using Vision - WWDC21
 Twitter
 GitHub
 iosdev.space