Become a Simulator expert
 Sarthak Khillon
Description: Simulator runs your iOS, iPadOS, tvOS, or watchOS apps directly on your Mac — no separate device required. We’ll give you a tour of the app's latest tools and features and show you how to sharpen your Simulator skills. Discover how to test pointer and trackpad support, adjust Simulator preferences, and use command line tools like simctl to help you simulate push notifications in a development environment. While you can get a quick overview of Simulator in this session, for more detailed information about the tool you may want to refresh yourself on “Getting the Most Out of Simulator” from WWDC19.
Overview: What is Simulator and what can it do?
It lets you test apps for a bunch of different OS's without needing a physical device (iOS, tvOS, etc). You can prototype much faster this way.
Simulator comes with Xcode, so it starts automatically when you run or build your app in Xcode without a physical device attached. But you can also run it as a stand-alone tool and make use of its powerful device emulation.
Simulator Toolbar
The toolbar above each device shows the device name and OS. It also has some buttons on the right for common device functionality. For example, the screenshot tool can be used to take device screenshots from the simulator and use them like any other screenshot on your Mac. This is a great way to take screenshots for the App Store Preview.
You can also drag files onto a Simulator, which can cause different events such as:
- Adding image to Photo library
- Triggering a push notification
- Adding a certificate
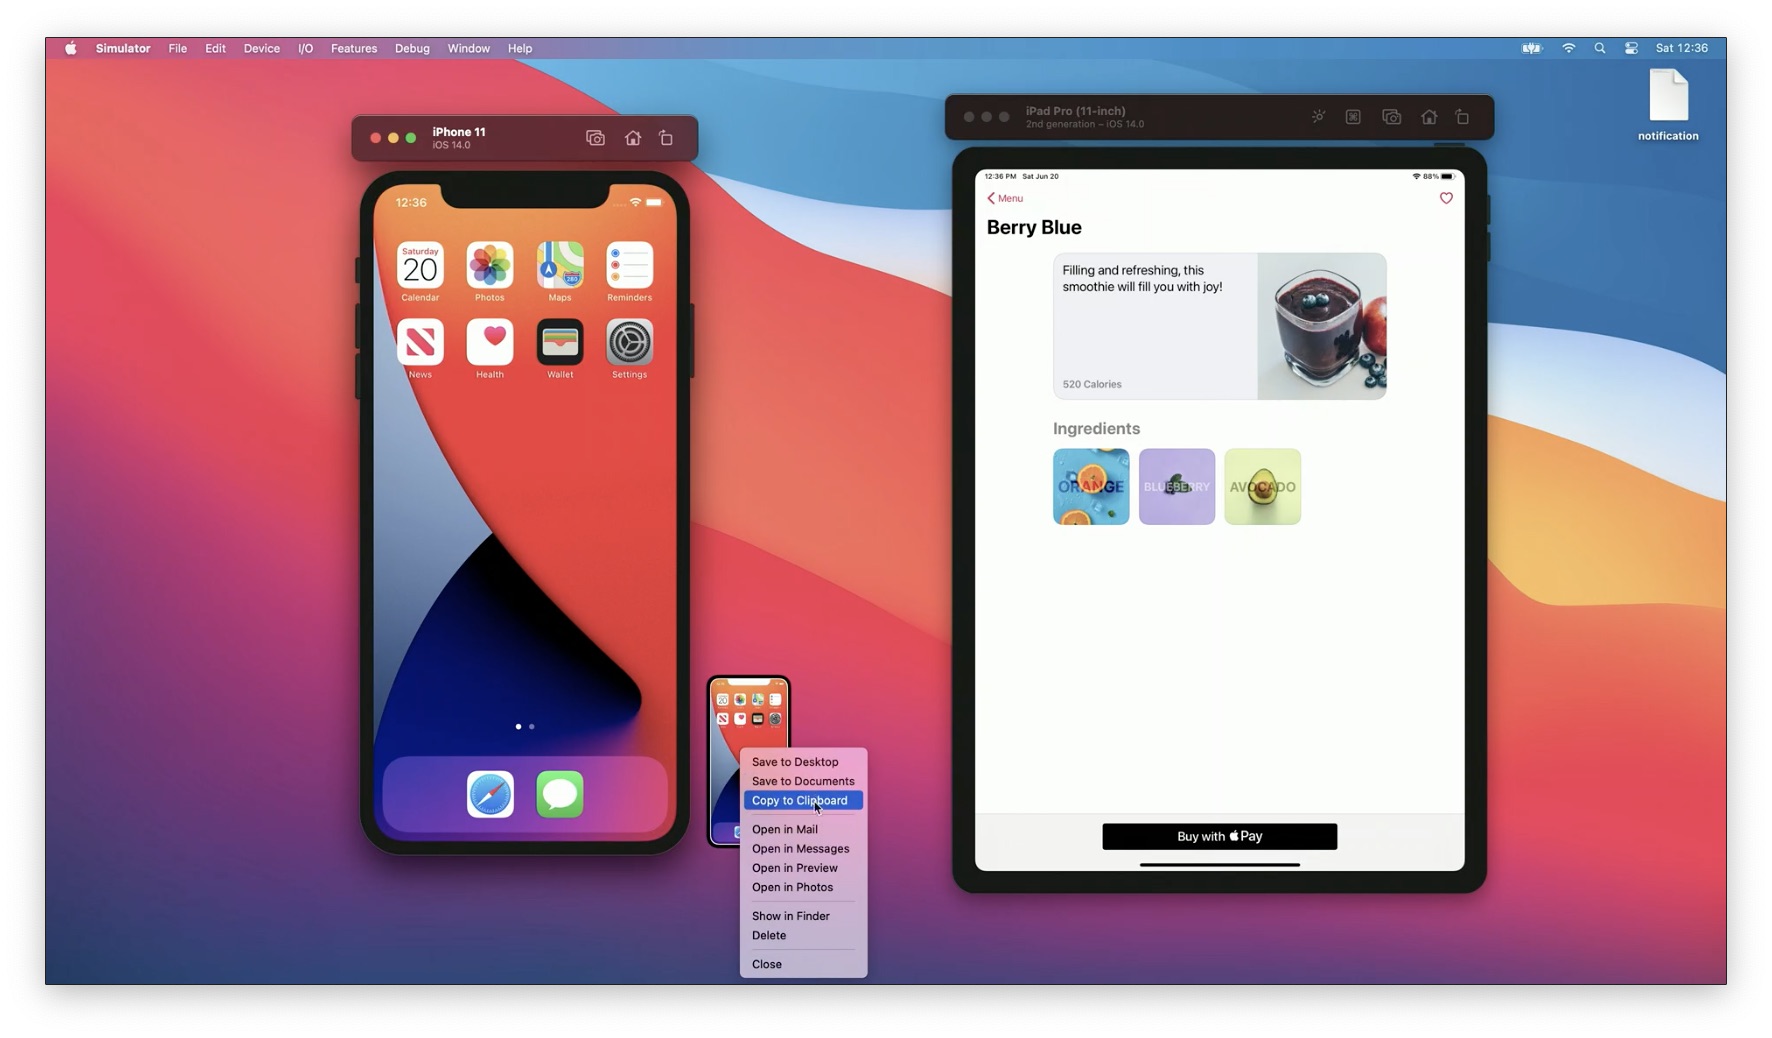
You can drag an APNS file onto Simulator to cause a push notification. The 'notification' file on the top right corner was dragged onto Simulator:

Full Screen Mode
With the release of Xcode 12, Simulator can now run in full screen mode. You can just run Simulator by itself or tiled with another app. The example below shows Simulator and Xcode running side by side in full screen mode.
Using Simulator to Test Support for Platform-Specific Features
iPadOS features mouse/trackpad interaction, so if a user connects a mouse or trackpad to their iPad, they get full pointer and gesture support.
You can test this with "Capture Pointer" mode in the iPad Pro Simulator toolbar. After starting that option, your mouse also enters pointer mode. All mouse, trackpad gestures, and keyboard shortcuts are then processed by iPadOS.

Now in this mode, you can open the Maps app, pinch on your trackpad to zoom in/out, and use keyboard shortcuts like CMD+H to go home. You can also do 2-finger drag to scroll on the Simulator. You can also capture just the keyboard but not the pointer (the presenter did not specify how).
To stop Capture Pointer mode, simply press Escape.
Simulator also keeps track of which devices are capturing input. When a Simulator window loses focus, such as when you switch to a different window, capturing stops. But when you switch back, capturing turns back on again. This makes debugging much easier.
Simulator Preferences
What if you want the Escape key to do something in your app? You can choose from 3 supported options, along with other configurations, in the Preferences window.
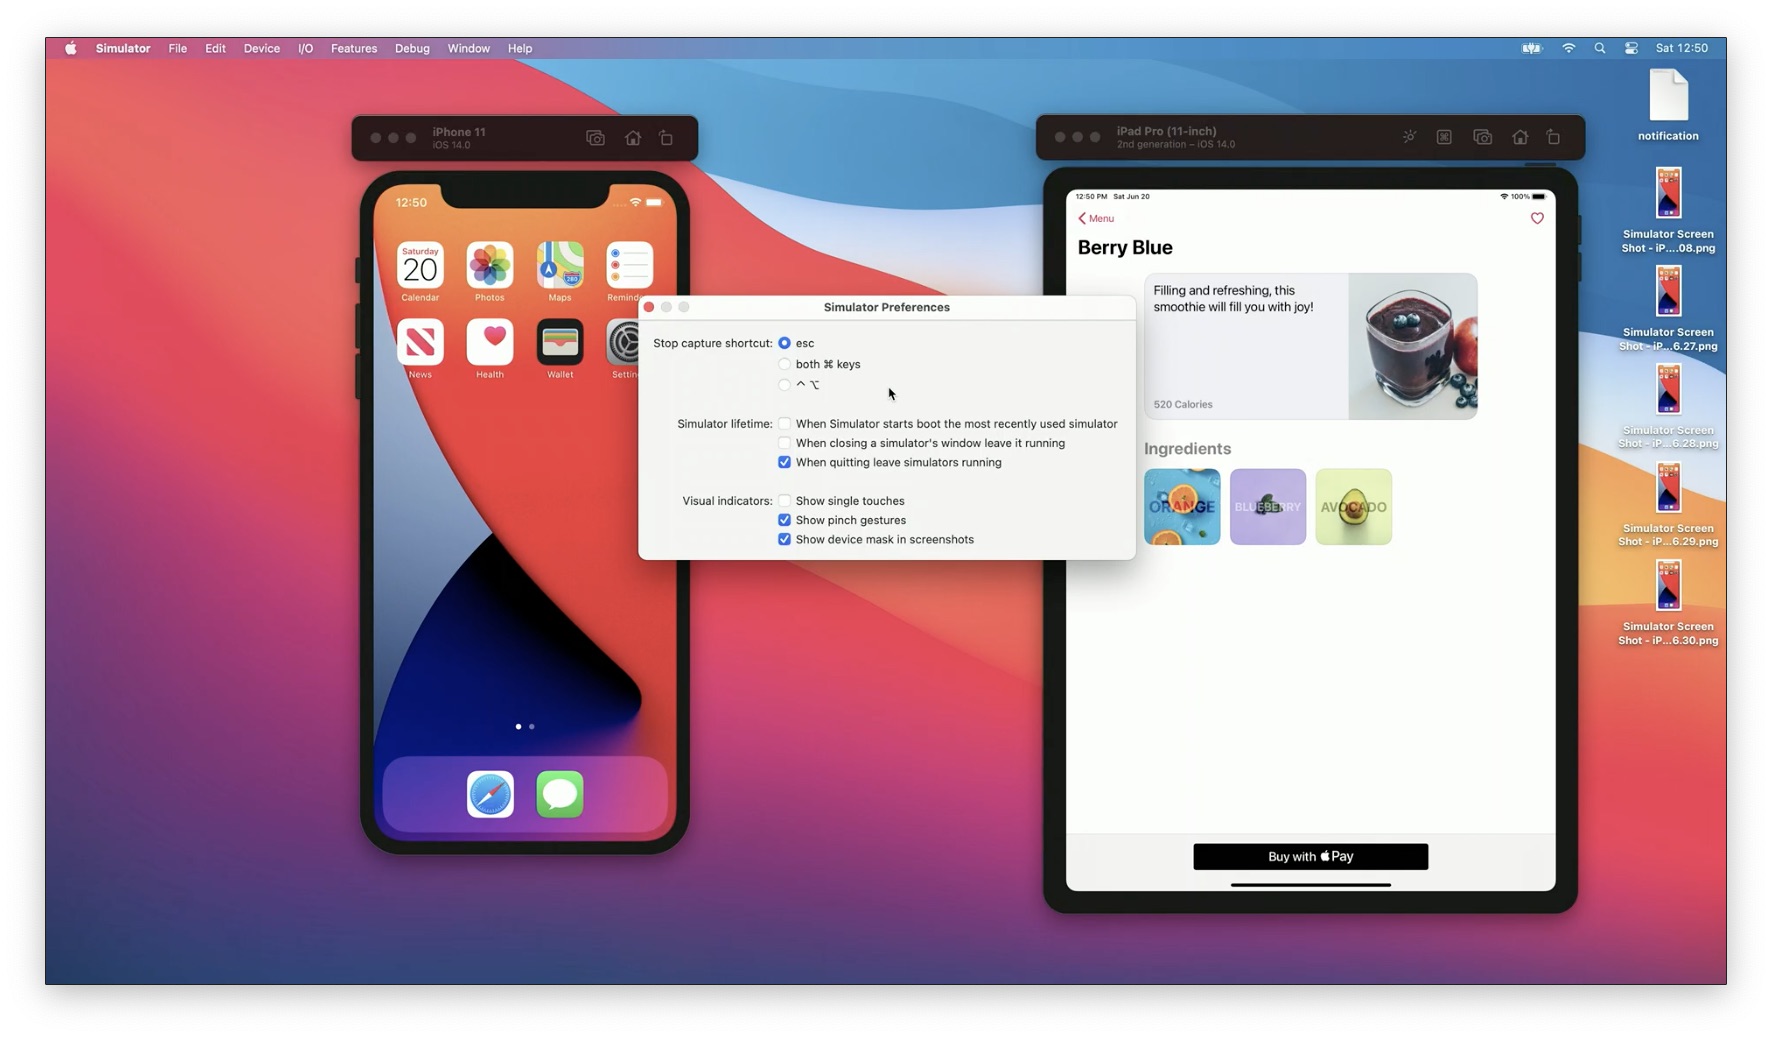
Some useful choices for App Store Previews are visual indicators, like showing touch/pinch gestures. Another useful feature is showing the device mask in screenshots. The notch area is then rendered transparently.
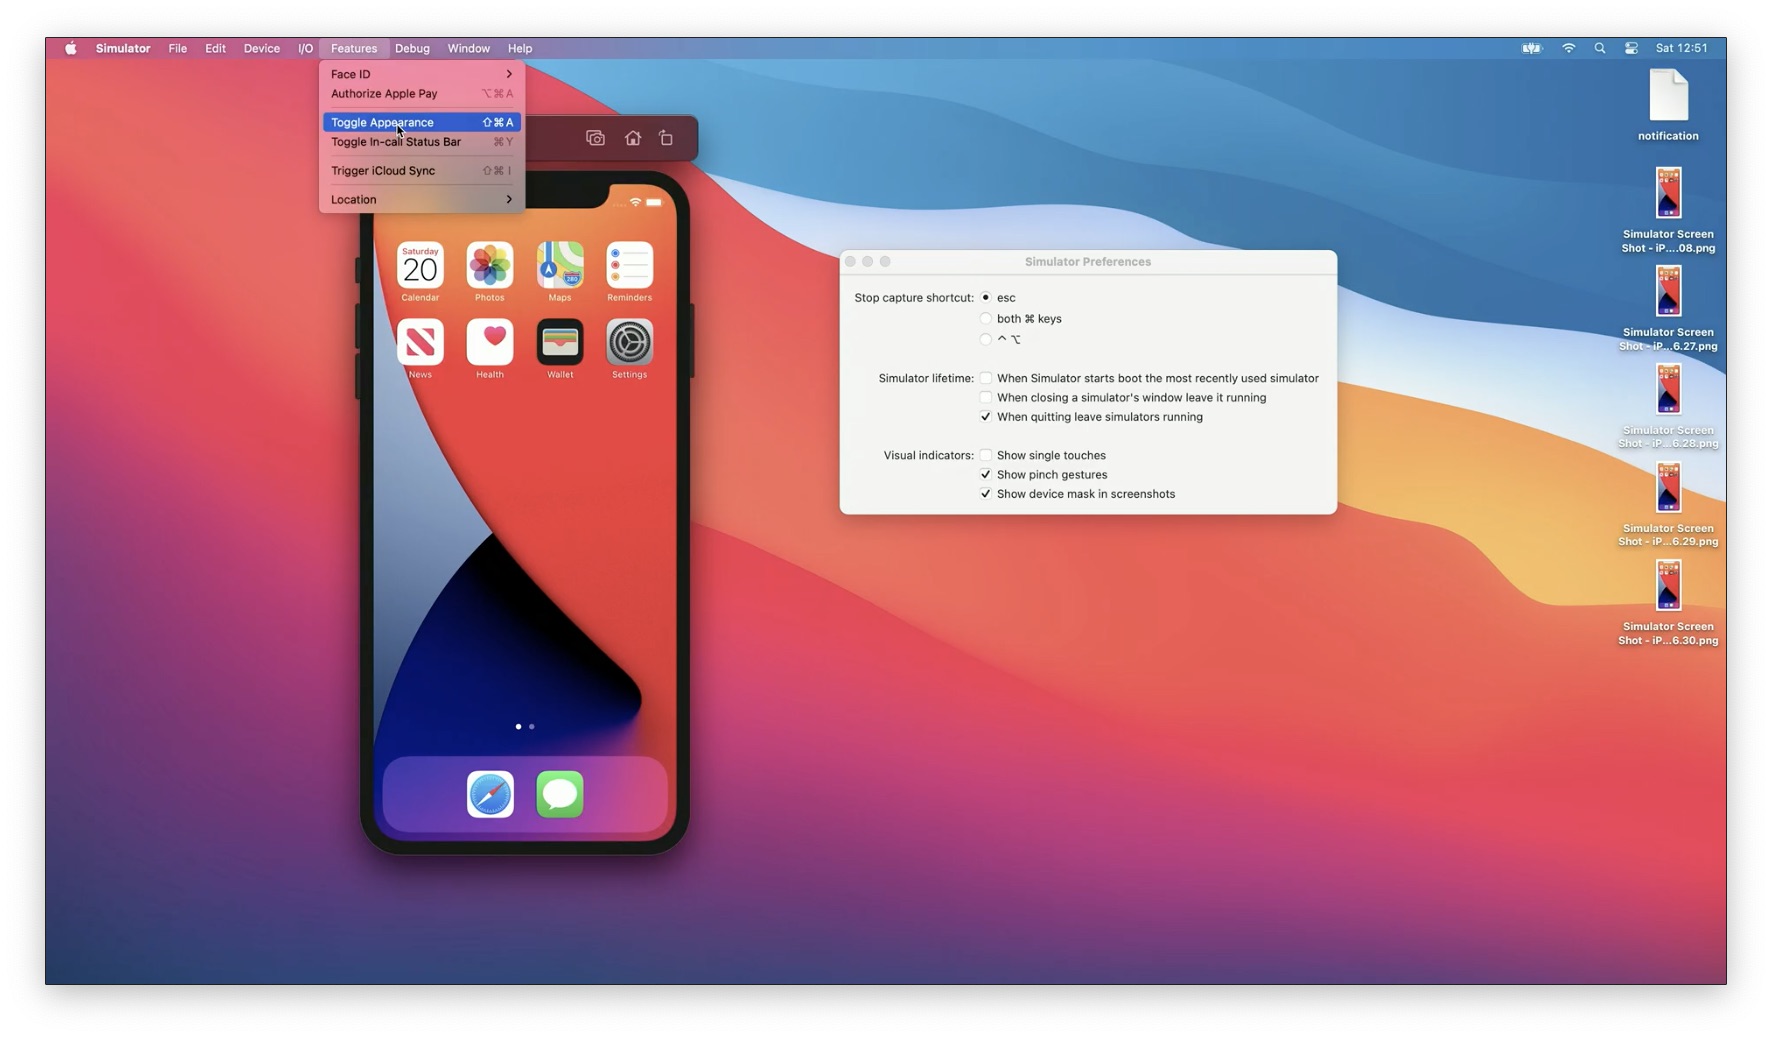
Device-specific Preferences
You can use the menu bar when focused on a particular Simulator to set device-specific features. Simply use the Features tab.
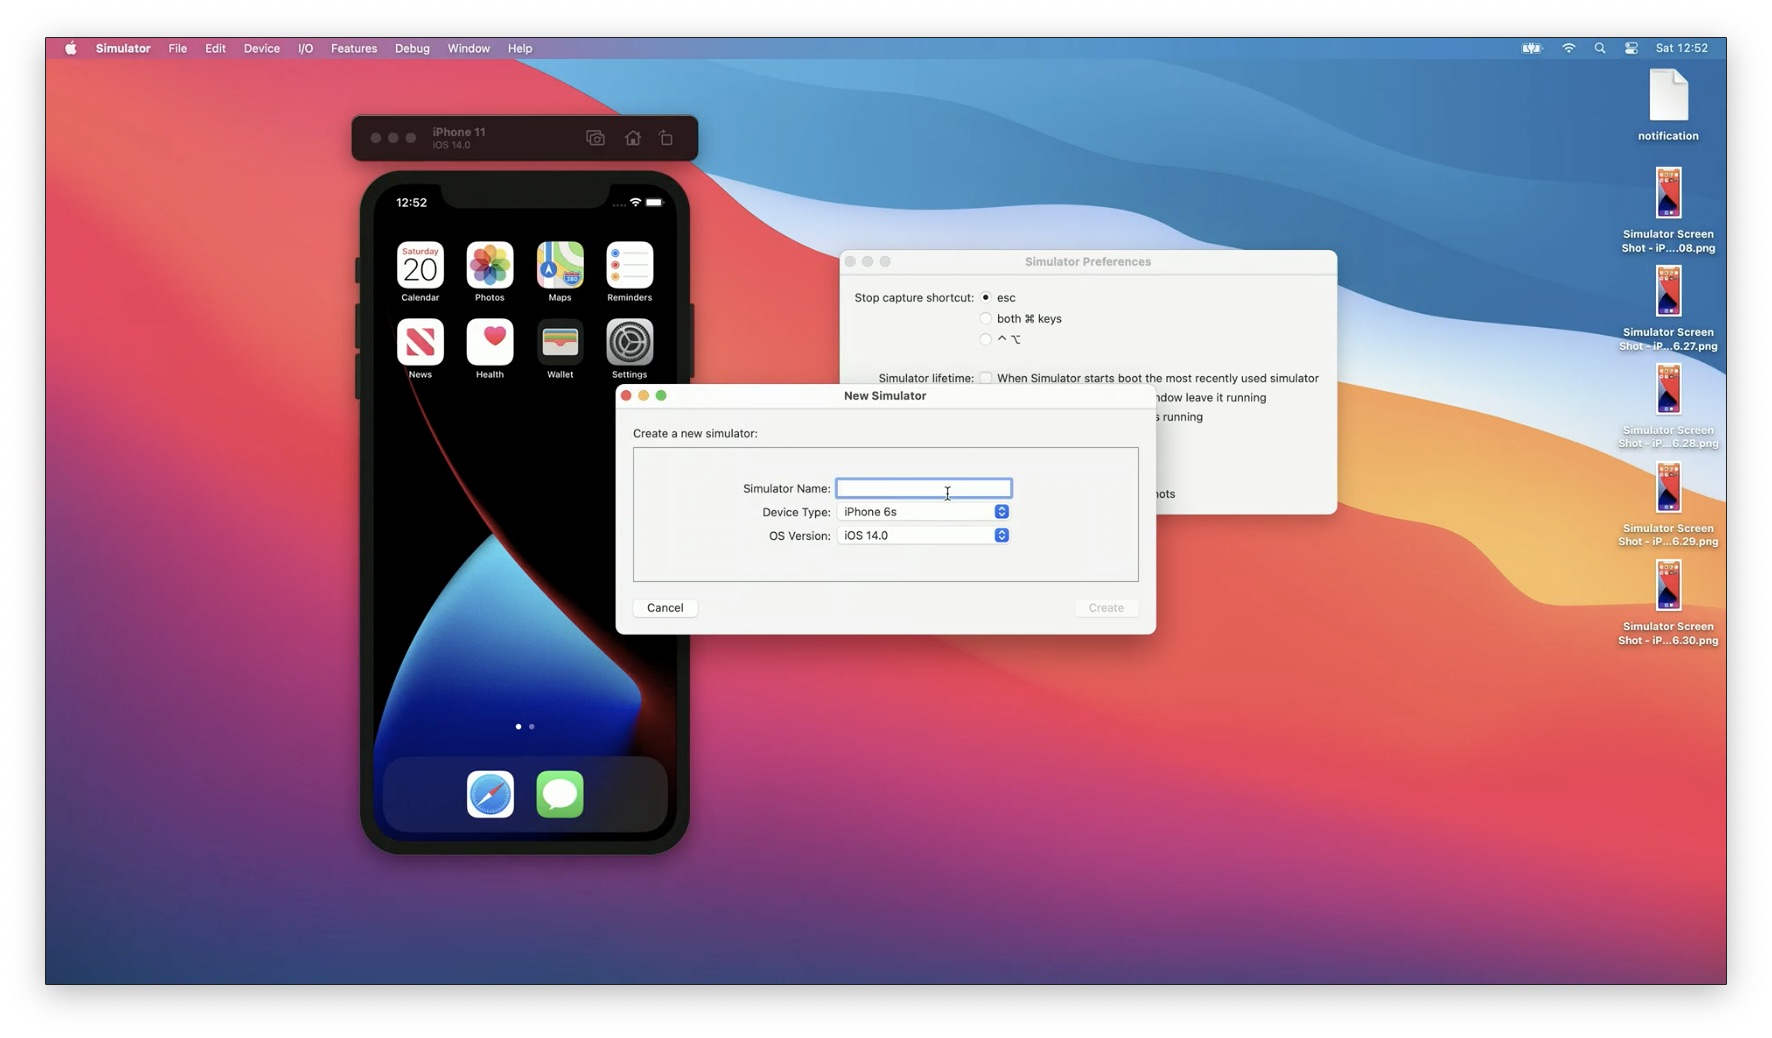
One new feature in Xcode 12 is the ability to create a new Simulator from within the app. Simply go to File -> New Simulator and customize the name, device type, and OS version.
The Window Menu
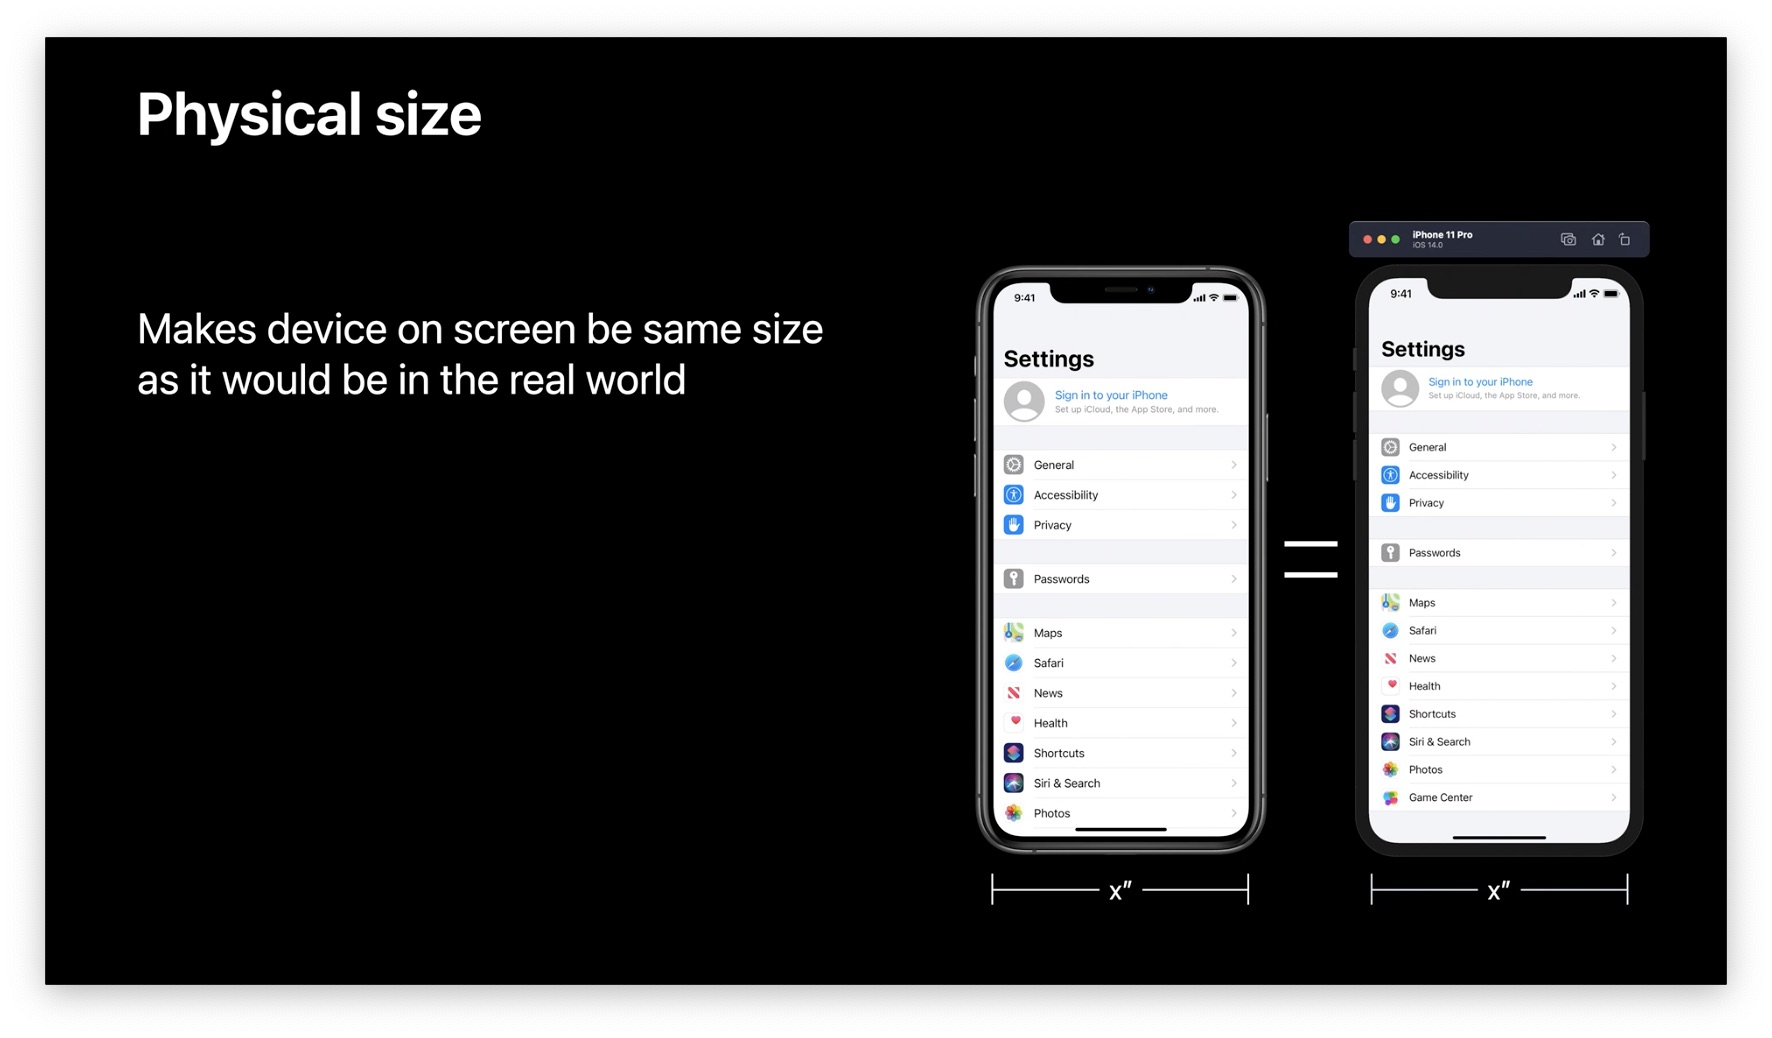
You can click and drag on a corner to resize the simulator. The Window Menu also has some preset sizes like "Fit Screen", "Physical Size", "Point Accurate", and "Pixel Accurate".
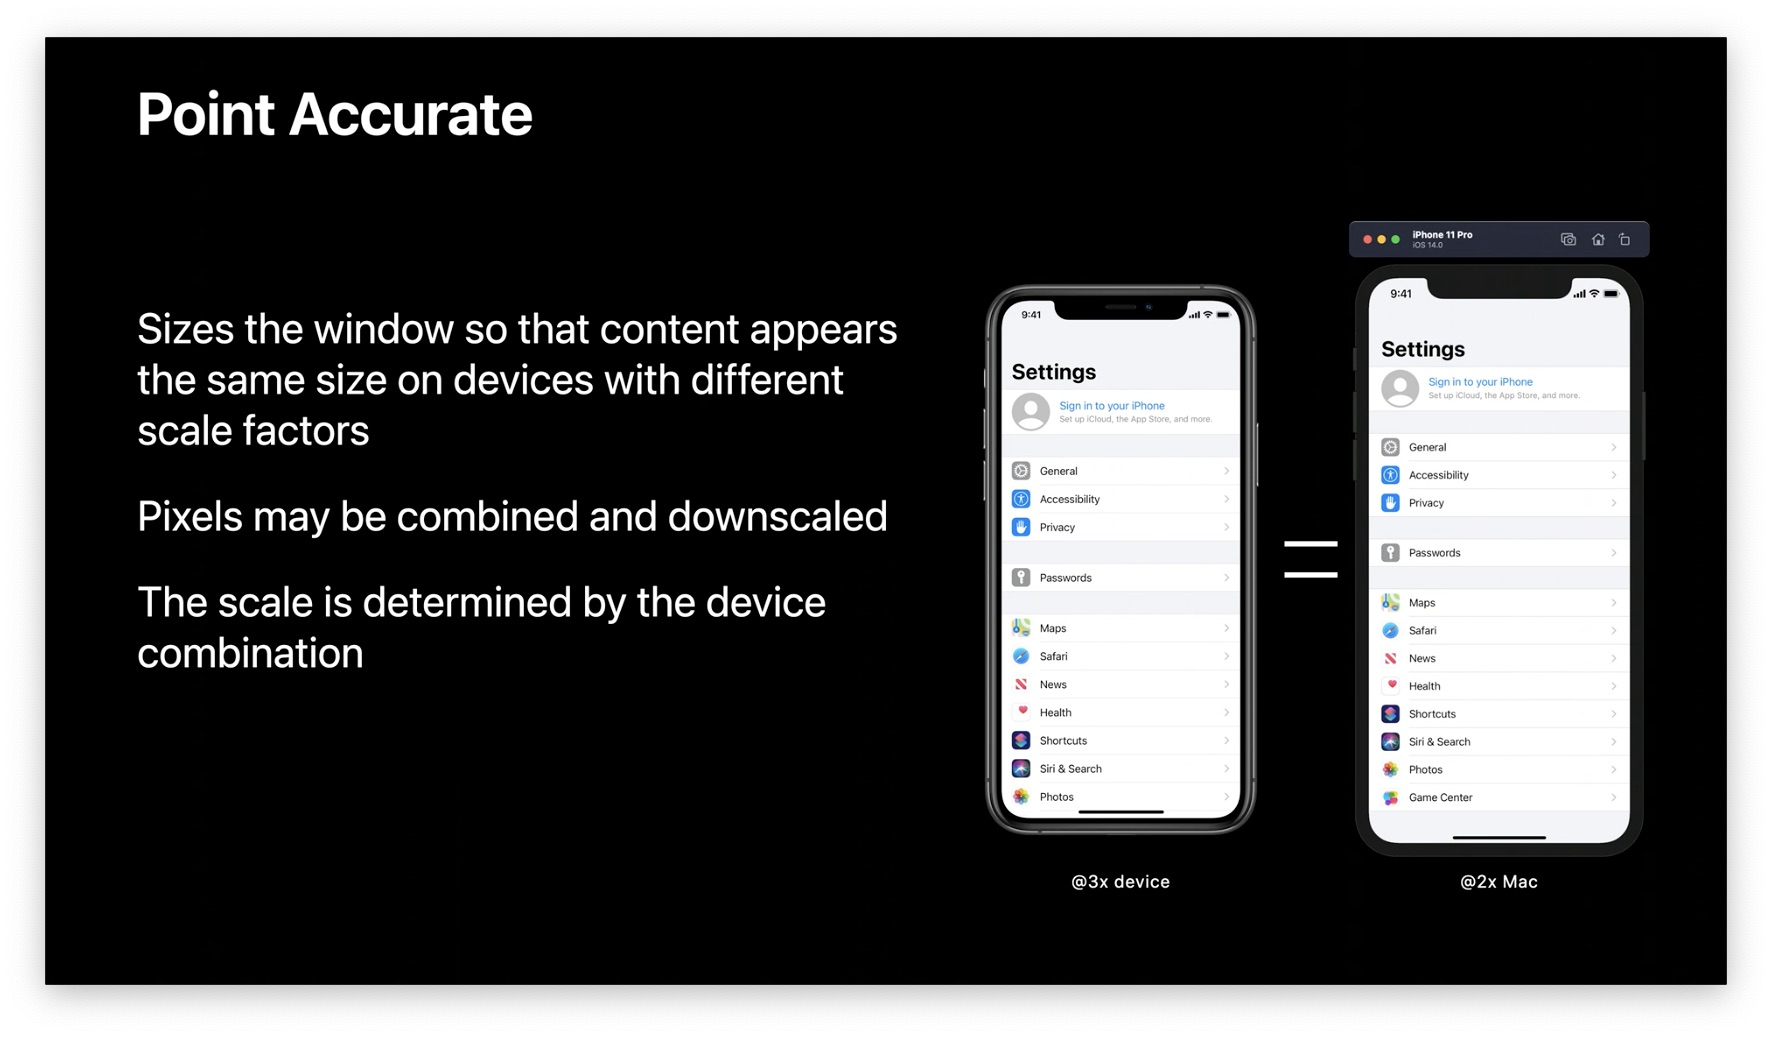
Point Accurate mode will downscale to fit different pixel densities. If the simulator device and your Mac have the same pixel densities, then Point Accurate is the same as Pixel Accurate.
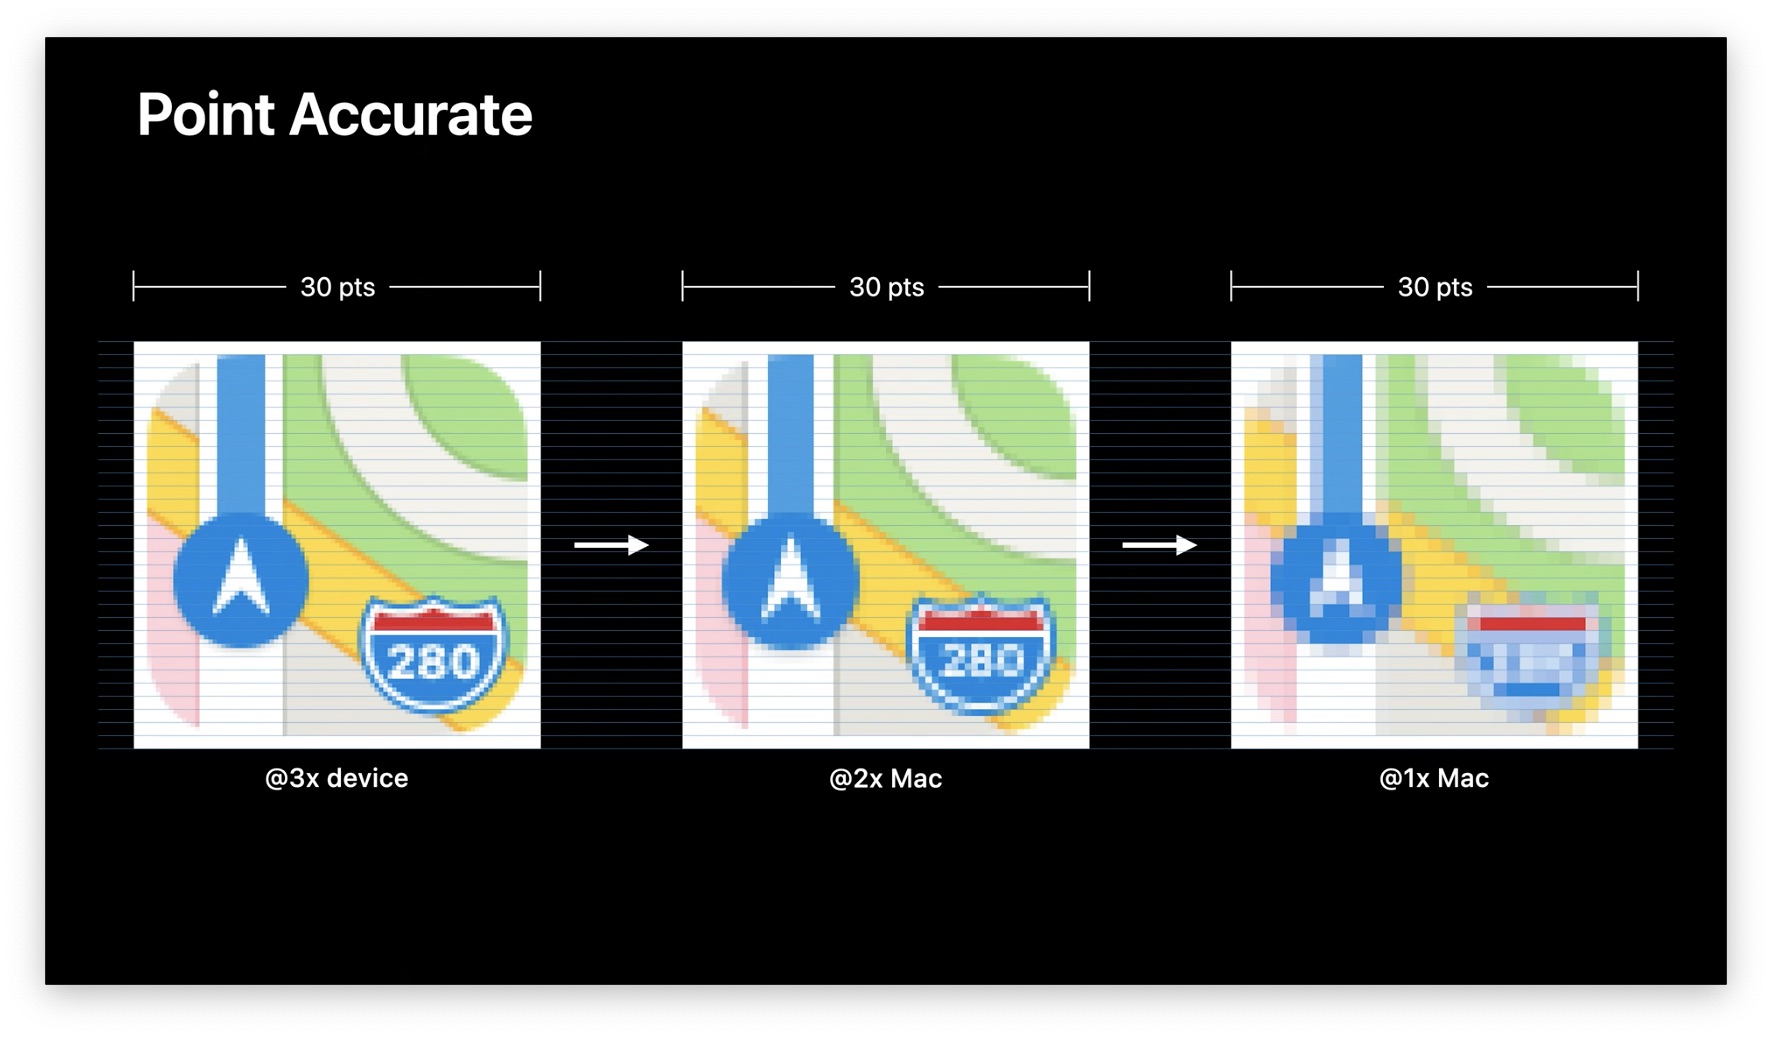
Pixel accurate provides a 1:1 mapping between the device and the Mac's pixels, so if you have a lower resolution Mac, the Simulators will look bigger.
Using the Command Line
You can control Simulator from the command line with the simctl command.
Topics covered:
- Privacy
- Push Notifications
- Video Recording
- Status Bar
- Keychain
1. Privacy
Apps don't get user data without permission, so you need to test how your app handles granted and denied permissions.
You can run the simulator with some permission granted with the command:
xcrun simctl privacy booted grant <permission> com.example.MyApp
where <permission> is one of:
- news
- reminders
- health
- wallet
- settings
- photos
- maps
- calendar
- contacts
- location
...and more. To see the full list, run the following command:
xcrun simctl privacy
You can also revoke an app's access to a resource by replacing grant with revoke in the commands above.
You can also use all as an alias for granting or revoking all permissions.
You can reset all permissions for all simulators to defaults with:
xcrun simctl privacy booted reset all
If you want to reset permissions for only one app, simply put your bundle identifier (e.g. com.example.MyApp) as the last command.
2. Push Notifications
Here's a sample push notification with a title and a body associated with a sample app. The "Simulator Target Bundle" key is optional because you're going to also provide the target in your command:
{
	"Simulator Target Bundle": "com.example.MyApp",
	"aps": {
		"alert": {
			"title": "Push Notification",
			"subtitle": "New fruit smoothies are available",
			"body": "We know you'll love these delicious concoctions 🥰"
		}
	}
}
Assuming this push notification is stored in a file payload.json, you can run the following command to trigger a push notification with that data:
xcrun simctl push booted com.example.MyApp payload.json
You can also drag and drop a file onto the simulator. However, in this case, the "Simulator Target Bundle" key is required because otherwise the Simulator has no context about which app should receive the push notification.
If you specify the bundle identifier on the command line AND in the payload, and they don't match, the command line takes precedence.
3. Video Recording
You don't need QuickTime to record the Simulator! You can do it from the command line, and Simulator.app doesn't even need to be running:
xcrun simctl io booted recordVideo video.mp4
You can terminate recording by pressing CTRL+C in the terminal.
Note that video.mp4 should not already exist; otherwise, the recording will fail. You can use --force to overwrite an existing recording with the same filename.
Simulator recording mainly uses your GPU, so it doesn't use up too many CPU resources.
Recording options
The default recording options give an HEVC codec with a black device mask.
You can explicitly specify the codec and mask you want. Here, we specify no device mask and the h264 codec:
xcrun simctl io booted recordVideo --codec h264 --mask ignored video.mp4
External Displays
Certain devices running iOS support external displays. You can choose to capture video from either the main display or the external display.
Here's how to capture video from an external display:
xcrun simctl io booted recordVideo --display external external.mp4
To see the video this captures, jump to 16:50.
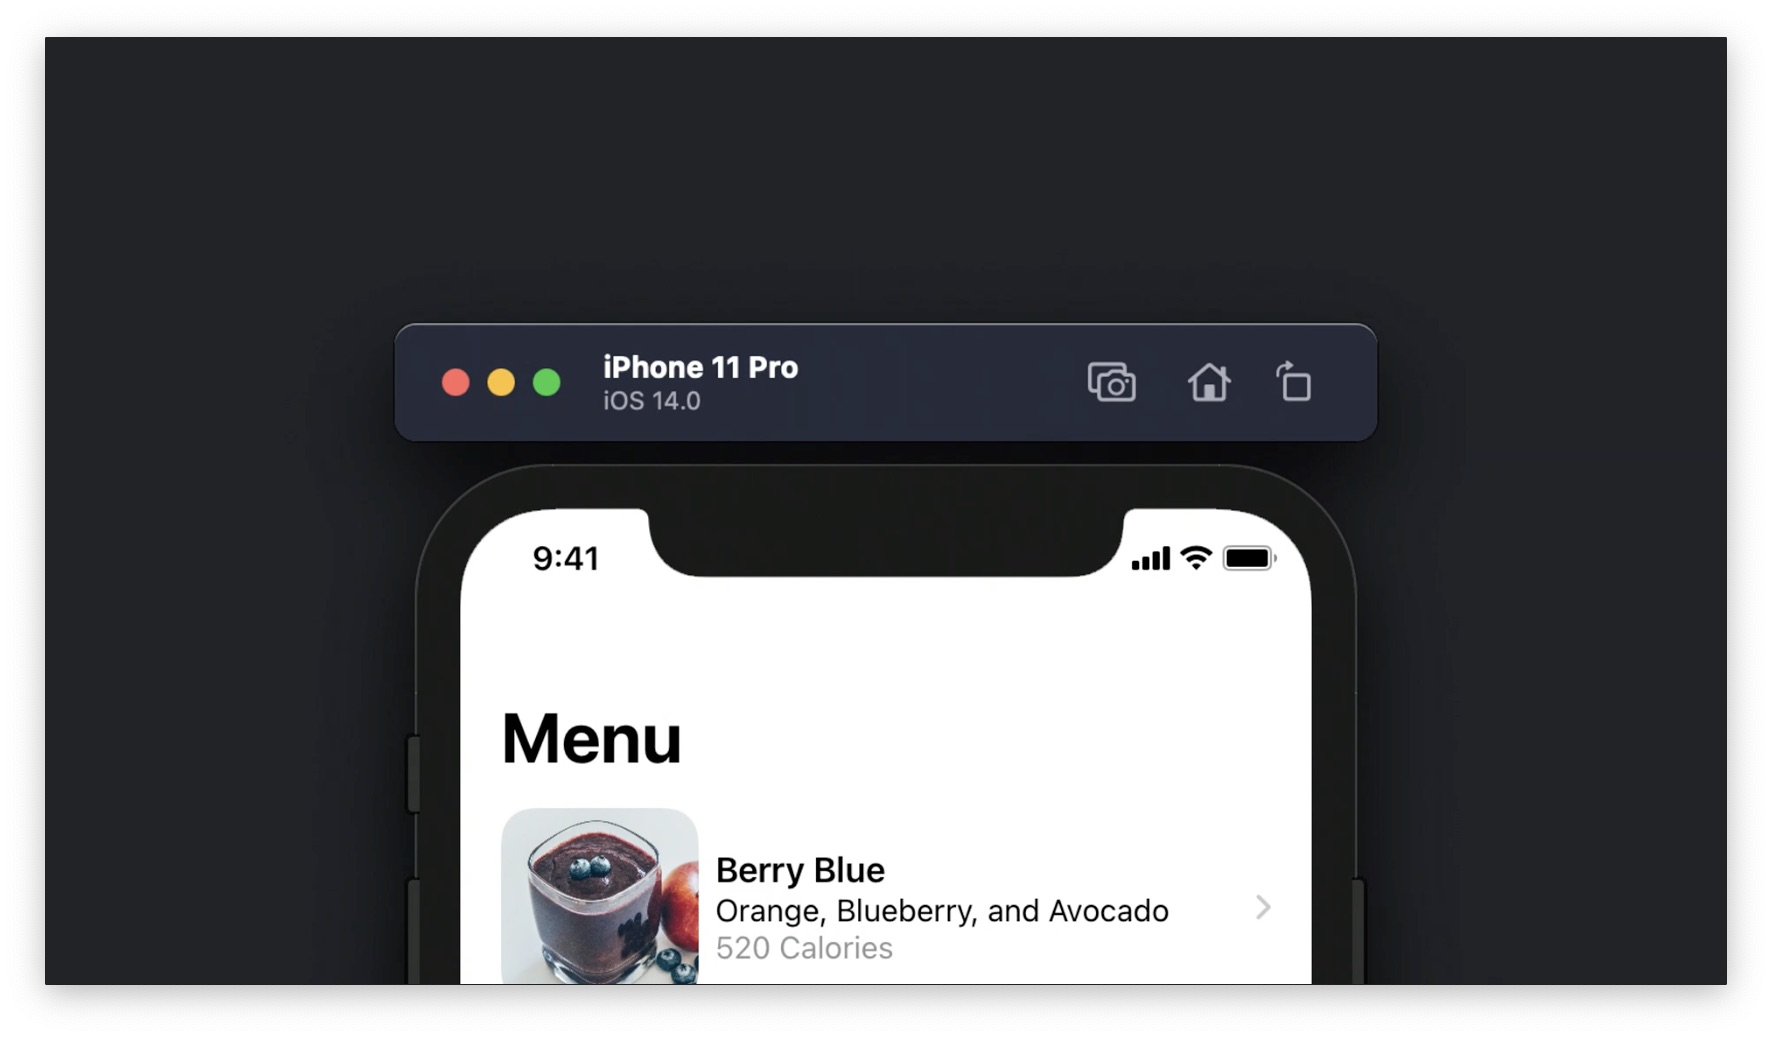
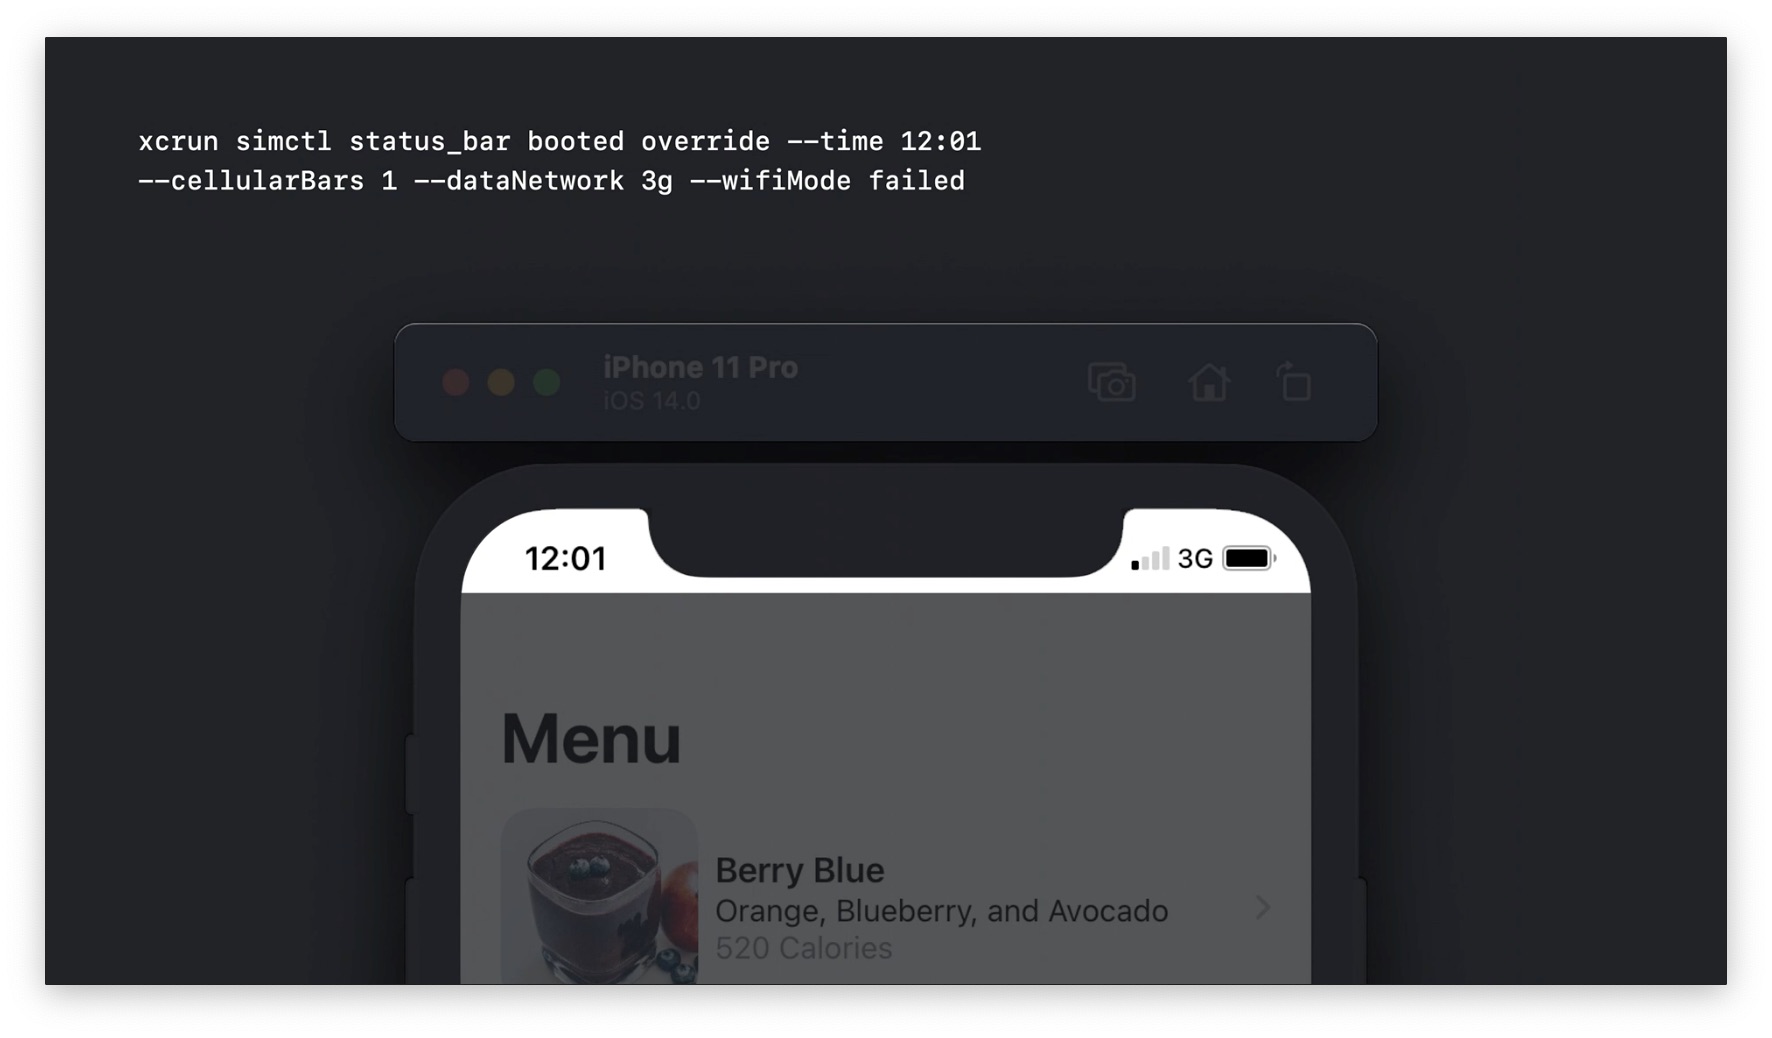
4. Status Bar
You can use simctl to customize information on the status bar, such as when you want screenshots for your app's App Store page.
Here's what the status bar might normally look like:
Let's say we want the time to be 12:01, the signal to be low and 3G, and still keep full battery:
You can clear your overrides when you don't want them anymore:
xcrun simctl status_bar booted clear
There are more options that you can override. To see all possible commands, run:
xcrun simctl status_bar
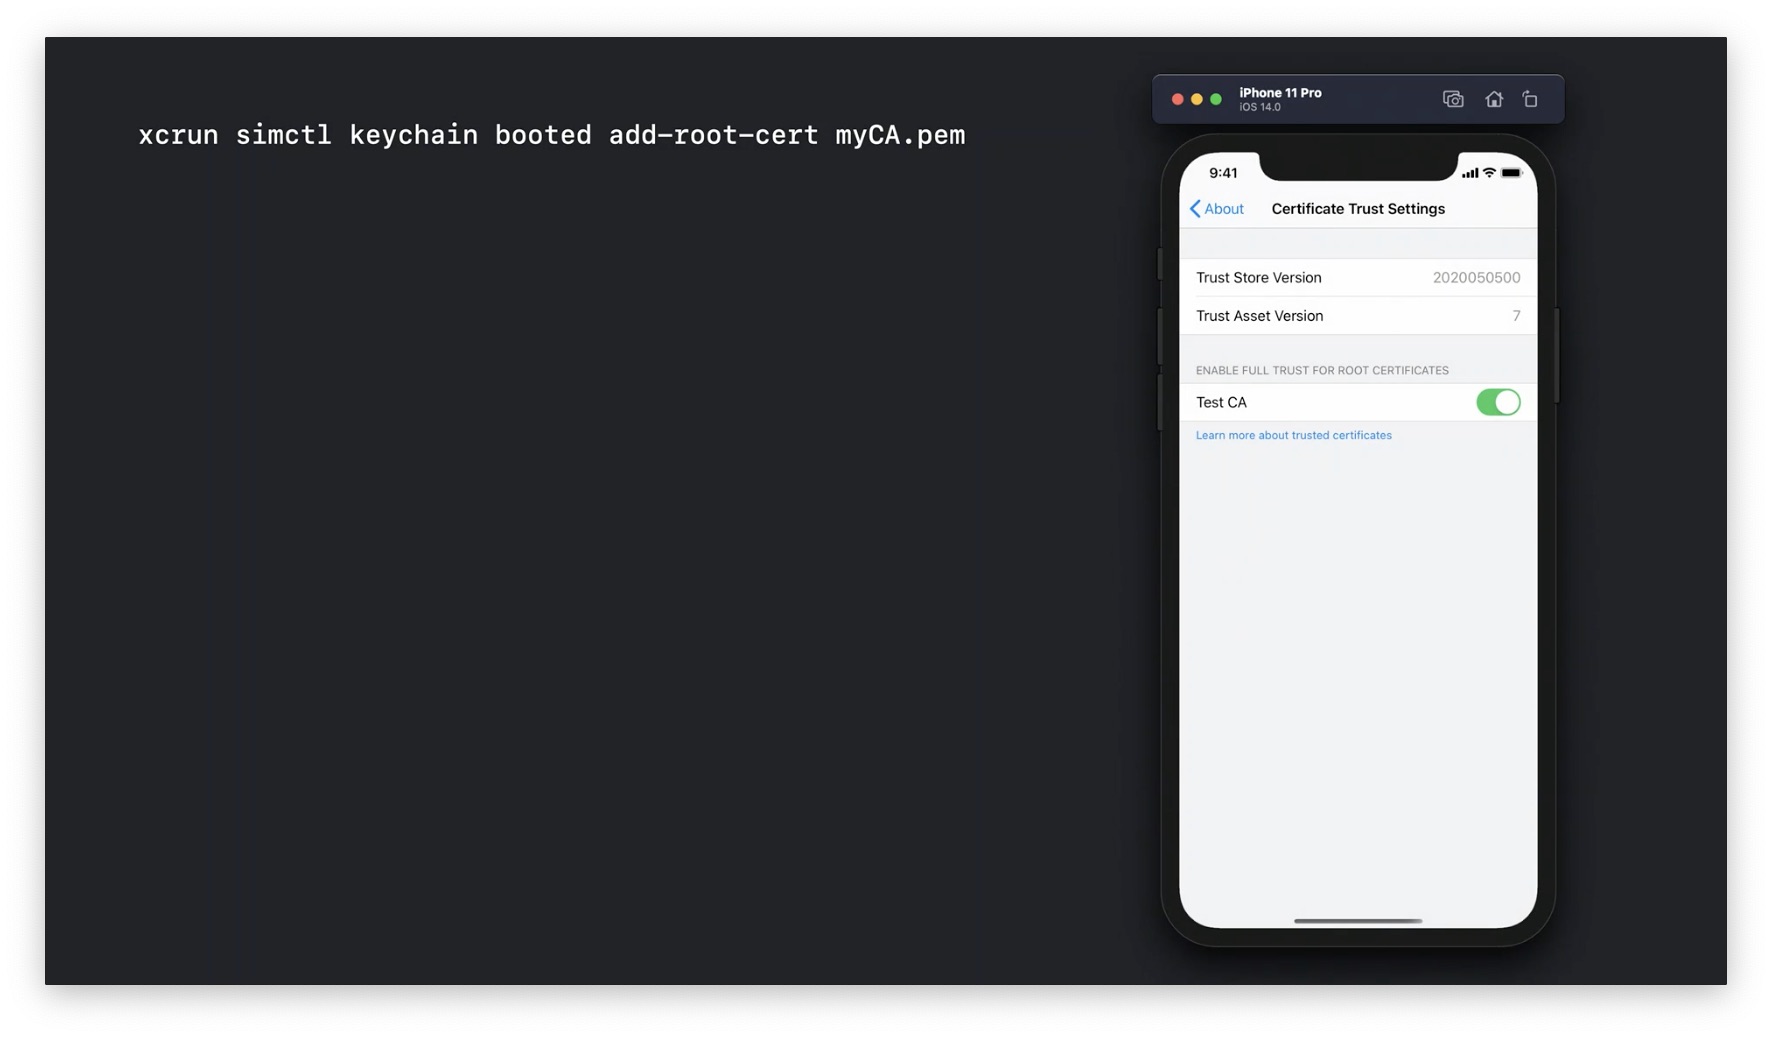
5. Keychain
You can add CA certificates to the device's trusted root store. This is useful when developing apps with network capabilities.
You can add a certificate with this command:
xcrun simctl keychain booted add-root-cert myCA.cer
You can also add the certificate by visually dragging it onto the Simulator window.
You're not done yet. You still have to trust the certificate manually. To do that, go into Settings > General > About > Certificate Trust Settings and enable "Test CA" after acknowledging the warning message.
You can do a lot of other things with the keychain utility, such as clearing passwords. For more information, check the help pages.
 Twitter
 GitHub
 www.linkedin.com