Add configuration and intelligence to your widgets
 Federico Zanetello
Description: Widgets are at their best when they show up on someone’s Home screen or in the Today View at the right time and provide actionable, relevant information. We’ll show you how to build configurable widgets to let people create a personalized Home screen experience, and that take advantage of system intelligence to help people get what they want, when they want it. Learn how to customize your widget’s configuration interface, and how to appear within Siri Suggestions or at the top of a widget Smart Stack based on user behavior or by letting the system know when there's new, timely information. For more on widgets, watch "Meet WidgetKit". And for more on system intelligence, watch the collection "Design for Intelligence."
- By making our widget configurable, users can create multiple different instances of the same widget, each with a different configuration.
- Adding configuration to our widget allows the system to better predict times to display your widget in a stack.
Basics
Widget Extension
- contains SwiftUI code that renders the visual appearance of the widget.
- contains some metadata about the widget itself.
Widget Configuration
- When our widget is configurable, we can specify which options to user can configure on the backside of the widget
- The system will display our widget configuration for us.
- The widget user configuration are composed by parameters.
- We use Intents to define which parameters are shown. These intents are the same as used in Siri and Shortcuts.
- An Intent contains an ordered list of parameters.
- Each parameter in our Intent will show up as a row in the widget configuration UI.
- We declare Intents in Xcode using an Intents definition file.
- This file contains all of your Intents, their parameters, and indicates which parts of the system they support.
- By compiling this file into our app, the system will be able to read information about our Intents.
- Xcode will also generate an Intent class for us, containing a property for each parameter:
class ViewRecentPurchasesIntent: INIntent {
  var card: Card?
  var category: Category?
}
Kind of supported configurations: - String (the widget UI will show a text field) - Bool (the widget UI will display a toggle) - Integers (number fields and steppers) - Decimals (number fields and sliders) - Contact pickers - Location pickers - Enumerations (will display a list of possible cases, both static and dynamic enumerations are supported) - Date Picker - Duration - Url - Measurement - Currency amount = Payment method
How to add a configuration to your widget
The session shows how to add a configuration to an intent, this is done via the intent editor and it's several steps around enabling an intent in our Widget, it starts at 7:00 and continues to 15:00. It's very visual: it's better to watch the video for this part.
Configuration experience
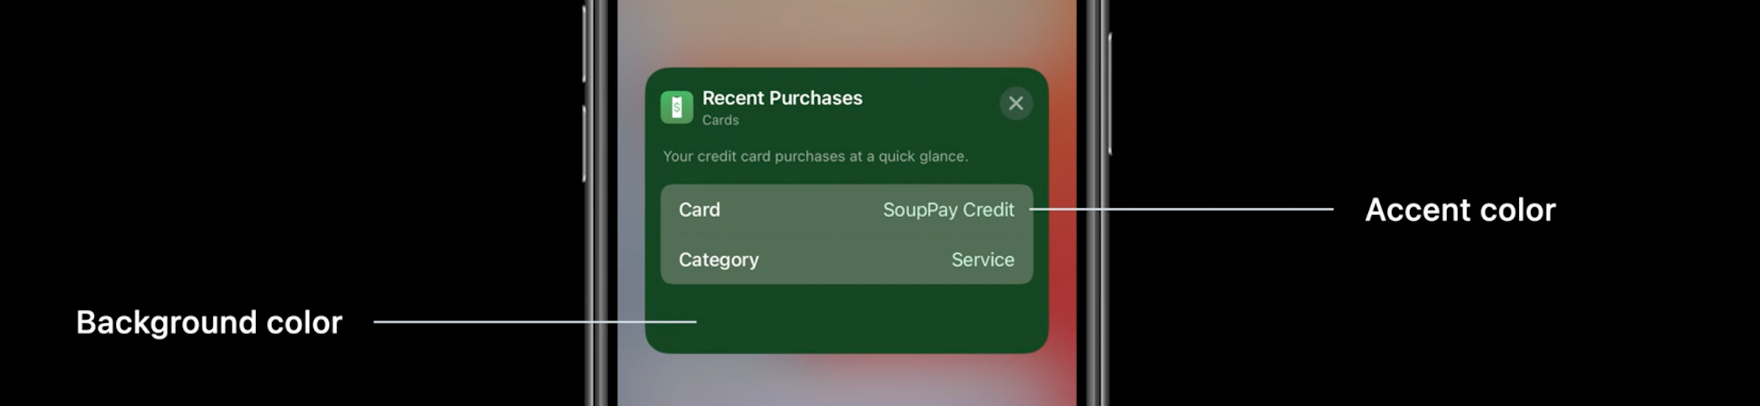
We can customize the appearance of the backside of our widget:
.configurationDisplayName(_:)on the widget declaration to customize the title.description(_:)on the widget declaration to customize its title
- we can define a
AccentColorcolor asset in the Widget assets catalog for the Widget accent color, the name of the color asset has to be added into the widget extension's build settings forGlobal Accent Color Name - we can define a
WidgetBackgroundcolor to set the widget background color, the name of the color asset has to be added into the widget extension's build settings forWidget Background Color Name.
System Intelligence
How do Stacks behave intelligently?
The system will try to surface widgets based on two reasons: - User behavior - Relevance Information
User Behavior
- Based on how frequently the user uses our app
- In iOS 12, Apple introduced the concept of Shortcuts and custom Intent donations, which provides a way for the system to understand what people do in our app, the same intents will be used by the system to predict when it's time to show our widget.
Relevance information from the app
- Our widget can tell the system that it has a highly relevant update
- A timeline entry has three components:
- a date timestamp that determines when this entry should be rendered
- the view that should be rendered
- the relevance of the entry.
- The relevance has two fields: a
scoreand aduration.- Score:
- The score indicates how relevant an entry is compared to all entries provided in the past (by us).
- The score range is up to us, as the system only considers the score in relation to other entries.
- Use
0or a negative number to tell the system that the widget has no relevant information and should not be surfaced
- Score:
- Duration:
- Used for situations where we have a well defined period of time, where the relevant score will be fixed.
- Leave the duration to
zeroto tell the system that the relevant score will last until the next timeline entry relevance is received.
 GitHub
 zntfdr.dev