Bringing People into AR
 Sarthak Khillon
Description: ARKit 3 enables a revolutionary capability for robust integration of real people into AR scenes. Learn how apps can use live motion capture to animate virtual characters or be applied to 2D and 3D simulation. See how People Occlusion enables even more immersive AR experiences by enabling virtual content to pass behind people in the real world.
Overview
- People Occlusion
- Motion Capture
1. People Occlusion
Overview
In ARKit today, we can place objects in the real world.
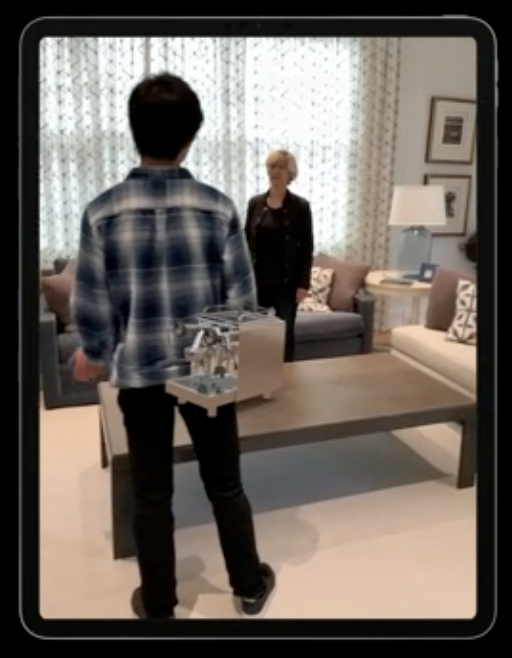
We would expect items to be hidden, or occluded, by a person closer to the camera.
ARKit3 enables us to provide this functionality.
Explanation
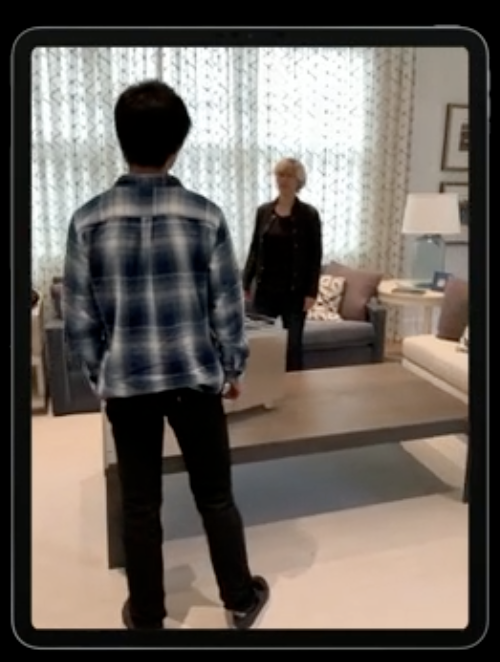
In ARKit2, the AR object would simply be overlayed on top of the camera scene.
Now, we need to have different things in different "depth frames". This is a "depth ordering problem".
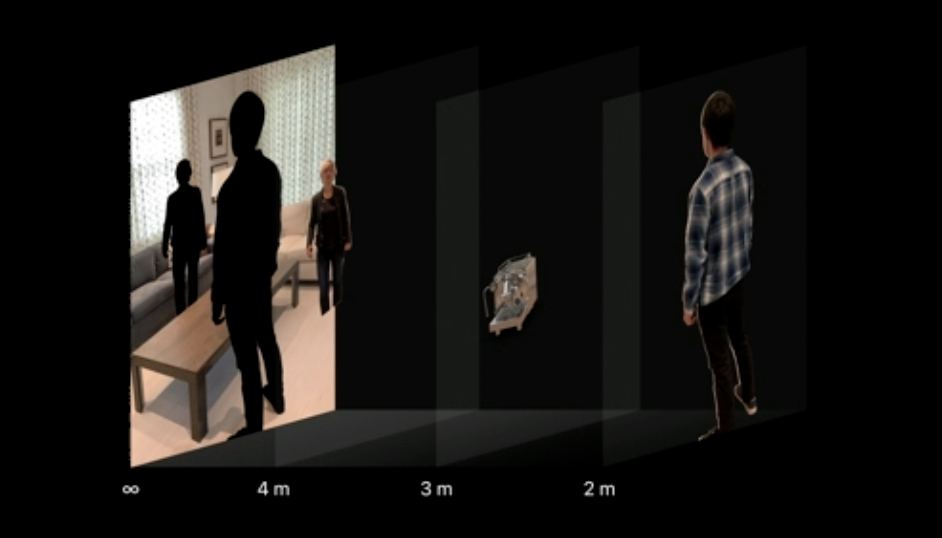
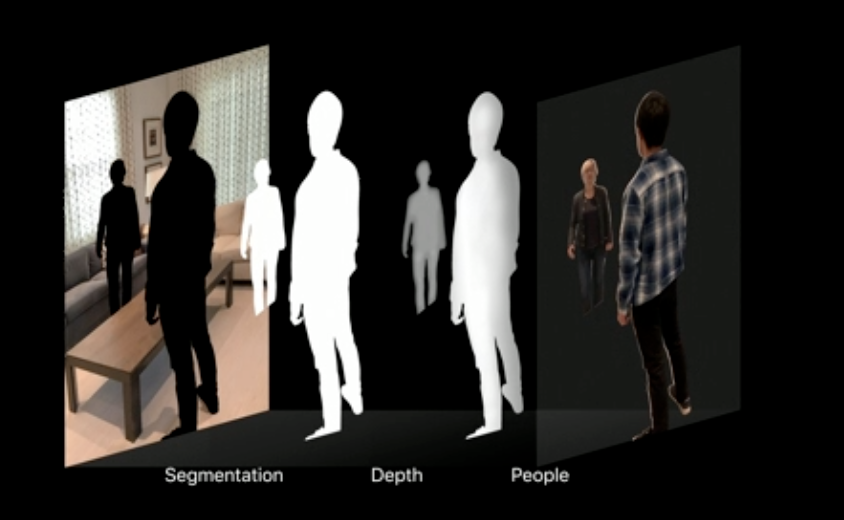
The graphics pipeline already knows where the rendered object will be using the depth buffer, but we need to understand where people are in the scene. ARKit3 introduces the Segmentation and People buffers, which are generated using the A12 chip and machine learning.
These two new buffers are exposed on the ARFrame as two new properties:
var segmentationBuffer: CVPixelBuffer? { get }
var estimatedDepthData: CVPixelBuffer? { get }
These are generated in real-time at the same cadence as the camera frame, i.e. 60 fps.
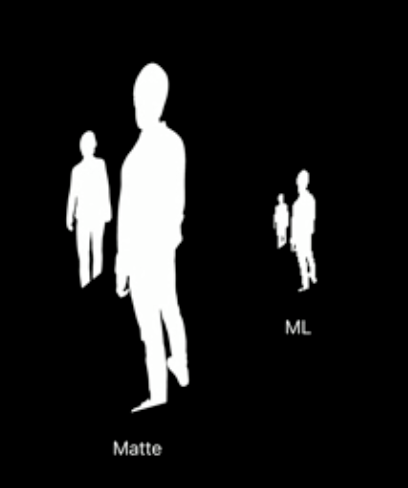
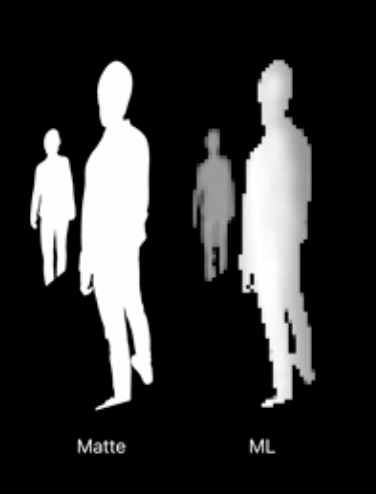
We would also like these to be at the same resolution as the camera image, but the neural network only sees a smaller image that is missing a lot of detail.
To compensate for that missing detail, ARKit3 does some additional processing called matting. Matting uses the segmentationBuffer as a guide to look at the camera image and figure out what the missing detail was.
There's a lot that goes on behind the scenes, but they're making it as easy as possible to adopt this. It's available in RealityKit, but it's also added in SceneKit's ARSCNView. And, in case you have your own renderer or you're working with third-party rendering, you can incorporate it into your own app using Metal.
Implementation in RealityKit
RealityKit has a new UI element called the ARView, which provides an easy to use API for AR photorealism. This is the recommended way for new apps because it has a deep renderer integration, meaning that the entire pipeline expects people occlusion and works with transparent objects, so it is built for optimal performance.
ARView also has built-in support for people occlusion:
override func viewDidLoad() {
  super.viewDidLoad()

  // Check if people occlusion is supported.
  guard
    let config = arView.session.config as? ARWorldTrackingConfiguration,
    ARWorldTrackingConfiguration.supportsFrameSemantics(.personSegmentationWithDepth)
  else {
    return
  }

  // Enable frame semantics.
  config.frameSemantics = .personSegmentationWithDepth

  // You can also use `.personSegmentation` in case you want to enable a "green-screen" experience.
}
Now, when the ARView starts running, people occlusion will automatically happen.
As an example for what you can build now, see SwiftStrike at timestamp 8:15.
What if you've been using SceneKit?
All you have to do is enable frame semantics. However, composition is done as a post-process, so it may not work as well with transparent objects.
What if you have your own/third-party rendering engine?
You can use Metal for complete control of composition. Metal provides a new class for generating matte.
Generating matte
To review, matting is the process of finding details that the ML engine missed:
Let's look at some code.
func compositeFrame(_ frame: ARFrame!, commandBuffer: MTLCommandBuffer!) {
  // Ensure people occlusion is supported.
  guard ARWorldTrackingConfiguration.supportsFrameSemantics(.personSegmentationWithDepth) else {
    return
  }

  // Create Metal texture using new API.
  let matte = matteGenerator.generateMatte(from: frame, commandBuffer: commandBuffer)

  // Custom composition code using texture...

  // Schedule everything to GPU.
  commandBuffer.commit()
}
The new object for matteGenerator is here:
class ARMatteGenerator: NSObject {
  func generateMatte(from: ARFrame, commandBuffer: MTLCommandBuffer) -> MTLTexture
}
But we're not done yet. Just like the segmentationBuffer was of a lower resolution, the estimatedDepthData is also lower. If we simply magnify it and overlay it on our matted image, there might be a mismatch. We can have depth values where there's no alpha value in the matte, and more importantly, we can have alpha values in the matte where there's no corresponding depth value.
Modifying the depth buffer
Because the matte has already recaptured some missing detail, we can't modify the alpha itself. Instead, we need to modify the depth buffer.
Going back to the previous example:
// Create Metal texture using new API.
let matte = matteGenerator.generateMatte(from: frame, commandBuffer: commandBuffer)
Add a function call underneath from the same ARMatteGenerator class:
// Create Metal texture using new API.
let matte = matteGenerator.generateMatte(from: frame, commandBuffer: commandBuffer)
let dilatedDepth = matteGenerator.generateDilatedDepth(from: frame, commandBuffer: commandBuffer)
This function ensures that for every alpha value we find in the matte, we have a corresponding depth value that we can use when we do our final composition.
Composition
Now let's move on to composition. Composition is usually done on the GPU in the fragment shader.
fragment half4 customComposition(...) {
  // Sample the camera image and texture.
  // Also sample rendered depth because we're doing people occlusion.
  half4 camera = cameraTexture.sample(s, in.uv);
  half4 rendered = renderedTexture.sample(s, in.uv);
  float renderedDepth = renderedDepthTexture.sample(s, in.uv);

  // Do what we would usually do in AR: simply overlay rendered content on the
  // real image given the rendered alpha.
  half4 scene = mix(rendered, camera, rendered.a);

  // The new part to enable people occlusion: also sample matte and dilated depth.
  half matte = matteTexture.sample(s, in.uv);
  float dilatedDepth = dilatedDepthTexture.sample(s, in.uv);

  // If there's people in front of rendered, mix the camera back. Otherwise,
  // do what we always do and overlay rendered content.
  if (dilatedDepth < renderedDepth) {
    return mix(scene, camera, matte);
  } else {
    return scene;
  }
}
Best practices for people occlusion
- Supported on A12 devices and later
- Works best in indoor environments
- Works on people, hands and feet, and multiple people in a scene.
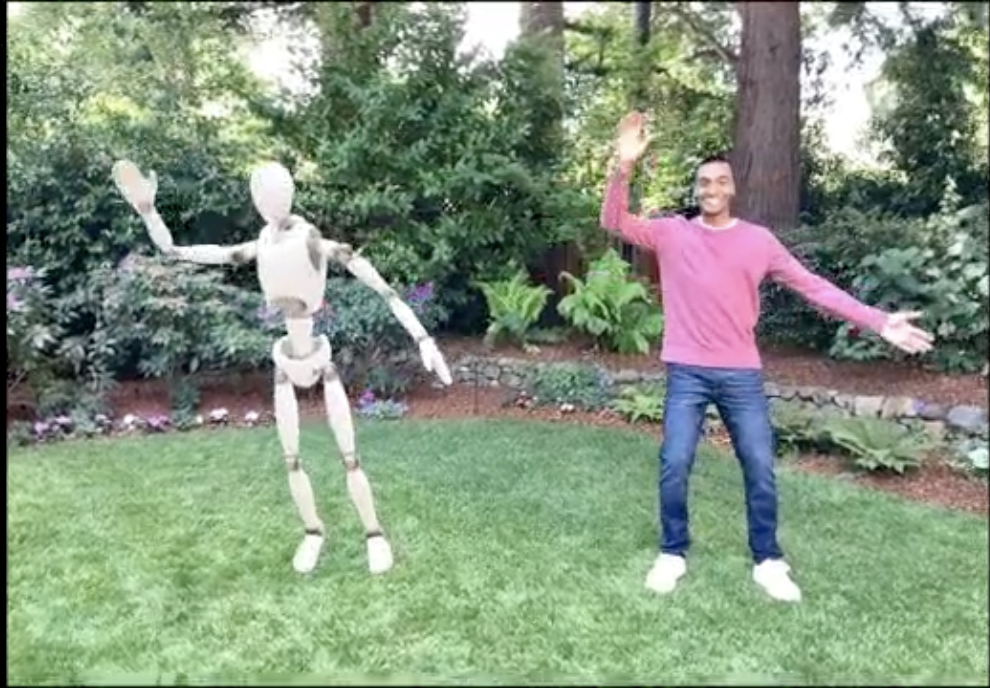
2. Motion Capture
A way to animate a virtual character that performs the same set of actions as the person you're looking at.
Virtual Character Overview
Has 2 main components: An outer coating (mesh), and the bony structure inside (skeleton).
The skeleton is the driving force behind the entire character, so we need to animate the skeleton and the mesh will follow.

Machine Learning estimates the pose of the person in the image, which builds a high-fidelity skeleton. The mesh is overlayed to give a final character and is presented with ARKit3 + RealityKit. This is available on A12 devices and later.
Use Cases
- Animate virtual characters (puppets). This is enabled out-of-the-box.
- Action/Activity recognition.
- Sports and fitness analysis.
- Interacting with virtual objects.
- Since ARKit also provides a 2D version of the skeleton in image space, you can use it to build editing tools or for semantic image understanding.
- Remote use cases?
How to Use It
- Motion Capture in RealityKit: If you just want to quickly animate a character, this high-level API will help you get there.
- Extracting data from skeleton in 3D: Activity recognition/analysis, or interaction with 3D objects in a scene.
- Extracting data from skeleton in 2D: For semantic image analysis or editing tools.
1. Motion Capture in RealityKit
Overview
You can quickly animate characters with a simple API. You can add your custom characters with your own meshes.
The tracked person is easy to access using AnchorEntity objects that automatically capture the required transforms for motion capture.
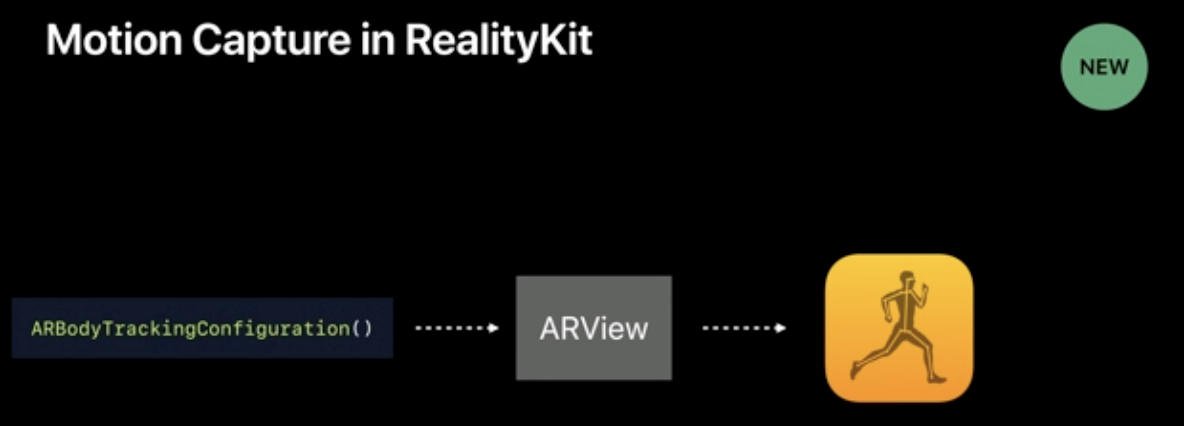
As an overview, the bodyTrackedEntity represents 1 person. It contains the underlying skeleton and its position. It's tracked in real time and gets updated every frame. It combines the skeleton to give an automatic mesh and the full character in a .usdz model.
Code
// Step 1: Load skeleton + mesh for character using "robot.usdz".
Entity.loadBodyTrackedAsync(named: "robot")
  .sink(
    receiveCompletion: {
      // Catch any failures/errors.
    },
    receiveValue: { character in
      guard let character = character as? BodyTrackedEntity else { return }

      // Step 2: Get the location where you want to put your character.
      // You can put it anywhere you want, just provide an anchor at a different location.
      let personAnchor = AnchorEntity(.body)
      arView.scene.addAnchor(personAnchor)

      // Step 3: Add the character to that location.
      personAnchor.addChild(character)
    }
  )
You can use your own characters as long as they follow the skeleton naming scheme. The skeleton has 91 joints.
2. Extracting Data from Skeleton in 3D
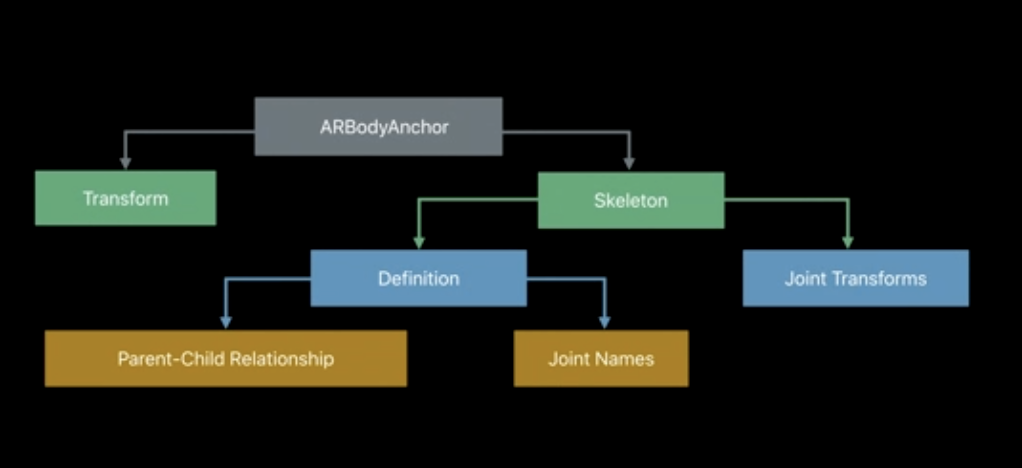
You can access data using a new type of anchor called ARBodyAnchor
Let's walk through this structure.
class ARBodyAnchor: ARAnchor
ARBodyAnchor is just a regular anchor that contains a geometry (the skeleton). The skeleton consists of nodes and edges, just like any other geometry.
class ARSkeleton
The transform is just the location of the anchor in rotation and translation matrix form.
var transform: matrix_float4x4
Skeleton Overview
We're mainly interested in accessing the skeleton. The nodes represent the joints, and the edges represent the bones.
You can access the skeleton using the skeleton property of ARBodyAnchor. Note that the root node of the skeleton is the right hip joint.
The definition property contains 2 components:
- The names of all the joints in the skeleton, like "left shoulder".
- The connections between them, which tell you how to connect those joints together. So, the "right hand" is a child of "right elbow", which is a child of "right shoulder", all the way down to the root node, "hip". Note that fingers, etc. aren't tracked, they simply follow the general motion of their closest parent.
Accessing Joint Locations
There are two ways to access joint locations.
The first one is relative to its parent. If you want the location of the right hand relative to the elbow, you use this these functions on the ARSkeleton3D object:
func localTransform(for: ARSkeleton.JointName) -> simd_float4x4?

let rightHandRelativeTransforms = localTransform(for: .rightHand)
If you want the transform relative to the root (hip), you use:
func modelTransform(for: ARSkeleton.JointName) -> simd_float4x4?

let rightHandModelTransforms = modelTransform(for: .rightHand)
If you want a list of transforms for all the joints you can get them with the following properties:
var jointLocalTransforms: [simd_float4x4]
var jointModelTransforms: [simd_float4x4]
Drawing the Skeleton
Note that there are many code updates with visualizations. If you would like to watch all of them in the video, see 29:43
// Look for the bodyAnchor
for anchor in anchors {
  guard let bodyAnchor = anchor as? ARBodyAnchor else { return }

  // Access the position of the root node.
  let hipWorldPosition = bodyAnchor.transform

  // Access the skeleton geometry.
  let skeleton = bodyAnchor.skeleton

  // Access the list of transforms of all joints relative to the root.
  let jointTransforms = skeleton.jointModelTransforms

  // Iterate over all the joints.
  for (i, jointTransform) in jointTransforms.enumerated() {
    // Extract parent index from definition.
    let parentIndex = skeleton.definition.parentIndices[i]

    // Check if it's not root (the root doesn't have a parent).
    guard parentIndex != -1 else { continue }

    // Find position of parent joint
    let parentJointTransform = jointTransforms[parentIndex.intValue]

    // Use this however you want...
  }
}
3. Extracting Data from Skeleton in 2D

Accessing the Skeleton
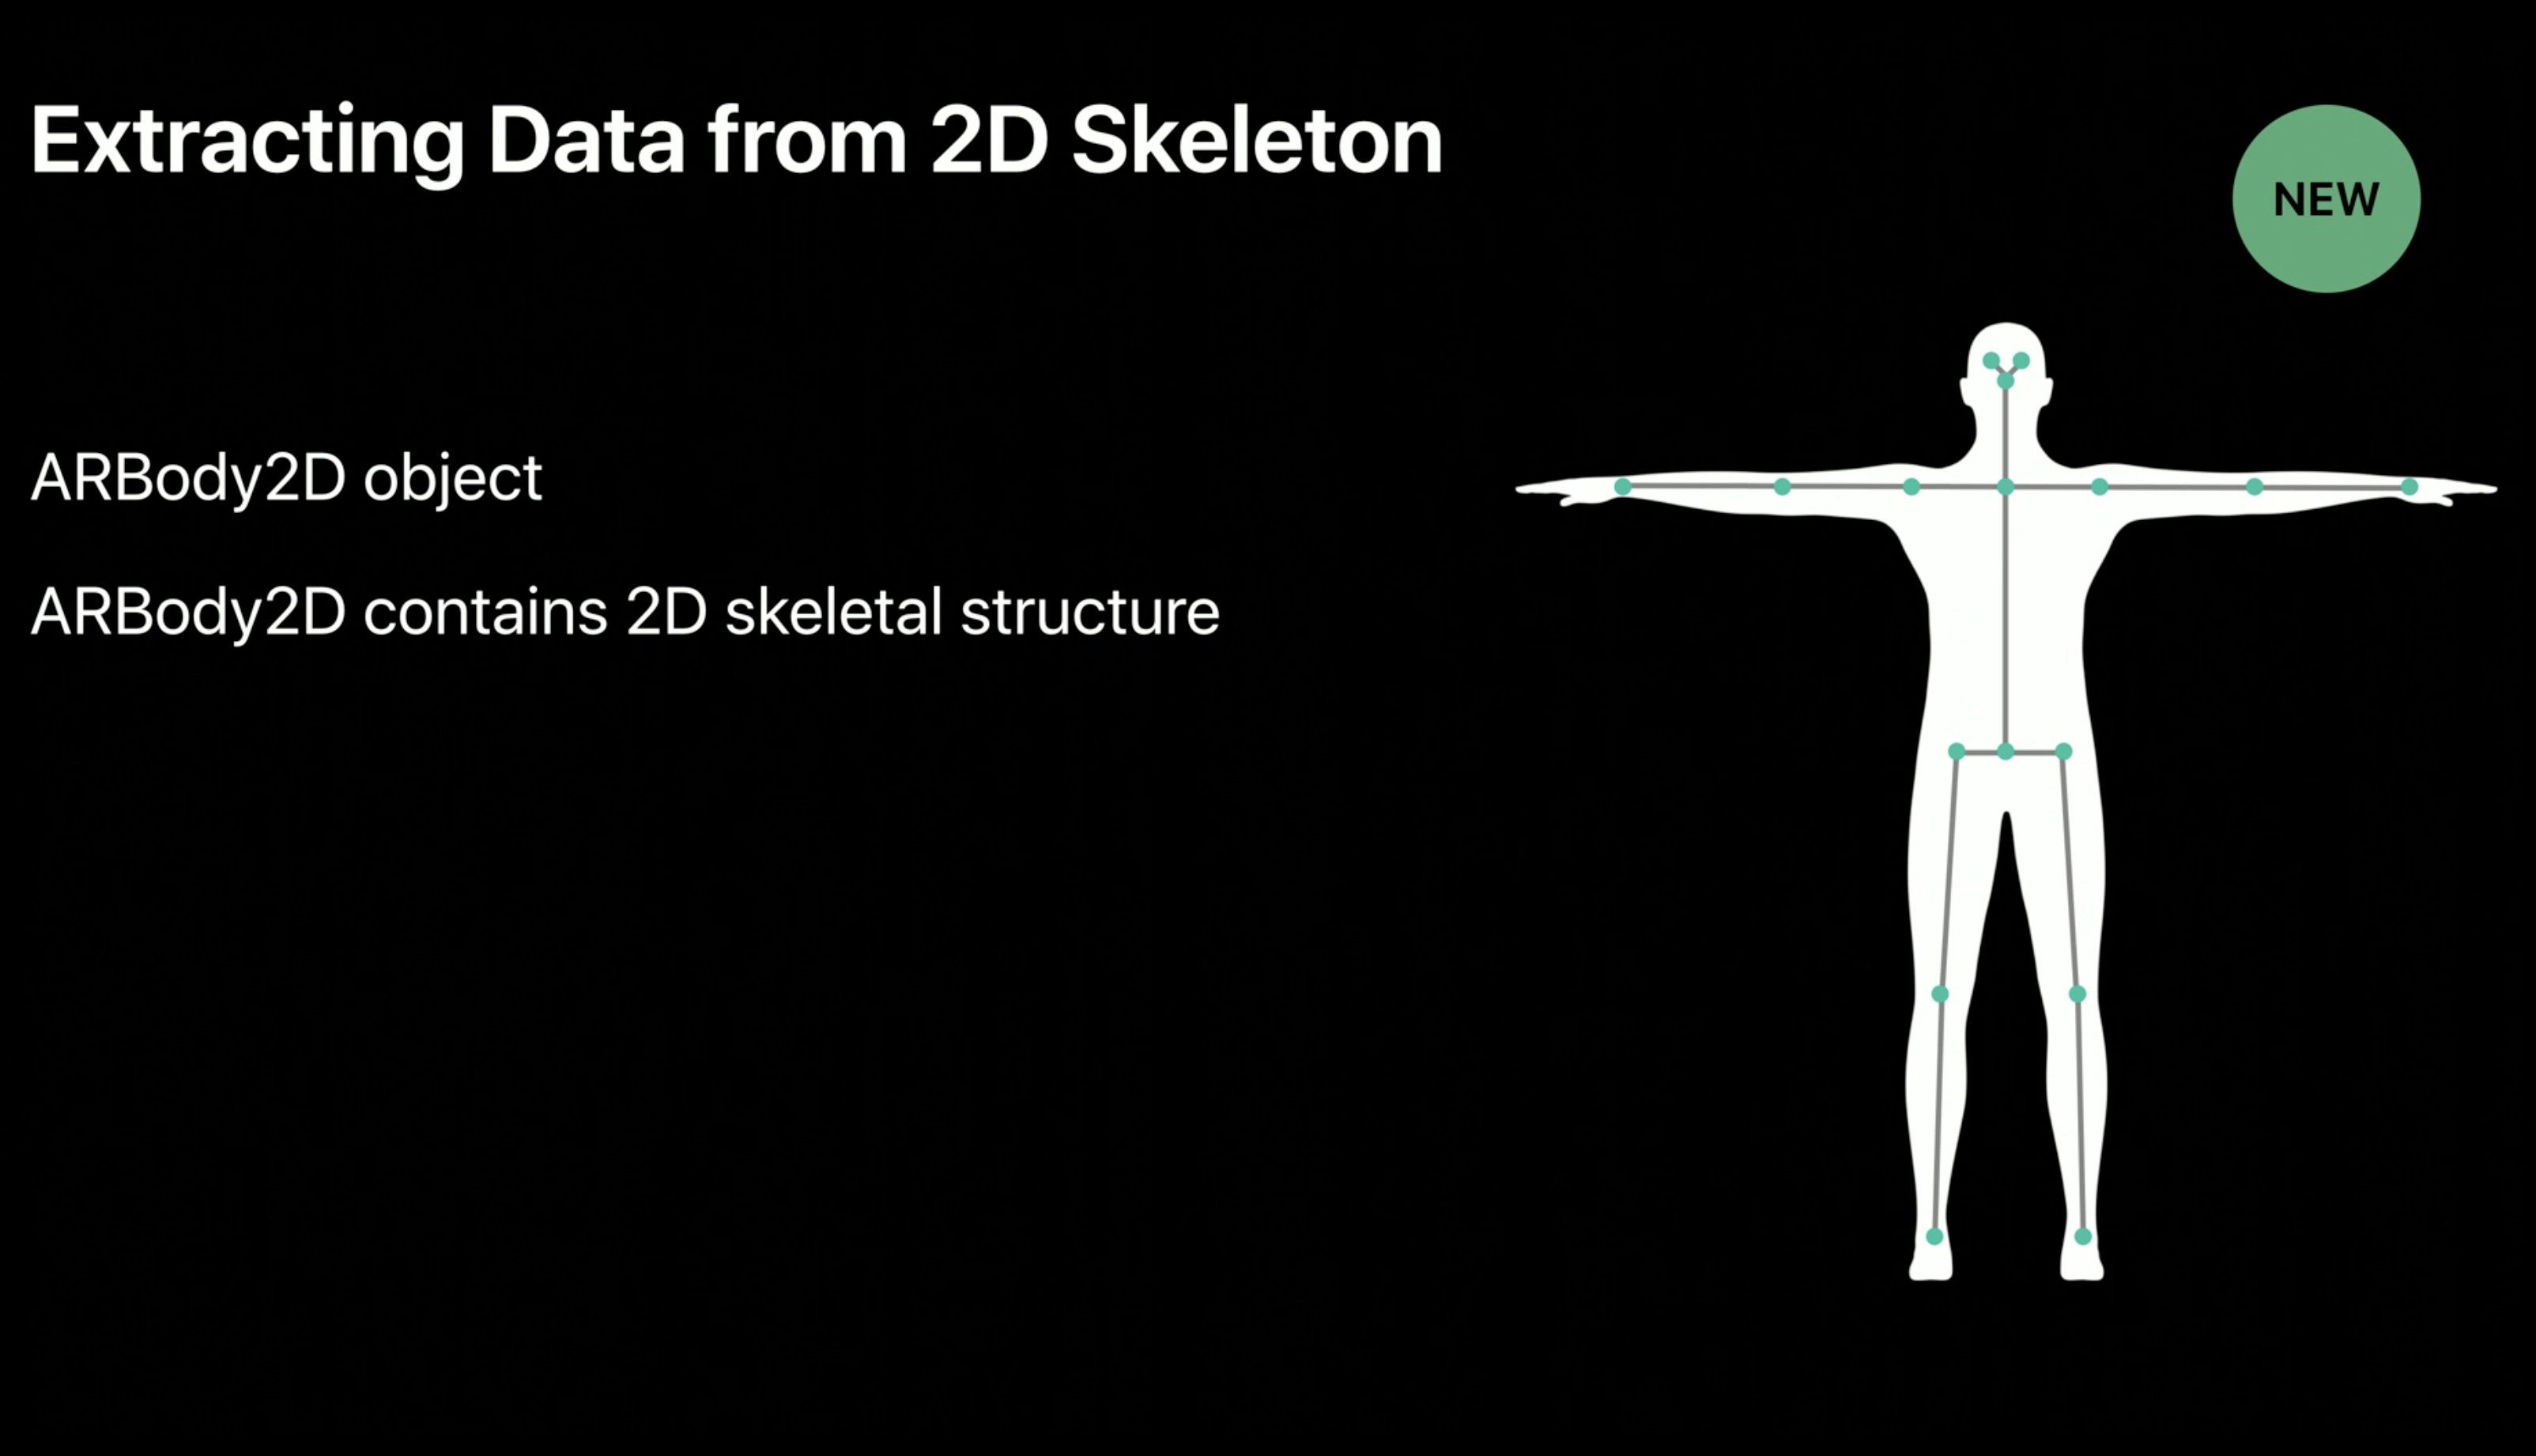
You can easily access the ARBody2D object in 2 different ways.
If you're already working in 2D space, you can access it using ARFrame:
func session(_ session: ARSession, didUpdate frame: ARFrame) {
  let person: ARBody2D = frame.detectedBody
}
If you're working in 3D space and working with a 3D skeleton, but you also want the corresponding 2D skeleton in image space, you can use the following code:
guard let bodyAnchor = anchor as? ARBodyAnchor else { continue }

let body2D = bodyAnchor.referenceBody
Skeleton Image Space
Points are in normalized Cartesian coordinate space, as shown below:

Note that joints are called joint landmarks because they are pixel locations in an image:
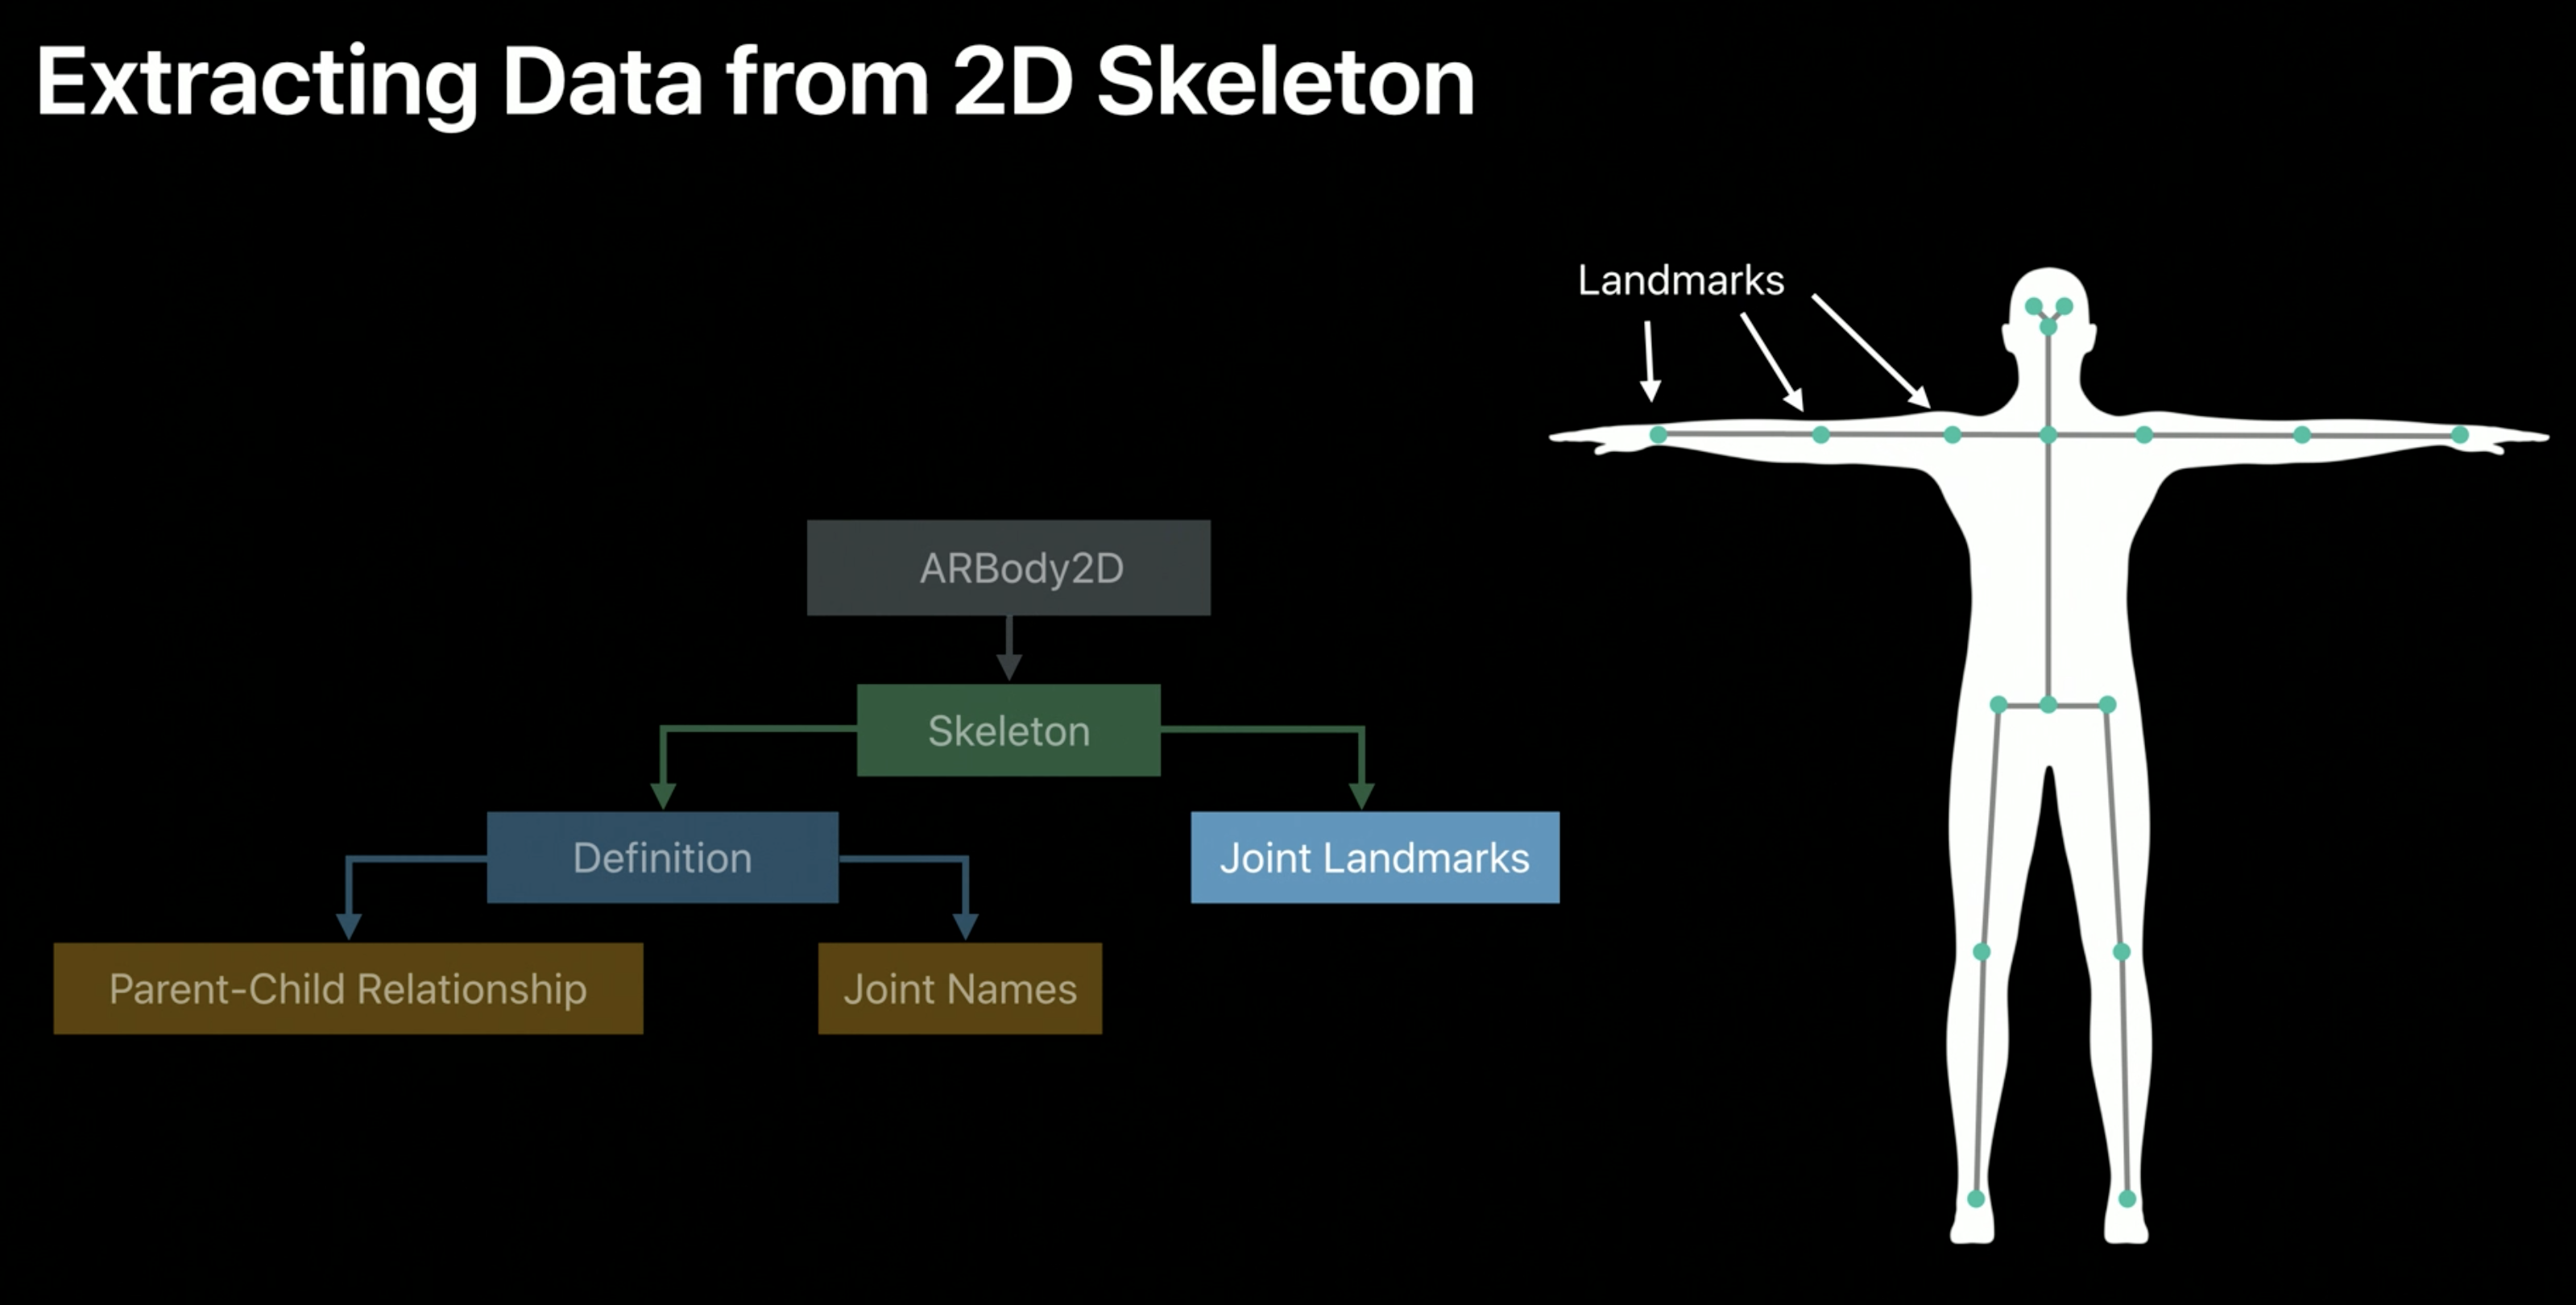
Just like the 3D version, there is a definition object with joint names and parent-child relationships.
While the 3D version has 91 joints, the 2D version has only 16 joint landmarks. They also have semantically meaningful names, like "Right Foot" and "Left Shoulder" and "Head". The root node is still the Hip joint, and parent-child relationships work just as the 3D version.
Drawing the 2D Skeleton
The approach is very similar to the 3D version:
func session(_ session: ARSession, didUpdate frame: ARFrame) {
  // Access `ARBody2D` object from `ARFrame`.
  let person = frame.detectedBody

  // Use `skeleton` property to access the skeleton.
  let skeleton2D = person.skeleton

  // Access `definition` object containing structure.
  let definition = skeleton2D.definition

  // Get list of joint landmarks.
  let jointLandmarks = skeleton2D.jointLandmarks

  // Iterate over landmarks.
  for (i, joint) in jointLandmarks.enumerated() {
    // Find index of parent.
    let parentIndex = definition.parentIndices[i]

    // Check if current joint landmark is not the root.
    guard parentIndex != -1 else { continue }

    // Find position of parent index.
    let parentJointLandmark = jointLandmarks[parentIndex.intValue]

    // Use this however you want...
  }
}
Summary
- Access to tracked person
- Provides 3D and 2D skeleton
- Enables character animation
- RealityKit API for quickly animating a character
- ARKit API for advanced use cases
 Twitter
 GitHub
 www.linkedin.com