Core Animation Essentials
 Federico Zanetello
Description: Core Animation is the layer-based animation system at the heart of the dynamic user experience seen in iOS and Mac OS X. See Core Animation in action and explore its intuitive programming model for creating compelling animations. Understand how to maintain high frame rates and learn recommended practices to deliver smooth transitions and effects in your apps.
Check out the Core Animation Programming Guide.
Architecture
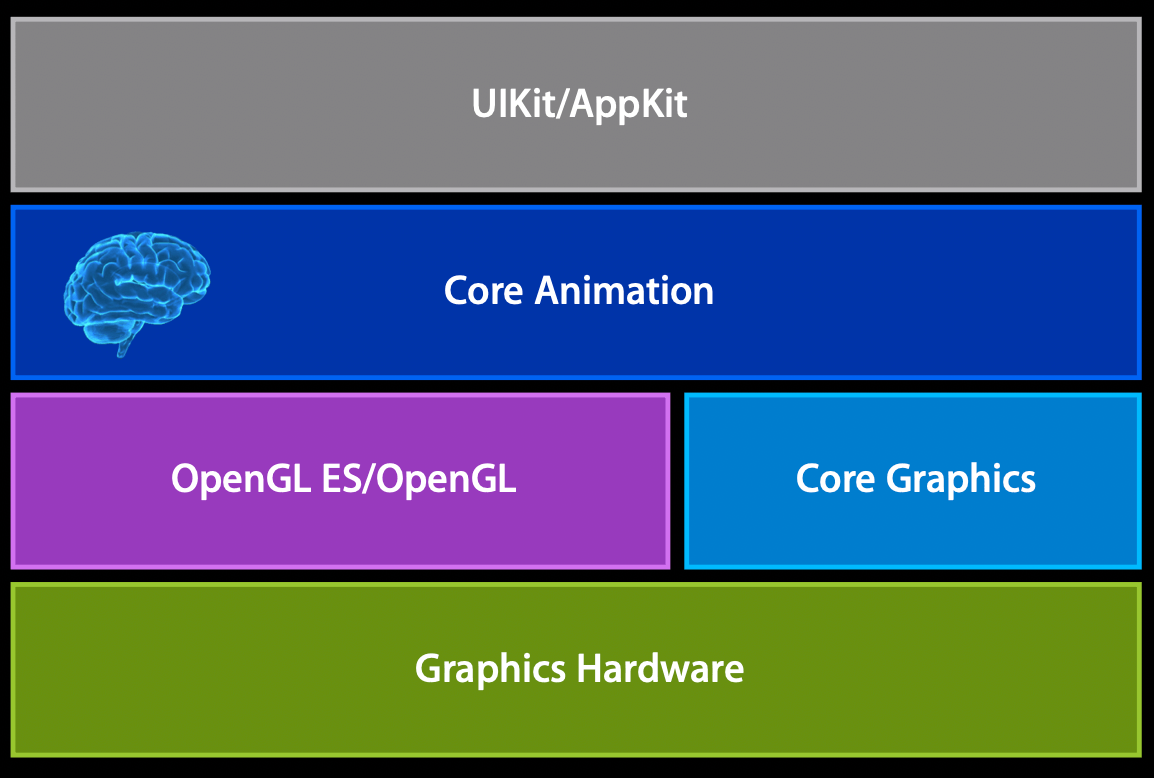
Introduction
Imagine that we'd like to move a layer from point a to point b. We'd do this by setting the position of the layer:
ball.position = p;
When we do this, Core Animation needs to take care for mainly two things for the animation to happen:
- interpolated points
- timing (timing function that controls how the appearance will look like)
Once these have been set, Core Animation will play the animation by producing all the intermediate frames and display them onto the device.
Layers and layer properties
- Every
UIViewhas aCALayer(accessible viaview.layer) UIView'sdrawRectrenders directly into the layer (it's like we're drawing directly there)
How to create and add new layers
#import <QuartzCore/QuartzCore.h>

CALayer* myLayer = [CALayer layer];
myLayer.bounds = CGRectMake(0,0,w,h);
myLayer.position = CGPointMake(x,y); // coordinates in the coordinate space of the hosting layer
myLayer.content = familyImage; // provide content of the layer, in this case an image
[view.layer addSubLayer:myLayer];
Adding/managing layers is similar to adding/managing UIViews, with the difference that they're much more lightweight.
Here are some of the methods you might want to use:
addSublayer:insertSublayer:above:(and similar)setNeedsLayoutlayoutSublayerssetNeedsDisplaydrawInContext:- you can override this in yourCALayersubclass to provide your context using CoreGraphics
A more common way to override drawInContext: is to set the layer delegate and implement drawLayer:inContext:.
Layers support transformations is 3D (it has x, y, and z axes).
Animating layer properties
An animation is an interpolations of points from a start position (fromValue) to an end position (toValue).
There are two styles of animations in Core Animation:
- implicit animations
- explicit animations
Implicit animations
// This layer will fade out with a default animation duration of 1 second
myLayer.opacity = 0;
If we want to change the duration, we do so via a CATransaction:
[CATransaction setAnimationDuration:5]
myLayer.opacity = 0;
Note that the position of these lines is important: if myLayer.opacity = 0; came before the transaction duration, that animation would have used the default animation duration.
Behind the scenes:
When we do a layer property change, if Core Animation finds a CAAction for that property, then Core Animation will create a CAAnimation and adds it to the layer via [self addAnimation:forKey:], which creates the implicit animation.
Transactions
- All applied together in run loop
CATransactionclassduration- timing function
CATransactionproperties are applied at the time an implicit animation is created (e.g.,myLayer.opacity = 0;)
Use [CATransaction setDisableActions:YES] to disable animations (and get the layer property change as soon as possible).
Note that this command is only valid for the next run loop.
Explicit animations

Animations that we create, we mostly only create animations that are either (leaves in the chart above):
CAAnimationGroupCABasicAnimationCAKeyframeAnimation
Example (note that for position we could use the implicit animation):
// First we set the final position in the model layer (explicit animations only touch the presentation layer)
layer.position = toPosition;

// Then we create the animation for that change
CABasicAnimation* drop = [CABasicAnimation animationWithKeyPath:@"position.y"];
// The initial value of the animation
drop.fromValue = [NSNumber numberWithFloat:startPosition.y];
// The final value of the animation, this should match the value we set above
drop.toValue = [NSNumber numberWithFloat:toPosition.y];
// No need to use [CATransaction setAnimationDuration:5]
drop.duration = 5;
// The animation will start as soon as we add it to the layer.
// The key is used to identify the animation, in case we need to do some operations on it later.
[layer addAnimation:drop forKey:@"position"];
All implicit animations will use the name of the changed property as the animation key:
- when we write
layer.position = toPosition;, an implicit animation with key"position"will be added to our layer - by setting our explicit animation with the same key
"position", we're cancelling the implicit animation and make sure that only our explicit animation takes place
Keyframe animations
With CAKeyframeAnimation we're giving Core Animation a few "key" points or our animation, and leave Core Animation to figure out the rest of the interpolated points.
How to setup keyframe animations:
- Use either
path- the animation will follow the control points of the path as its keyframesvalues- the animation will interpolate among the values set here
- Set
keyTimes(optional) - you can tell the fraction of total time for each keyframe segment, each value has to be 0 to 1 - Set
calculationModeto tell which interpolation to compute for the frames between the givenvaluesor along thepath, the options are:- Linear
- Discrete - no interpolation, jump from key value to key value
- Cubic - fills gaps with Bezier curves
Group animations
This animation gathers together other kind of explicit animations which are then:
- Applied simultaneously to layer's properties'
- Their timings are clipped to the group timing
Example:
CABasicAnimation* a1 = ....
CAKeyFrameAnimation* a2 = ...
CAAnimationGroup* group = [CAAnimationGroup animation];
group.animations = [NSArray arrayWithObjects:a1,a2,...,nil];
group.duration = ...
[layer addAnimation:group forKey:nil];
How to add perspective to layers
- Change the
zPositionon the layers (default to0for all layers) - Set the
sublayerTransformto a parent layer with your effect
Example:
CATransform3D perspective = CATransform3DIdentity;
perspective.m34 = -1./EYE_Z; // uses the zPosition for changing the scale of each layer

CALayer* parent = [CALayer layer];
parent.sublayerTransform = perspective;

blueLayer.zPosition = -100;
[layer addSublayer:blueLayer];

grayLayer.zPosition = 100;
[layer addSublayer:grayLayer];

// now blue and gray layer will appear to have different sizes even if their model layer
// has the same size.
Animation timing
Both CAAnimation and CALayer use the CAMediaTiming protocol, a few properties:
beginTimerepeatCount,repeatDuration(use one or the other)durationautoreversesfillMode
Animation notifications
- Explicit animations have a delegate:
myAnimation.delegate = self;
...

- (void)animationDidStart:(CAAnimation *)theAnimation {
  ...
}

- (void)animationDidStop:(CAAnimation *)theAnimation finished:(BOOL)flag {
  ...
}
- Implicit animations can have a completion block via
CATransaction:
// Always declare the transaction before the implicit animation
[CATransaction setCompletionBlock:^{
  // block that runs when animations have completed
  [CATransaction setDisableActions:YES];
  [layer removeFromSuperlayer];
}];

layer.opacity = 0;
layer.position = CGPointMake (2000, layer.position.y);
Presentation vs model
- Layer properties do not reflect active animations
- Use
-presentationLayermethod to get screen values- Creates a temporary layer with animations applied
- Asking for sublayers returns presentation versions
- Useful for from values of animations
anim = [CABasicAnimation animationWithKeyPath:@”borderColor”];
anim.fromValue = [[layer presentationLayer] borderColor];
- And for hit-testing against real geometry
hitLayer = [[[layer presentationLayer] hitTest:p] modelLayer];
Replicators
CAReplicatorLayercreates a specified number of sublayer copies with varying geometric, temporal, and color transformations.- You control the number of copies via its
instanceCountproperty - by default all copies will sit on top of each other with all the same properties, we can change that by setting one (or more) of the following
CAReplicatorLayerproperties (note that they're all also animatable):instanceTransform: CATransform3D,instanceColor: CGColor?,instanceRedOffset: Float,instanceGreenOffset: Float,instanceBlueOffset: Float,instanceAlphaOffset: Float
Particles

- done thanks to
CAEmitterLayer - can use them from iOS 5 and later
- can be used to mock water, smoke, fire, etc
How to:
- set the
emitterShapeproperty to set the shape of the emitter (line, circle etc) - set the
emitterPositionproperty to set the center of the particle emitter - set the
emitterModeproperty to specify where the particles are emitted from - set the
emitterCellsproperty with an array ofCAEmitterCell, which represent characteristics of your particles (how do they look and behave)
 GitHub
 zntfdr.dev